Build a Buy-Me-A-Coffee DApp
목차
- 1. 프로젝트 설정
- 2. 커피 구매 스마트 컨트랙트 생성하기
- 3. 스크립트를 사용하여 컨트랙트 기능 테스트하기
- 4. 클레이튼 테스트넷에 BMC 스마트 컨트랙트 배포하기
- 5. 리액트와 Web3Onbaord로 BMC 프론트엔드 구축하기
- 6. Fleek을 사용하여 IPFS에 프론트엔드 코드 배포하기
- 7. 결론
소개
Buy Me a Coffee(BMC)는 크리에이터가 팬이나 시청자로부터 금전적 지원과 기부를 받을 수 있는 플랫폼입니다. 이 플랫폼의 도움으로 팬은 크리에이터의 성공 스토리에 중요한 역할을 할 수 있고, 시청자는 크리에이터가 성취한 작업에 감사를 표할 수 있으며, 크리에이터는 자신의 작업으로 수익을 창출할 수 있습니다.
크게 보면, Buy-me-a-Coffee는 크리에이터의 결제 수락 프로세스를 간소화하고 크리에이터와 시청자 간의 상호작용을 강화합니다. 이 외에도 BMC 플랫폼의 흥미로운 기능 중 일부는 다음과 같습니다. 긍정적인 측면에서 이 플랫폼을 블록체인에 적용한다고 상상해 보세요. 이제 크리에이터는 다음과 같은 더 많은 혜택을 누릴 수 있습니다:
- 크리에이터가 받은 후원금에 대해 5%의 수수료를 부과하는 기존 BMC와 달리 완전한 결제가 가능합니다.
- 모든 거래가 블록체인에 기록되므로 투명성이 보장됩니다.
- 중개자 없이 팬으로부터 직접 후원금을 받을 수 있습니다.
- 탈중앙화, 즉 플랫폼을 통제하는 중앙 기관이 없습니다.
이 튜토리얼에서는 탈중앙화된 버전의 Buy Me a Coffee(BMC) 플랫폼(프런트엔드 + 스마트 컨트랙트)을 구축하게 됩니다. 이 플랫폼은 서포터가 팁을 줄 수 있는 기존 BMC 플랫폼을 최소한으로 구현한 것으로, 여러분은 컨트랙트의 소유자로서 BMC 스마트 컨트랙트로 전달된 팁을 인출할 수 있습니다. 서포터들은 이 사이트를 사용하여 커피 거래에서 테스트 KLAY와 러블리 메시지를 함께 보낼 수 있습니다.
이 가이드가 끝날 때까지 다음을 사용하여 이 dApp을 만들 수 있습니다:
- Solidity: BMC 스마트 컨트랙트를 작성하기 위해
- NextJs와 Tailwind: BMC dApp을 위한 프론트엔드 웹사이트 구축용
- Web3Onboard: 클레이튼 테스트넷 Baobab에 여러 지갑을 연결할 수 있도록 합니다.
- Fleek: Fleek을 사용하면 IPFS에서 BMC dApp을 호스팅할 수 있습니다.
전제 조건
이 튜토리얼을 완료하려면 다음이 필요합니다:
- Node.js
- 후크 등과 같은 JavaScript 및 React 기본 사항에 익숙해야 합니다.
- Coinbase Wallet, MetaMask 월렛 등 필요한 월렛 설치
- Faucet에서 KLAY를 테스트합니다.
- RPC 엔드포인트: 지원되는 엔드포인트 공급자 중 하나에서 얻을 수 있습니다.
- Fleek에서 계정을 생성합니다.
1. 프로젝트 설정
이 섹션에서는 프로젝트 폴더를 초기화하겠습니다. 이 폴더에는 두 개의 별도 폴더가 포함됩니다:
- frontend 폴더 - dApp의 프론트엔드 구현을 위한 코드가 들어 있습니다.
- smart-contract 폴더 - BMC dApp의 스마트 컨트랙트 코드가 들어 있습니다.
프로젝트 폴더를 만들려면 터미널에 다음 코드를 붙여넣으세요.
mkdir BuyMeACoffeecd BuyMeACoffee
1.1. frontend 폴더
이 폴더에는 프로젝트 프론트엔드 웹사이트를 구축하기 위한 도구가 들어 있습니다. 이 가이드에서는 Next의 create-next-app 유틸리티를 사용하여 Next.js 및 Tailwind CSS 프로젝트를 부트스트랩하겠습니다. 아래 단계에 따라 필요한 종속 요소를 설치하고 frontend 폴더를 생성합니다:
1단계 - frontend 폴더 만들기
다음 앱 생성 유틸리티를 사용하여 프런트엔드 폴더를 생성하려면 BuyMeACoffee 폴더에 아래 코드를 붙여넣으세요:
npx create-next-app frontendcd frontend
2단계 - Tailwind 종속성 다운�로드 및 구성 설정하기
npm install -D tailwindcss postcss autoprefixernpx tailwindcss init -p
3단계 - tailwind.config.js 수정하기
tailwind.config.js 파일로 이동하여 아래 코드로 바꿉니다:
module.exports = { content: [ "./pages/**/*.{js,ts,jsx,tsx}", "./components/**/*.{js,ts,jsx,tsx}", ], theme: { extend: {}, }, plugins: [],}
4단계 - styles/global.css에서 코드 바꾸기
styles/global.css 파일로 이동하여 아래 코드로 바꿉니다:
@tailwind base;@tailwind components;@tailwind utilities;
프론트엔드 프로젝트 폴더를 성공적으로 설정했습니다. 자세한 내용은 나중에 설명하겠습니다. 다음 단계는 smart-contract 폴더를 설정하는 것입니다.
1.2. smart-contract 폴더
이 폴더에는 BuyMeACoffee 기능을 위한 스마트 컨트랙트가 들어 있습니다. 아래 단계에 따라 필요한 종속 요소를 설치하고 smart-contract 폴더를 생성하세요:
1단계 - smart-contract 폴더 만들기
이 폴더를 생성하려면 프로젝트 디렉터리로 이동합니다: BuyMeACoffee로 이동하고 아래 명령을 실행하여 smart-contract 폴더를 생성합니다:
cd ..mkdir smart-contractcd smart-contract
2단계 - Hardhat 프로젝트 템플릿 생성하기
이 템플릿은 스마트 컨트랙트를 작성, 테스트 및 배포하는 데 적합합니다. 먼저 터미널에서 아래 코드를 실행하여 새 npm 프로젝트를 시작합니다:
npm init -y
이렇게 하면 다음과 같은 package.json 파일이 생성됩니다:
{ "name": "buymeacoffee", "version": "1.0.0", "description": "", "main": "index.js", "scripts": { "test": "echo \"Error: no test specified\" && exit 1" }, "keywords": [], "author": "", "license": "ISC"}
그런 다음, hardhat과 hardhat-toolbox 및 dotenv와 같은 기타 종속성을 설치합니다. 이렇게 하려면 package.json 파일을 아래 코드로 바꾸세요:
{ "name": "buymeacoffee", "devDependencies": { "@nomicfoundation/hardhat-toolbox": "^2.0.2", "hardhat": "^2.14.0" }, "dependencies": { "dotenv": "^16.0.3" }}
마지막으로 터미널에서 npm install을 실행합니다.
모든 종속성(hardhat, hardhat-toolbox, dotenv)을 성공적으로 설치한 후 다음을 통해 Hardhat 설치를 확인할 수 있습니다:
a. 현재 버전을 확인합니다:
npx hardhat --version
콘솔에 현재 설치된 버전(이 경우 2.14.0.)이 출력되어야 합니다.
b. 프로젝트 디렉터리 보기. 현재 디렉터리에는 다음이 포함되어야 합니다:
- contracts/ - 스마트 컨트랙트가 들어있는 폴더입니다.
- scripts/ - 이 폴더에는 블록체인 네트워크에 컨트랙트를 배포하는 코드가 들어 있습니다.
- test/ - 이 폴더에는 스마트 컨트랙트를 테스트하는 모든 단위 테스트가 포함되어 있습니다.
- hardhat.config.ts - 이 파일에는 Hardhat의 작업과 스마트 컨트랙트 배포에 중요한 구성이 포함되어 있습니다.
2. Buy Me A Coffee 스마트 컨트랙트 만들기
이 섹션에서는 BMC 기능이 포함된 스마트 컨트랙트를 생성하겠습니다. 시작하려면 contracts 폴더로 이동하여 BuyMeACoffee.sol이라는 새 파일을 생성하고 아래에 이 코드를 붙여넣으세요:
// SPDX-License-Identifier: UNLICENSEDpragma solidity ^0.8.9;contract BuyMeACoffee { // event to emit when a message is sent with tip event NewCoffee(address indexed _sender, string name, string _message, uint256 _timestamp); // address of contract deployer address payable owner; constructor() { // stores deployer as owner owner = payable(msg.sender); } // struct of BuyMeACoffe Tx struct BuyCoffee { address sender; string name; uint timestamp; string message; } // maps id to BuyCoffee struct mapping (uint => BuyCoffee) idToBuyCoffee; // id uint public coffeeId; // buy coffee function function buyCoffee(string memory name, string memory message) public payable { // Must accept more than 0 KLAY for a coffee. require(msg.value > 0, "Tip must be greater than zero"); coffeeId++; // Add the coffee tx to storage BuyCoffee storage coffee = idToBuyCoffee[coffeeId]; coffee.message = message; coffee.name = name; coffee.sender = msg.sender; coffee.timestamp = block.timestamp; // Emit a NewCoffee event with details about the coffee tx. emit NewCoffee(msg.sender, name, message, block.timestamp); } // withdraw coffee tips to the contract owner function withdrawCoffeTips() public { require(_owner == msg.sender, "Not owner"); require(owner.send(address(this).balance) ); } // get all coffee function getAllCoffee(uint _id) public view returns(BuyCoffee[] memory c){ require(_id <= coffeeId, "Non-existent id"); c = new BuyCoffee[](_id); for(uint i = 0; i < _id; i++) { c[i] = idToBuyCoffee[i + 1]; } }}
각 코드 줄이 무엇을 하는지 빠르게 살펴보겠습니다:
NewCoffee 이벤트는 buyCoffee 함수가 실행될 때 발생합니다. 발신자 주소, 발신자 이름, 전송된 메시지, 타임스탬프를 로그아웃합니다.
다음은 컨트랙트 배포자를 나타내는 owner 변수입니다. 그런 다음 생성자에서 msg.sender를 컨트랙트의 소유자로 설정합니다.
coffeeId는 생성된 커피 거래를 추적하기 위해 생성되었습니다.
그 후 커피 거래와 관련된 모든 데이터(주소 발신자, 문자열 이름, 정수 타임스탬프, 문자열 메시지)를 저장하는 buyMeACoffee struct를 선언했습니다. 그런 다음 이 구조체를 idToBuyCoffee 변수를 사용하여 아이디�에 매핑했습니다.
buyCoffee 함수는 BMC 스마트 컨트랙트의 핵심 구현입니다. 이 함수는 발신자의 이름과 주소라는 두 가지 매개변수를 받는 지불 가능한 함수입니다. 이 함수는 전송된 KLAY 금액이 0보다 큰지 확인합니다. 다음으로 coffeeId를 증가시킨 다음 커피 트랜잭션 또는 정보를 블록체인에 추가합니다. 마지막으로 커피 트랜잭션의 세부 정보를 포함하는 NewCoffee 이벤트를 발생시킵니다.
컨트랙트의 총 잔액(address(this).balance)을 소유자에게 인출하는 withdraw() 함수를 만들었습니다.
마지막으로 getAllCoffee() 함수가 생성되었습니다. 이 함수는 시간외에 생성된 모든 커피 트랜잭션을 반환합니다.
이제 BMC 스마트 컨트랙트 작성을 마쳤으니 다음 단계는 스마트 컨트랙트의 기능을 테스트하고, Klaytn 테스트넷 Baobab에서 스마트 컨트랙트를 배포하고 상호작용하는 것입니다.
3. 스크립트를 사용하여 컨트랙트의 기능 테스트하기
이 섹션에서는 스마트 컨트랙트의 기능을 테스트하기 위한 스크립트를 작성하겠습니다. 시작하려면 스크립트 폴더로 이동하여 bmc-sample.js라는 새 파일을 생성하고 다음 코드를 붙여넣습니다:
const hre = require("hardhat");// Logs the KLAY balances of a specific address.async function getBalance(address) { const balanceBigInt = await hre.ethers.provider.getBalance(address); return hre.ethers.utils.formatEther(balanceBigInt)}// Logs the KLAY balances for a list of addresses.async function getBalances(addresses) { let idx = 0; for (const address of addresses) { console.log(`address ${idx} balances`, await getBalance(address)); idx++; }}// Logs all the coffee info stored on-chain from coffee tx.async function getAllCoffee(memos) { for (const memo of memos) { const timestamp = memo.timestamp; const sender = memo.sender; const name = memo.name; const message = memo.message console.log(`At ${timestamp}, ${name}, with ${sender}, said: "${message}"`); }}async function main() { const [owner, tipper1, tipper2, tipper3 ] = await hre.ethers.getSigners(); const BuyMeACoffee = await hre.ethers.getContractFactory("BuyMeACoffee"); const buyMeACoffe = await BuyMeACoffee.deploy(); await buyMeACoffe.deployed(); console.log(`BuyMeACoffee Contract Address`, buyMeACoffe.address); // (========Check Balance==========) const addressses = [owner.address, tipper1.address, buyMeACoffe.address]; console.log("======GET BALANCE======="); await getBalances(addressses); // Buy Coffee for owner const tip = {value: hre.ethers.utils.parseEther("1")} await buyMeACoffe.connect(tipper1).buyCoffee("Alice", "Hi Jude", tip); await buyMeACoffe.connect(tipper2).buyCoffee("Bob", "Hi Alice", tip); await buyMeACoffe.connect(tipper3).buyCoffee("Japhet", "Hi Ox", tip); // check balance after tipping console.log("======GET BALANCE AFTER TIPPING======="); await getBalances(addressses); // withdraw coffee tips await buyMeACoffe.connect(owner).withdrawCoffeTips(); // check balance after withdrawing tip console.log("======GET BALANCE AFTER WITHDRAWING TIP======="); await getBalances(addressses); // get the current coffee tx id. const coffeeId = await buyMeACoffe.coffeeId() const id = coffeeId.toString(); console.log(coffeeId.toString()); // get all existing coffee tx const allCoffee = await buyMeACoffe.getAllCoffee(id); await getAllCoffee(allCoffee);}// We recommend this pattern to be able to use async/await everywhere// and properly handle errors.main().catch((error) => { console.error(error); process.exitCode = 1;});
항상 그렇듯이 각 코드 줄이 무엇을 하는지 살펴보겠습니다:
코드 상단에는 단일 주소와 여러 주소의 잔액을 가져오는 몇 가지 도우미 함수가 있음을 알 수 있습니다. 또한 코드에는 스마트 컨트랙트를 테스트하는 기능을 포함하는 메인 함수도 존재합니다.
main() 함수의 코드를 살펴보겠습니다.
먼저 await hre.ethers.getSigners()를 호출하여 테스트 목적으로 계정 목록(소유자, 팁퍼1, 팁퍼2, 팁퍼3)을 설정합니다.
다음으로 컨트랙트 인스턴스를 생성하고 배포했습니다. 이 경우에는 BuyMeACoffee.sol 컨트랙트입니다.
그런 다음 수취인 목록을 설정하고 getBalances() 함수를 사용하여 잔액을 확인했습니다. 그런 다음 세 개의 다른 인스턴스에서 buyCoffee 함수를 호출했습니다. 다음으로 커피 거래 후 각 주소의 잔액을 확인했습니다.
그런 다음 withdraw 함수를 호출하여 모든 자금을 소유자 주소로 출금했습니다. 다음으로 출금 후 주소 잔액을 확인했습니다.
마지막으로 getAllCoffee() 함수를 호출하여 스마트 컨트랙트의 모든 커피 트랜잭션을 가져왔습니다. 스크립트가 실제로 작동하는지 확인하려면 아래 명령을 실행하세요:
npx hardhat run scripts/bmc-coffee.js
터미널에 다음과 같은 출력이 표시되어야 합니다:
Ayomitans-MacBook-Pro:smart-contract oxpampam$ npx hardhat run scripts/bmc-sample.jsBuyMeACoffee Contract Address 0x5FbDB2315678afecb367f032d93F642f64180aa3======GET BALANCE=======address 0 balances 9999.998295071875address 1 balances 10000.0address 2 balances 0.0======GET BALANCE AFTER TIPPING=======address 0 balances 9999.998295071875address 1 balances 9998.999752128832448226address 2 balances 3.0======GET BALANCE AFTER WITHDRAWING TIP=======address 0 balances 10002.998249102355276178address 1 balances 9998.999752128832448226address 2 balances 0.03At 1686307885, Alice, with 0x70997970C51812dc3A010C7d01b50e0d17dc79C8, said: "Hi Jude"At 1686307886, Bob, with 0x3C44CdDdB6a900fa2b585dd299e03d12FA4293BC, said: "Hi Alice"At 1686307887, Japhet, with 0x90F79bf6EB2c4f870365E785982E1f101E93b906, said: "Hi Ox"
4. BMC 스마트 컨트랙트 배포
4.1 클레이튼 테스트넷에 BMC 스마트 컨트랙트 배포하기
BMC 스마트 컨트랙트의 기능을 성공적으로 테스트했다면, 다음 단계에 따라 Klaytn 테스트넷 Baobab에 배포해 보겠습니다:
1단계 - .env 파일 만들기
이제 프로젝트 폴더에 .env 파일을 생성합니다. 이 파일은 .env 파일에서 프로세스.env로 환경 변수를 로드하는 데 도움이 됩니다.
터미널에 다음 명령을 붙여넣어 .env 파일을 만듭니다.
touch .env
파일을 생성한 후 다음과 같이 .env 파일을 구성해 보겠습니다:
BAOBAB_URL= "Your RPC URL"PRIVATE_KEY= "your private key copied from metamask wallet"
2단계 - Hardhat 구성 설정하기
이 구성을 hardhat.config.js 파일에 붙여넣으세요.
require("@nomicfoundation/hardhat-toolbox");require("dotenv").config();const BAOBAB_URL = process.env.BAOBAB_URL;const PRIVATE_KEY = process.env.PRIVATE_KEY;/** @type import('hardhat/config').HardhatUserConfig */module.exports = { solidity: "0.8.18", defaultNetwork: "hardhat", networks: { baobab: { url: BAOBAB_URL, accounts: [PRIVATE_KEY], } }};
3단계 - 배포 스크립트 만들기
이 스마트 컨트랙트를 지정된 네트워크에 배포하는 새 배포 스크립트를 만들려면, scripts/deploy.js 파일을 새로 만들고 아래 코드에 붙여넣습니다:
const hre = require("hardhat");async function main() { const BuyMeACoffee = await hre.ethers.getContractFactory("BuyMeACoffee"); const buyMeACoffe = await BuyMeACoffee.deploy(); await buyMeACoffe.deployed(); console.log(`BuyMeACoffee Contract Address`, buyMeACoffe.address);}// We recommend this pattern to be able to use async/await everywhere// and properly handle errors.main().catch((error) => { console.error(error); process.exitCode = 1;});
이제 모든 설정이 완료되었으므로 아래 명령어를 실행하여 Klaytn 테스트넷 Baobab에 배포해 보겠습니다:
npx hardhat run scripts/deploy.js --network baobab
컨트랙트가 성공적으로 배포되면, 터미널은 다음과 같이 보일 것입니다:
BuyMeACoffee Contract Address 0x0bEd1ed7B205d8c18e38A20b5BaB6e265A96d1AC
클레이튼 Baobab 네트워크에 BMC 스마트 컨트랙트를 배포한 것을 축하드립니다! 검색창에 주소를 붙여넣으면 Klaytnscope에서 이 트랜잭션을 확인할 수 있습니다.
4.2 BMC 스마트 컨트랙트와 상호작용하기
이 섹션에서는 Hardhat 스크립트를 사용해 스마트 컨트랙트로 전송된 커피 팁을 인출하는 방법을 알아볼 것입니다. 시작하려면 스크립트 폴더에 withdraw.js 파일을 새로 생성하고 아래 코드를 붙여넣으세요:
const hre = require("hardhat");// contract address of BMC Contractconst buyMeACoffeAddress = "Paste BMC contract address";// address of the contract deployer// useful when calling the withdrawCoffeTips() function// ensure that this address is the SAME address as the original contract deployerconst deployerAddress = "Paste deployer address";// get the balance of a specified addressasync function getBalance(address) { const balanceBigInt = await hre.ethers.provider.getBalance(address); return hre.ethers.utils.formatEther(balanceBigInt)}async function main() { // initialize the deployerAddress to a signer object // this will be useful when calling the withdrawCoffeTips() to the owner address const signer = await hre.ethers.getSigner(deployerAddress); // instantiate the BMC contract const BuyMeACoffee = await hre.ethers.getContractAt("BuyMeACoffee", buyMeACoffeAddress, signer); const balanceBefore = await getBalance(signer.address); const contractBalance = await getBalance(BuyMeACoffee.address); console.log(`Owner balance before withdrawing tips: ${balanceBefore} KLAY`); console.log(`Contract balance before withdrawing tips: ${contractBalance} KLAY`); // Withdraw funds if there are funds to withdraw. if (contractBalance !== "0.0") { console.log("withdrawing funds..") const withdrawCoffeTxn = await BuyMeACoffee.withdrawCoffeTips(); await withdrawCoffeTxn.wait(); // check owner's balance after withdrawing coffee tips const balanceAfter = await getBalance(signer.address); console.log(`Owner balance after withdrawing tips ${balanceAfter} KLAY`); } else { console.log("no funds to withdraw!"); }}// We recommend this pattern to be able to use async/await everywhere// and properly handle errors.main().catch((error) => { console.error(error); process.exitCode = 1;});
위의 코드에서 볼 수 있듯이 BMC 컨트랙트를 인스턴스화한 후 스크립트는 컨트랙트 잔액이 0보다 클 때만 withdrawCoffeTips 함수를 실행합니다. 이해가 되시나요?
예! 컨트랙트에 자금이 없는 경우 "출금할 자금 없음"이라는 메시지가 표시되므로 컨트랙트 호출로 인한 가스를 절약할 수 있습니다.
실제로 작동하는 모습을 보려면 아래 스크립트를 실행해 보세요:
npx hardhat run scripts/withdraw.js --network baobab
스크립트가 성공적으로 실행되면 터미널은 다음과 같이 보일 것입니다:
Ayomitans-MacBook-Pro:smart-contract oxpampam$ npx hardhat run scripts/withdraw.js --network baobabOwner balance before withdrawing tips: 155.8337532 KLAYContract balance before withdrawing tips: 2.0 KLAYwithdrawing funds..Owner balance after withdrawing tips 157.83298835 KLAY
출력에서 커피 팁을 인출한 후 소유자 잔액이 2 KLAY 증가한 것을 확인할 수 있습니다.
이제 컨트랙트를 배포하고 ��모든 기능을 테스트했으니 이제 프론트엔드를 구축할 차례입니다.
즉, 이제 BMC 스마트 컨트랙트와 상호작용하는 방식을 시각화할 수 있습니다.
5. React 및 Web3Onboard로 BMC 프론트엔드 구축하기
이 섹션에서는 Next.js와 Web3Onbaord를 사용하여 dApp 프론트엔드 웹사이트를 구축하겠습니다. 시작하려면 이전에 생성한 frontend 폴더로 이동해야 합니다.
cd ..cd frontend
다음 단계는 BMC 프론트엔드 웹사이트를 실행하는 데 필요한 종속성을 설치하는 것입니다. 설치해야 할 패키지는 다음과 같습니다:
- Web3Onbaord 패키지: Web3-Onboard는 클레이튼 블록체인과 같은 EVM 호환 네트워크에 구축된 dApp에서 멀티월렛 호환성을 지원하는 체인에 구애받지 않는 지갑 라이브러리입니다.
- ethers.js: ethers.js, web3.js와 같은 라이브러리와 함께 사용할 수 있는 Web3-Onboard 공급자. 이 가이드에서는 ethers.js를 사용하여 사용자 계정 가져오기, 잔액 가져오기, 트랜잭션 서명, 트랜잭션 보내기, 스마트 컨트랙트 읽기 및 쓰기와 같은 Klaytn 블록체인 호출을 해보겠습니다.
중요: 프론트엔드/페이지 폴더에서 2개의 파일을 편집해야 합니다.
- _app.js
- index.js
5.1 Web3Onboard 공급자 및 지갑 모듈 설정하기
1단계 - @web3-onboard/react 설치하기
npm install @web3-onboard/react
_app.js 파일에서 web3OnboardProvider와 init 함수를 가져옵니다. 자세한 내용은 나중에 설명하겠습니다.
import { Web3OnboardProvider, init } from '@web3-onboard/react'
2단계 - 지갑 모듈 설치 및 인스턴스화
이 단계에서는 지갑 모듈을 사용하여 dApp에서 지원할 지갑을 얼마든지 추가할 수 있습니다. 하지만 이 가이드에서는 Web3-Onboard 구현에 Coinbase Wallet, WalletConnect, Injected Wallet을 추가하겠습니다.
npm install @web3-onboard/coinbase // Coinbase Walletnpm install @web3-onboard/walletconnect // WalletConnectnpm install @web3-onboard/injected-wallets // Used to connect to Metamask
_app.js 파일에서 지갑 모듈을 가져와 인스턴스화하여 dApp과 통합합니다. 각 모듈에는 폴백 JSON RPC URL 또는 기본 체인 ID와 같은 고유한 옵션 매개변수를 전달할 수 있습니다.
import coinbaseWalletModule from "@web3-onboard/coinbase";import walletConnectModule from "@web3-onboard/walletconnect";import injectedModule from "@web3-onboard/injected-wallets";const coinbaseWalletSdk = coinbaseWalletModule();const walletConnect = walletConnectModule();const injected = injectedModule();const modules = [coinbaseWalletSdk, walletConnect, injected];
3단계 - ethers 설치
npm install --save ethers
4단계 - Web3OnboardProvider를 사용하여 Web3Onboard 인스턴스화하기
Web3OnboardProvider는 글로벌 상태를 관리하는 더 나은 방법을 제공합니다. 이 기능을 사용하면 공급자 객체를 앱에 간단하게 래핑할 수 있으며 초기화된 Web3Onboard 인스턴스를 모든 하위 컴포넌트에서 사용할 수 있습니다.
Init 함수는 Web3-Onboard를 초기화하여 모든 후크가 사용할 수 있도록 합니다.
실제로 작동하는 모습을 보려면 _app.js 파일에 이전 코드 아래에 코드를 붙여넣으세요:
const ETH_MAINNET_RPC_URL = `https://ethereum-mainnet-rpc.allthatnode.com/1d322388ZEPI2cs0OHloJ6seI4Wfy36N`;const KLAYTN_MAINNET_URL = `https://klaytn-mainnet-rpc.allthatnode.com:8551/1d322388ZEPI2cs0OHloJ6seI4Wfy36N`;const KLAYTN_BAOBAB_URL = `https://klaytn-baobab-rpc.allthatnode.com:8551/1d322388ZEPI2cs0OHloJ6seI4Wfy36N`; const web3Onboard = init({ wallets: modules, chains: [ { id: "0x1", // chain ID must be in hexadecimal token: "ETH", namespace: "evm", label: "Ethereum Mainnet", rpcUrl: ETH_MAINNET_RPC_URL }, { id: "0x2019", // chain ID must be in hexadecimal token: "KLAY", namespace: "evm", label: "Klaytn Mainnet", rpcUrl: KLAYTN_MAINNET_URL }, { id: "0x3e9", // chain ID must be in hexadecimel token: "KLAY", namespace: "evm", label: "Klaytn Testnet", rpcUrl: KLAYTN_BAOBAB_URL }, // you can add as much supported chains as possible ], appMetadata: { name: "Klaytn-web3-onboard-App", // change to your dApp name icon: "paste your icon url" logo: "paste your logo url" description: "Web3Onboard-Klaytn", recommendedInjectedWallets: [ { name: "Coinbase", url: "https://wallet.coinbase.com/" }, { name: "MetaMask", url: "https://metamask.io" } ] } })export default function App({ Component, pageProps }) { return ( <Web3OnboardProvider web3Onboard={web3Onboard}> <Component {...pageProps} /> </Web3OnboardProvider> )}
앱에 모든 하위 컴포넌트에서 사용할 수 있는 공급자 객체와 web3Onboard 인스턴스를 부여하는 _app.js 파일을 설정했으면 이제 index.js 파일에 프런트엔드 로직을 구축해야 합니다.
- Index.js
이 페이지는 컨트랙트 배포자가 출금할 BMC 스마트 컨트랙트에 대한 지갑 연결과 커피 전송을 처��리합니다.
import React, { useEffect, useState } from 'react';import { useConnectWallet } from '@web3-onboard/react'import abi from "../utils/BuyMeACoffee.json"import { ethers } from "ethers";export default function Home() { const [name, setName] = useState(""); const [message, setMessage] = useState(""); const [coffee, setGetCoffee] = useState([]); const [coffeeContract, setCoffeeContract] = useState(); const [{ wallet, connecting }, connect, disconnect] = useConnectWallet(); const contractAddress = "Paste BMC contract address"; const contractABI = abi.abi; const getCoffee = async () => { try { console.log("getting coffee Id") const coffeeId = await coffeeContract.coffeeId(); console.log(coffeeId.toString()); const getCoffee = await coffeeContract.getAllCoffee(coffeeId.toString()); setGetCoffee(getCoffee); } catch (error) { console.log(error); } }; useEffect(() => { let ethersProvider if (wallet) { ethersProvider = new ethers.BrowserProvider(wallet.provider, 'any') } if (ethersProvider) { try { const getCoffeContract = async () => { const signer = await ethersProvider.getSigner(); const buyMeACoffee = new ethers.Contract(contractAddress, contractABI, signer); setCoffeeContract(buyMeACoffee) } getCoffeContract(); } catch (error) { console.log(error); } } }, [wallet]) useEffect(() => { const onNewCoffee = (from, timestamp, name, message) => { console.log("Coffee received: ", from, timestamp, name, message); setGetCoffee((prevState) => [ ...prevState, { address: from, timestamp: new Date(timestamp * 1000), message, name } ]); }; if (wallet && coffeeContract) { getCoffee() coffeeContract.on("NewCoffee", onNewCoffee); } else { console.log("provider not initialized yet"); } }, [wallet, coffeeContract]) const onNameChange = (event) => { setName(event.target.value); } const onMessageChange = (event) => { setMessage(event.target.value); } const buyCoffee = async (e) => { e.preventDefault(); try { if (!wallet && !coffeeContract) { console.log("provider not initialized yet"); return; } console.log("buying coffee..") const coffeeTxn = await coffeeContract.buyCoffee(name, message, {value: ethers.parseEther("1.0")}); const coffeTx = await coffeeTxn.wait(); console.log("mined ", coffeTx.hash); console.log("coffee sent!"); // clear target value fields e.target.inputName.value = ""; e.target.inputAmount.value = ""; // Clear the form fields. setName(""); setMessage(""); // set all coffees await getCoffee(); } catch (error) { console.log(error); } }; return ( <main className='coffeeMain max-w-8xl min-h-[100vh] p-10 bg-black mt-0 shadow-2xl m-auto flex flex-col justify-center items-center bg-[url("https://static.vecteezy.com/system/resources/previews/001/330/185/original/coffee-cup-on-hand-drawn-doodle-background-free-vector.jpg")]'> <div className='coffeContent'> <div className='compOne flex flex-col justify-center items-center'> <h1 className='text-white text-center text-2xl'>Buy me a coffee</h1> { wallet ? ( <div> <form onSubmit={buyCoffee} className="flex flex-col justify-center items-center mt-4"> <input type="text" name='inputName' placeholder="Enter your name" className="p-5 rounded-md bg-black text-white border-solid border-2 border-white outline-0" onChange={onNameChange} /> <input type="text" name='inputAmount' placeholder="Send your message" className="p-5 rounded-md bg-black text-white border-solid border-2 border-white mt-3 outline-0" onChange={onMessageChange}/> <input type="submit" value="Send Coffee" className="p-3 mt-4 rounded-2xl bg-white text-black cursor-pointer"/> </form> </div> ) : ( <button className='text-black bg-white p-3 rounded-lg mt-3 cursor-pointer' disabled={connecting} onClick={() => (wallet ? disconnect(wallet) : connect())}> {connecting ? 'Connecting' : wallet ? 'Disconnect' : 'Connect'} </button>) } </div> <div className="comp2 flex flex-col justify-normal items-center py-3 px-10"> {wallet && ( <div className="flex mt-5 mb-3"> <h1 className="text-white text-2xl">Coffee Transaction</h1> </div> ) } <div className="coffeeTransaction w-[1300px] flex flex-row gap-5 overflow-x-scroll"> {/* grid gap-4 grid-cols-2 */} {wallet && (coffee.map((coff, id) => { return ( <div key={id} className=" border-solid border-2 border-white p-5 w-auto rounded-2xl mb-3"> <p className=" text-white font-bold">"{coff.message}"</p> <p className=" text-white">From: {coff.name} at {`${new Date(coff.timestamp.toString() * 1000)}`}</p> </div> ) }))} </div> </div> </div> </main> )}
위 코드의 중요 참고 사항
-
contract ABI를 가져옵니다: contract ABI는 스마트 컨트랙트에서 호출할 수 있는 함수를 프론트엔드 코드에 지정합니다. contract ABI를 가져오려면 smart-contract 폴더로 이동하여 artifacts/contracts/BuyMeACoffee.sol/BuyMeACoffee.json 경로를 따라 이 파일의 텍스트를 복사합니다. 다음으로 frontend/src 폴더에 유틸리티 폴더를 생성했습니다. 그런 다음 새로 생성한 파일에 BuyMeACoffee.json 파일이라는 이름으로 붙여넣습니다.
-
BMC 컨트랙트 주소를 BMC 배포된 컨트랙트의 주소로 변경합니다.
이제 앱��이 아직 실행 중이 아니라면 셸로 이동하여 npm run dev를 사용하여 로컬 서버를 시작하여 변경 사항을 테스트할 수 있습니다. 몇 초 안에 웹 사이트가 로드되고 UI가 다음과 같이 표시되어야 합니다:
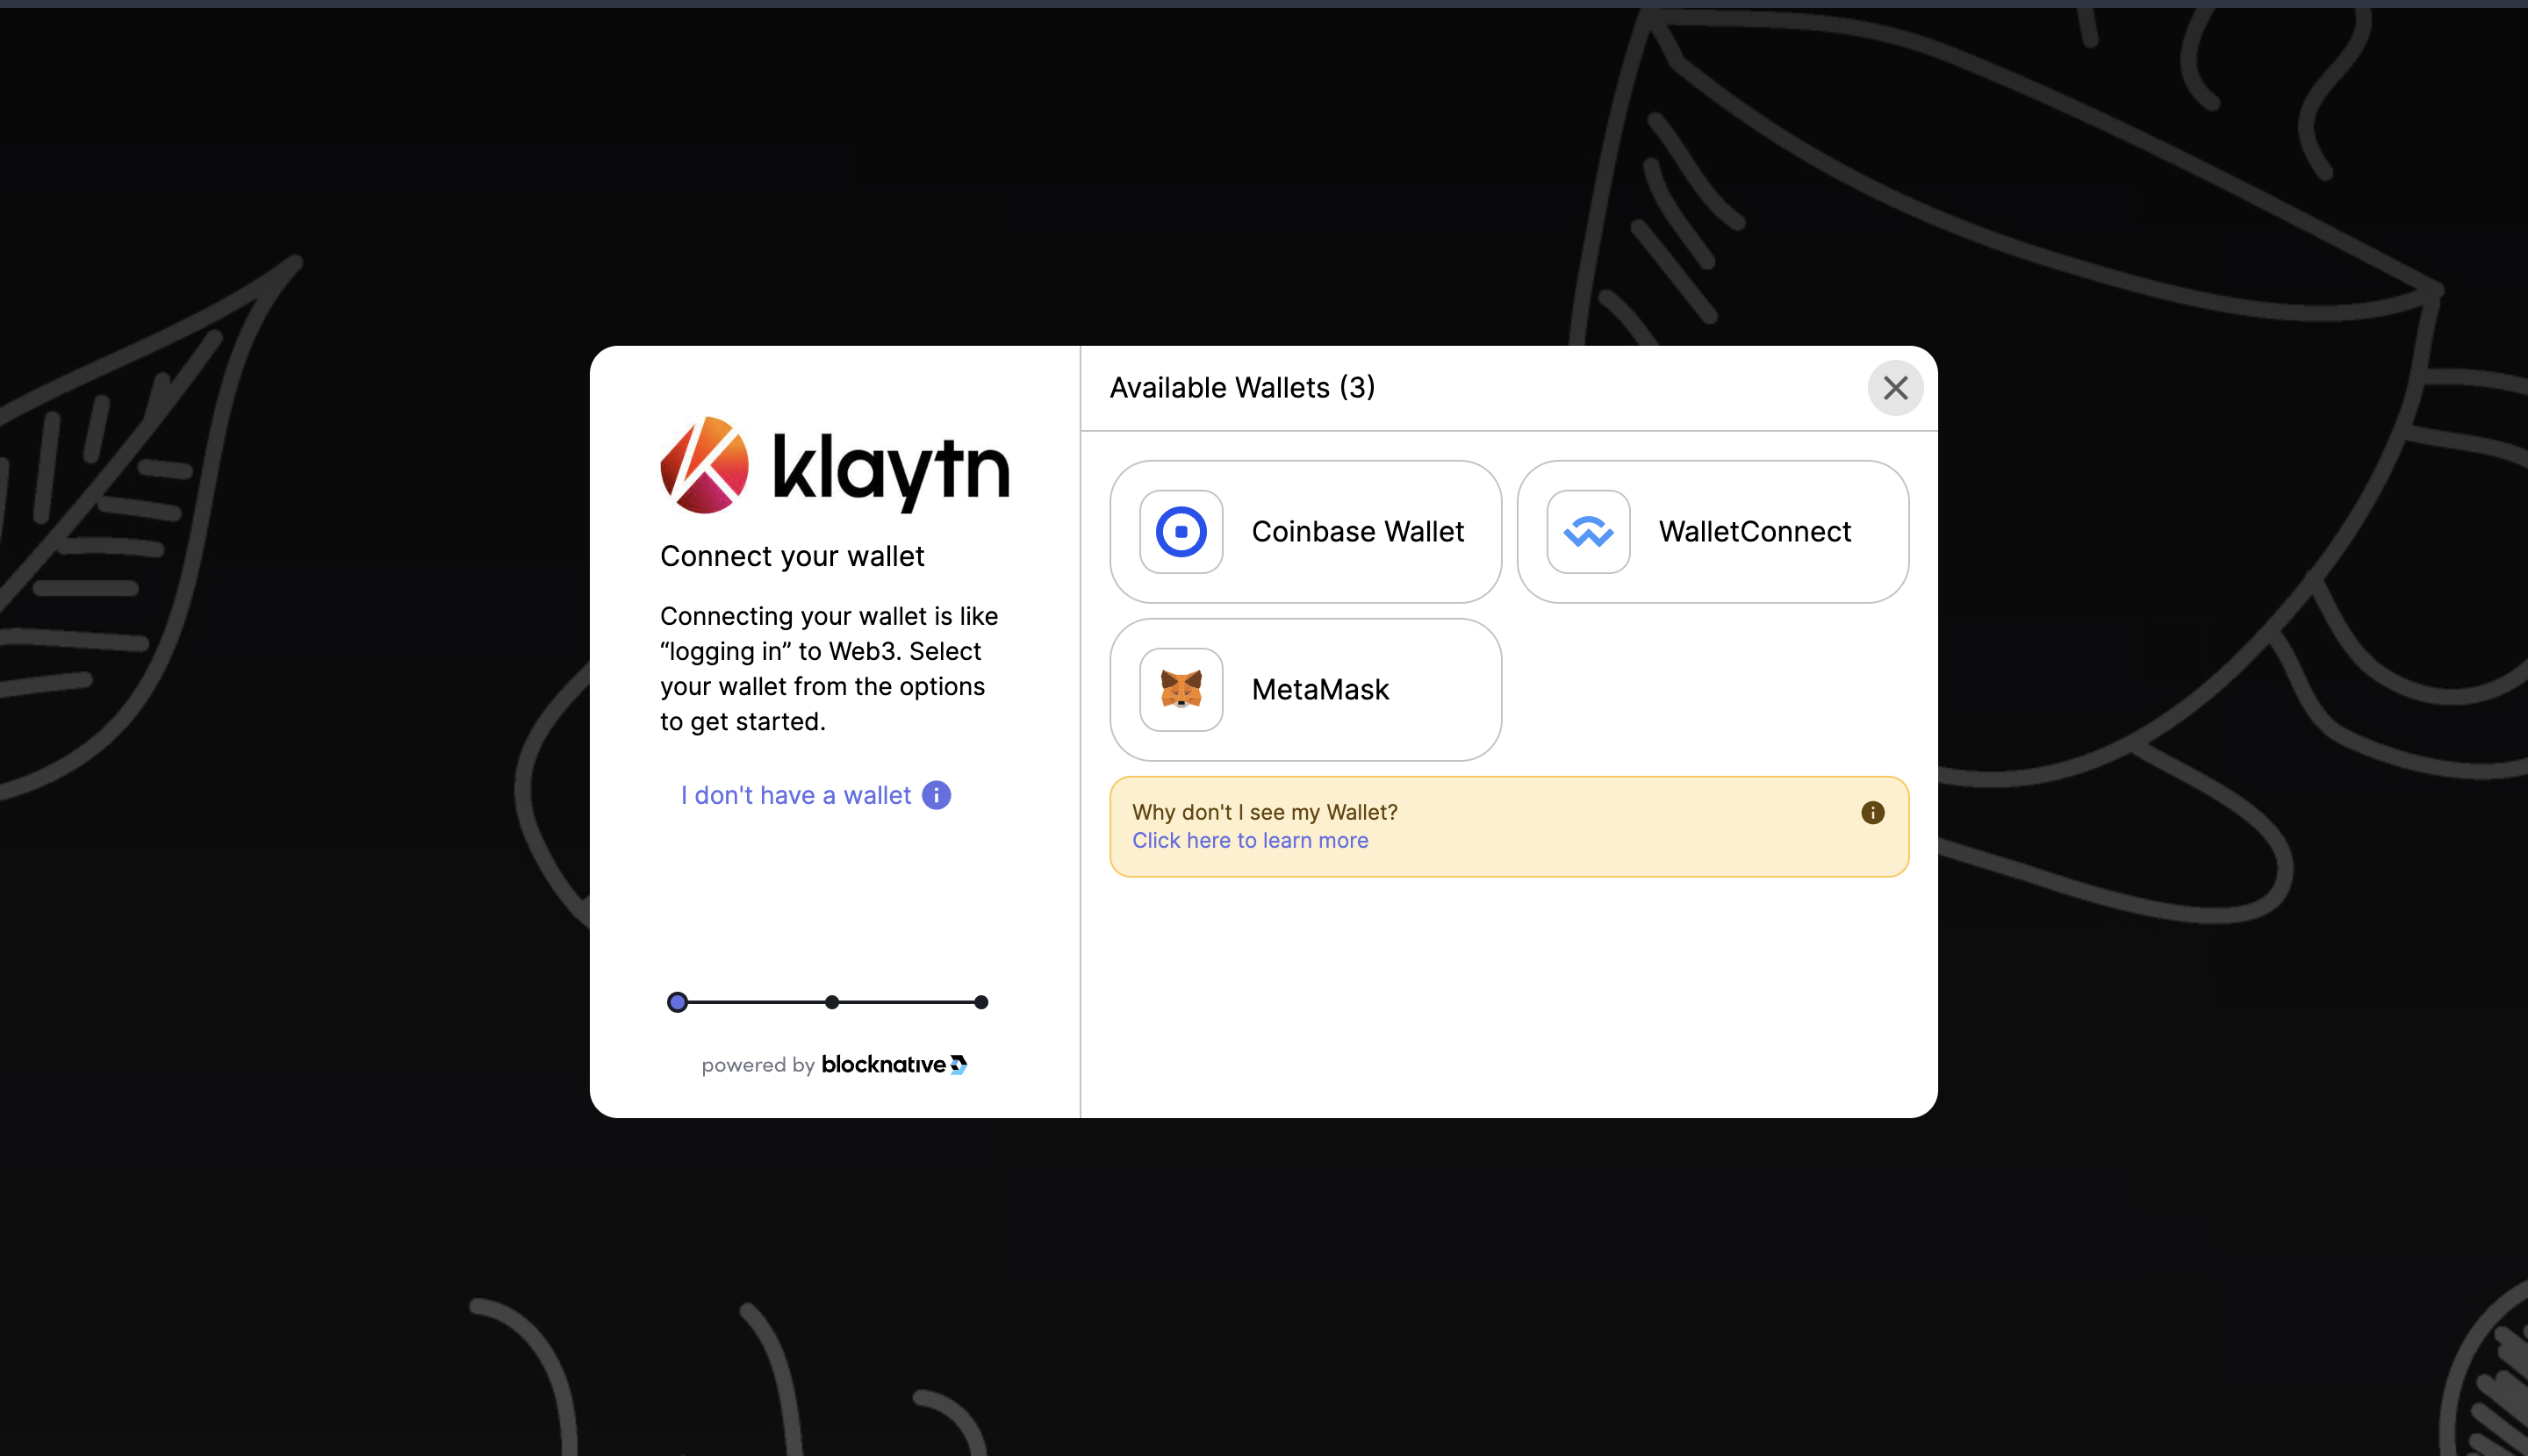
지갑 연결 페이지:
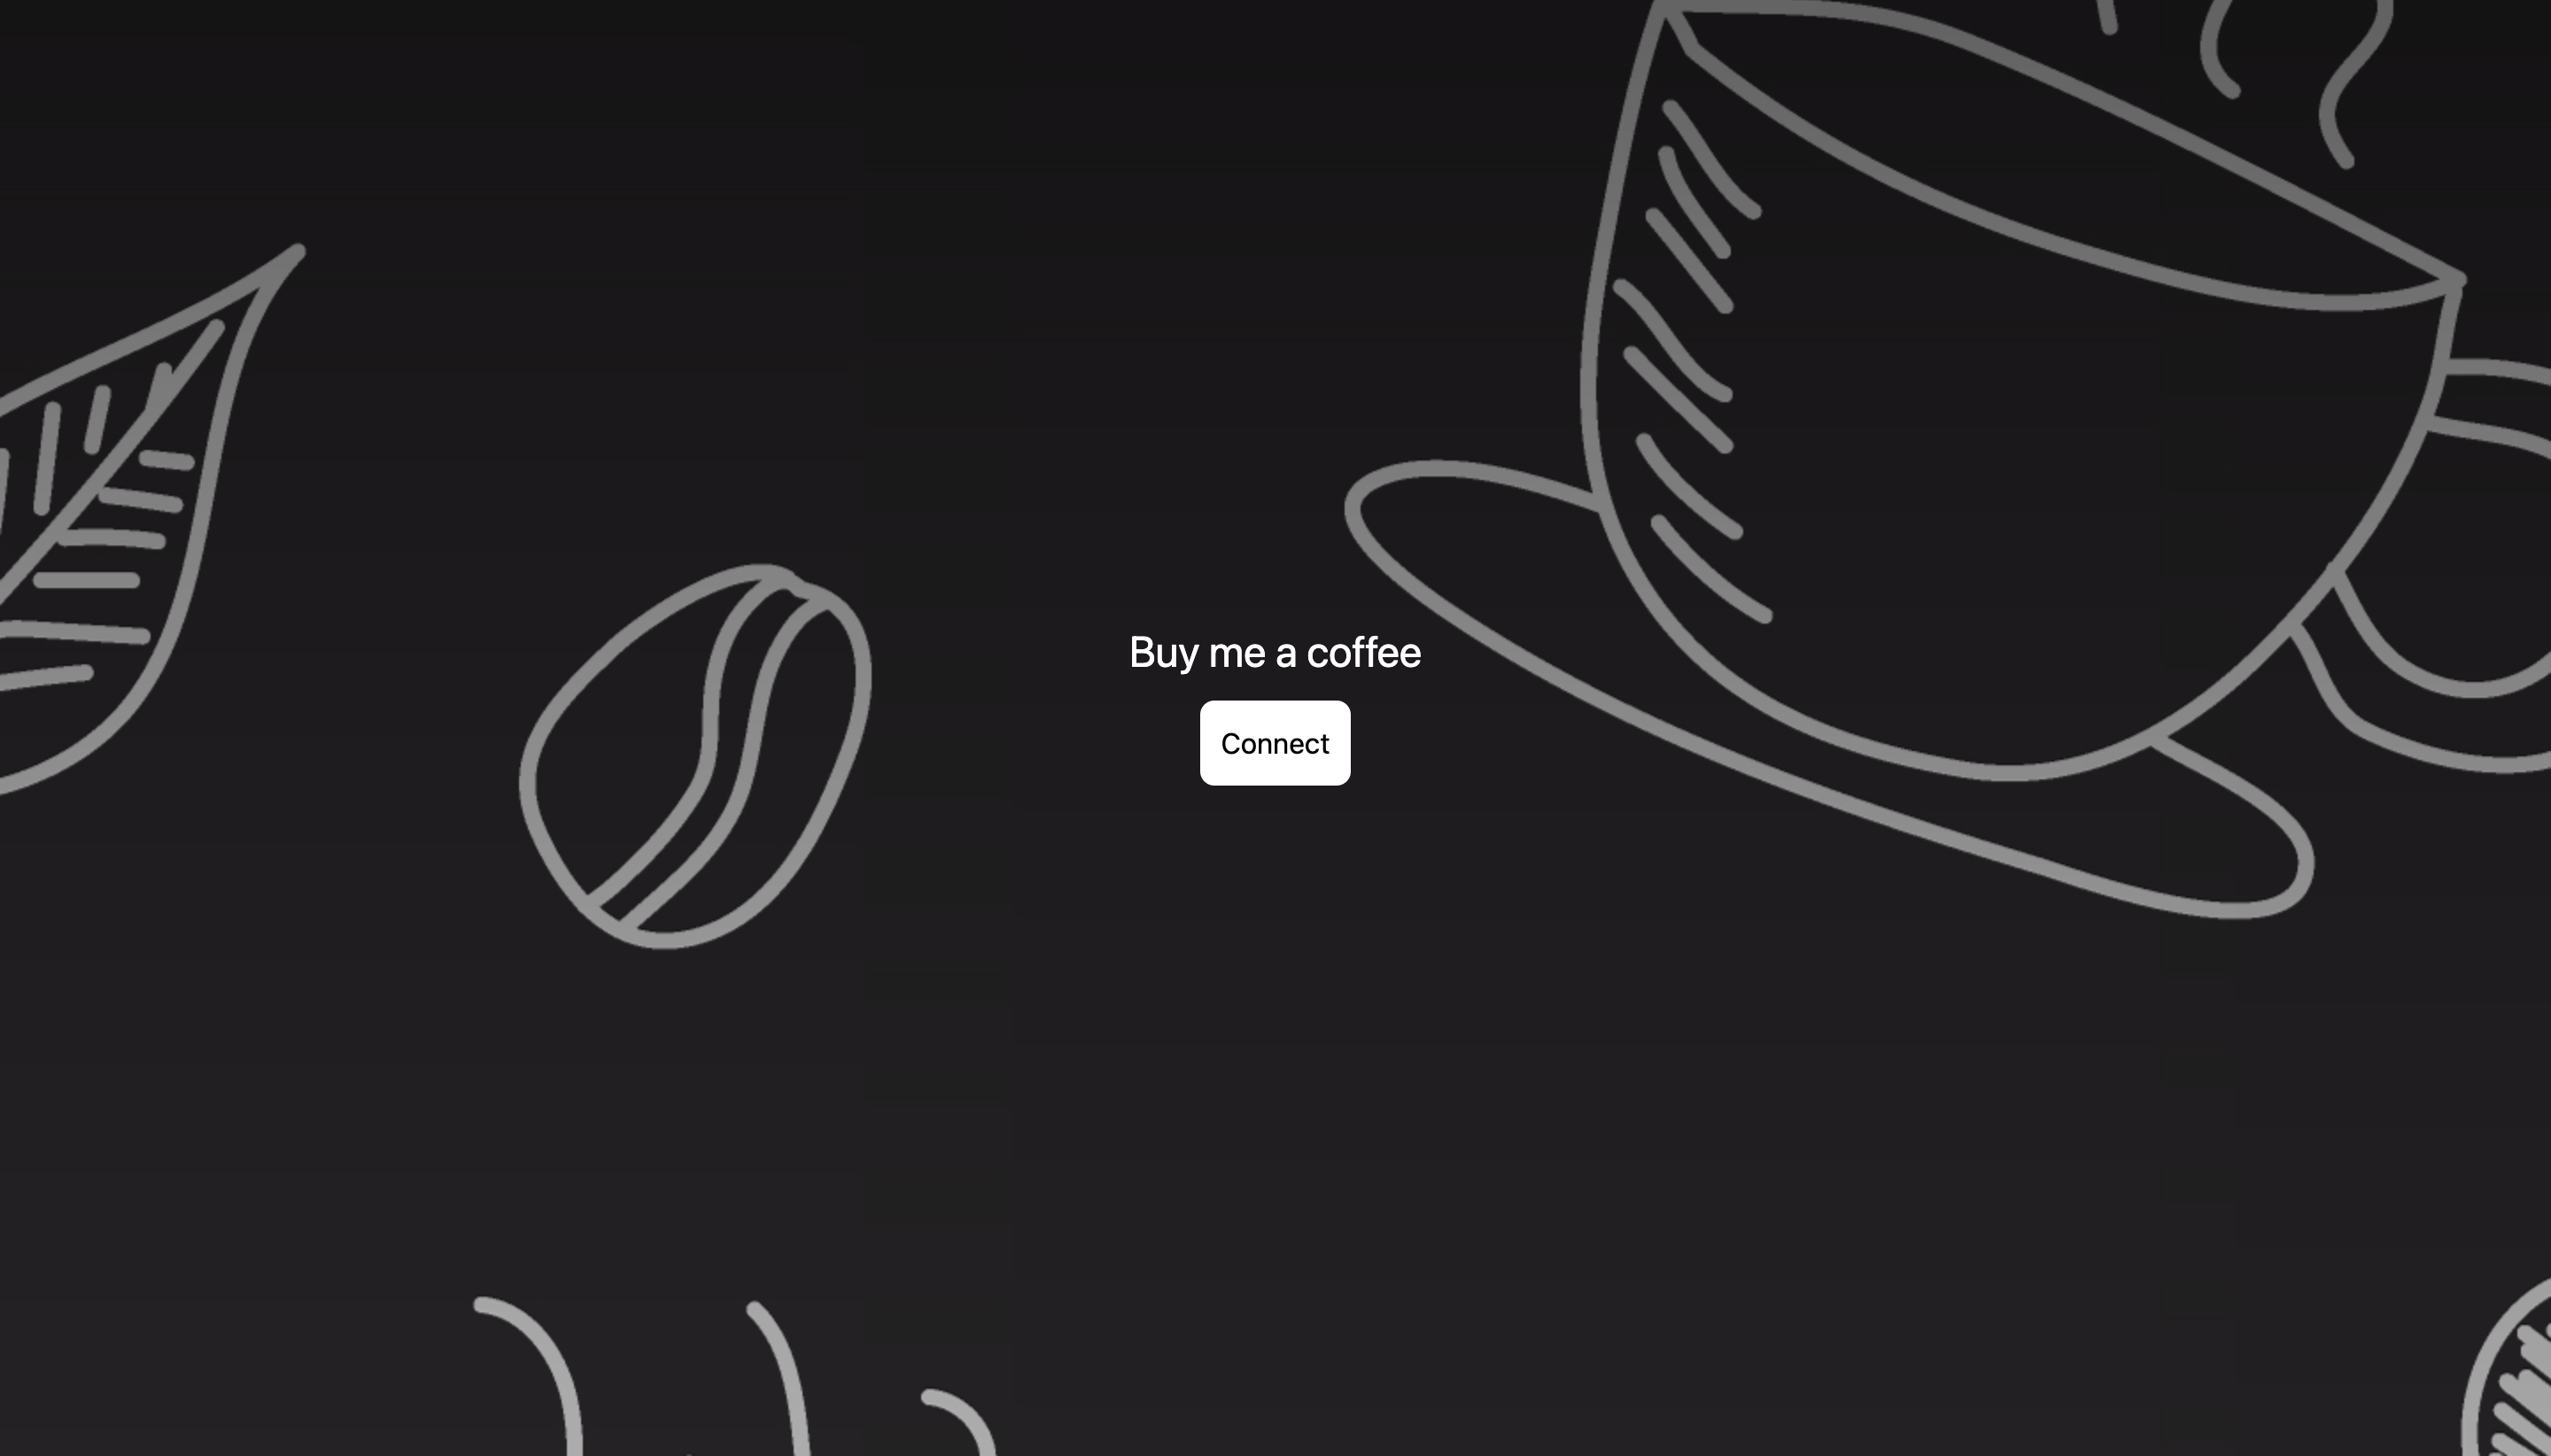
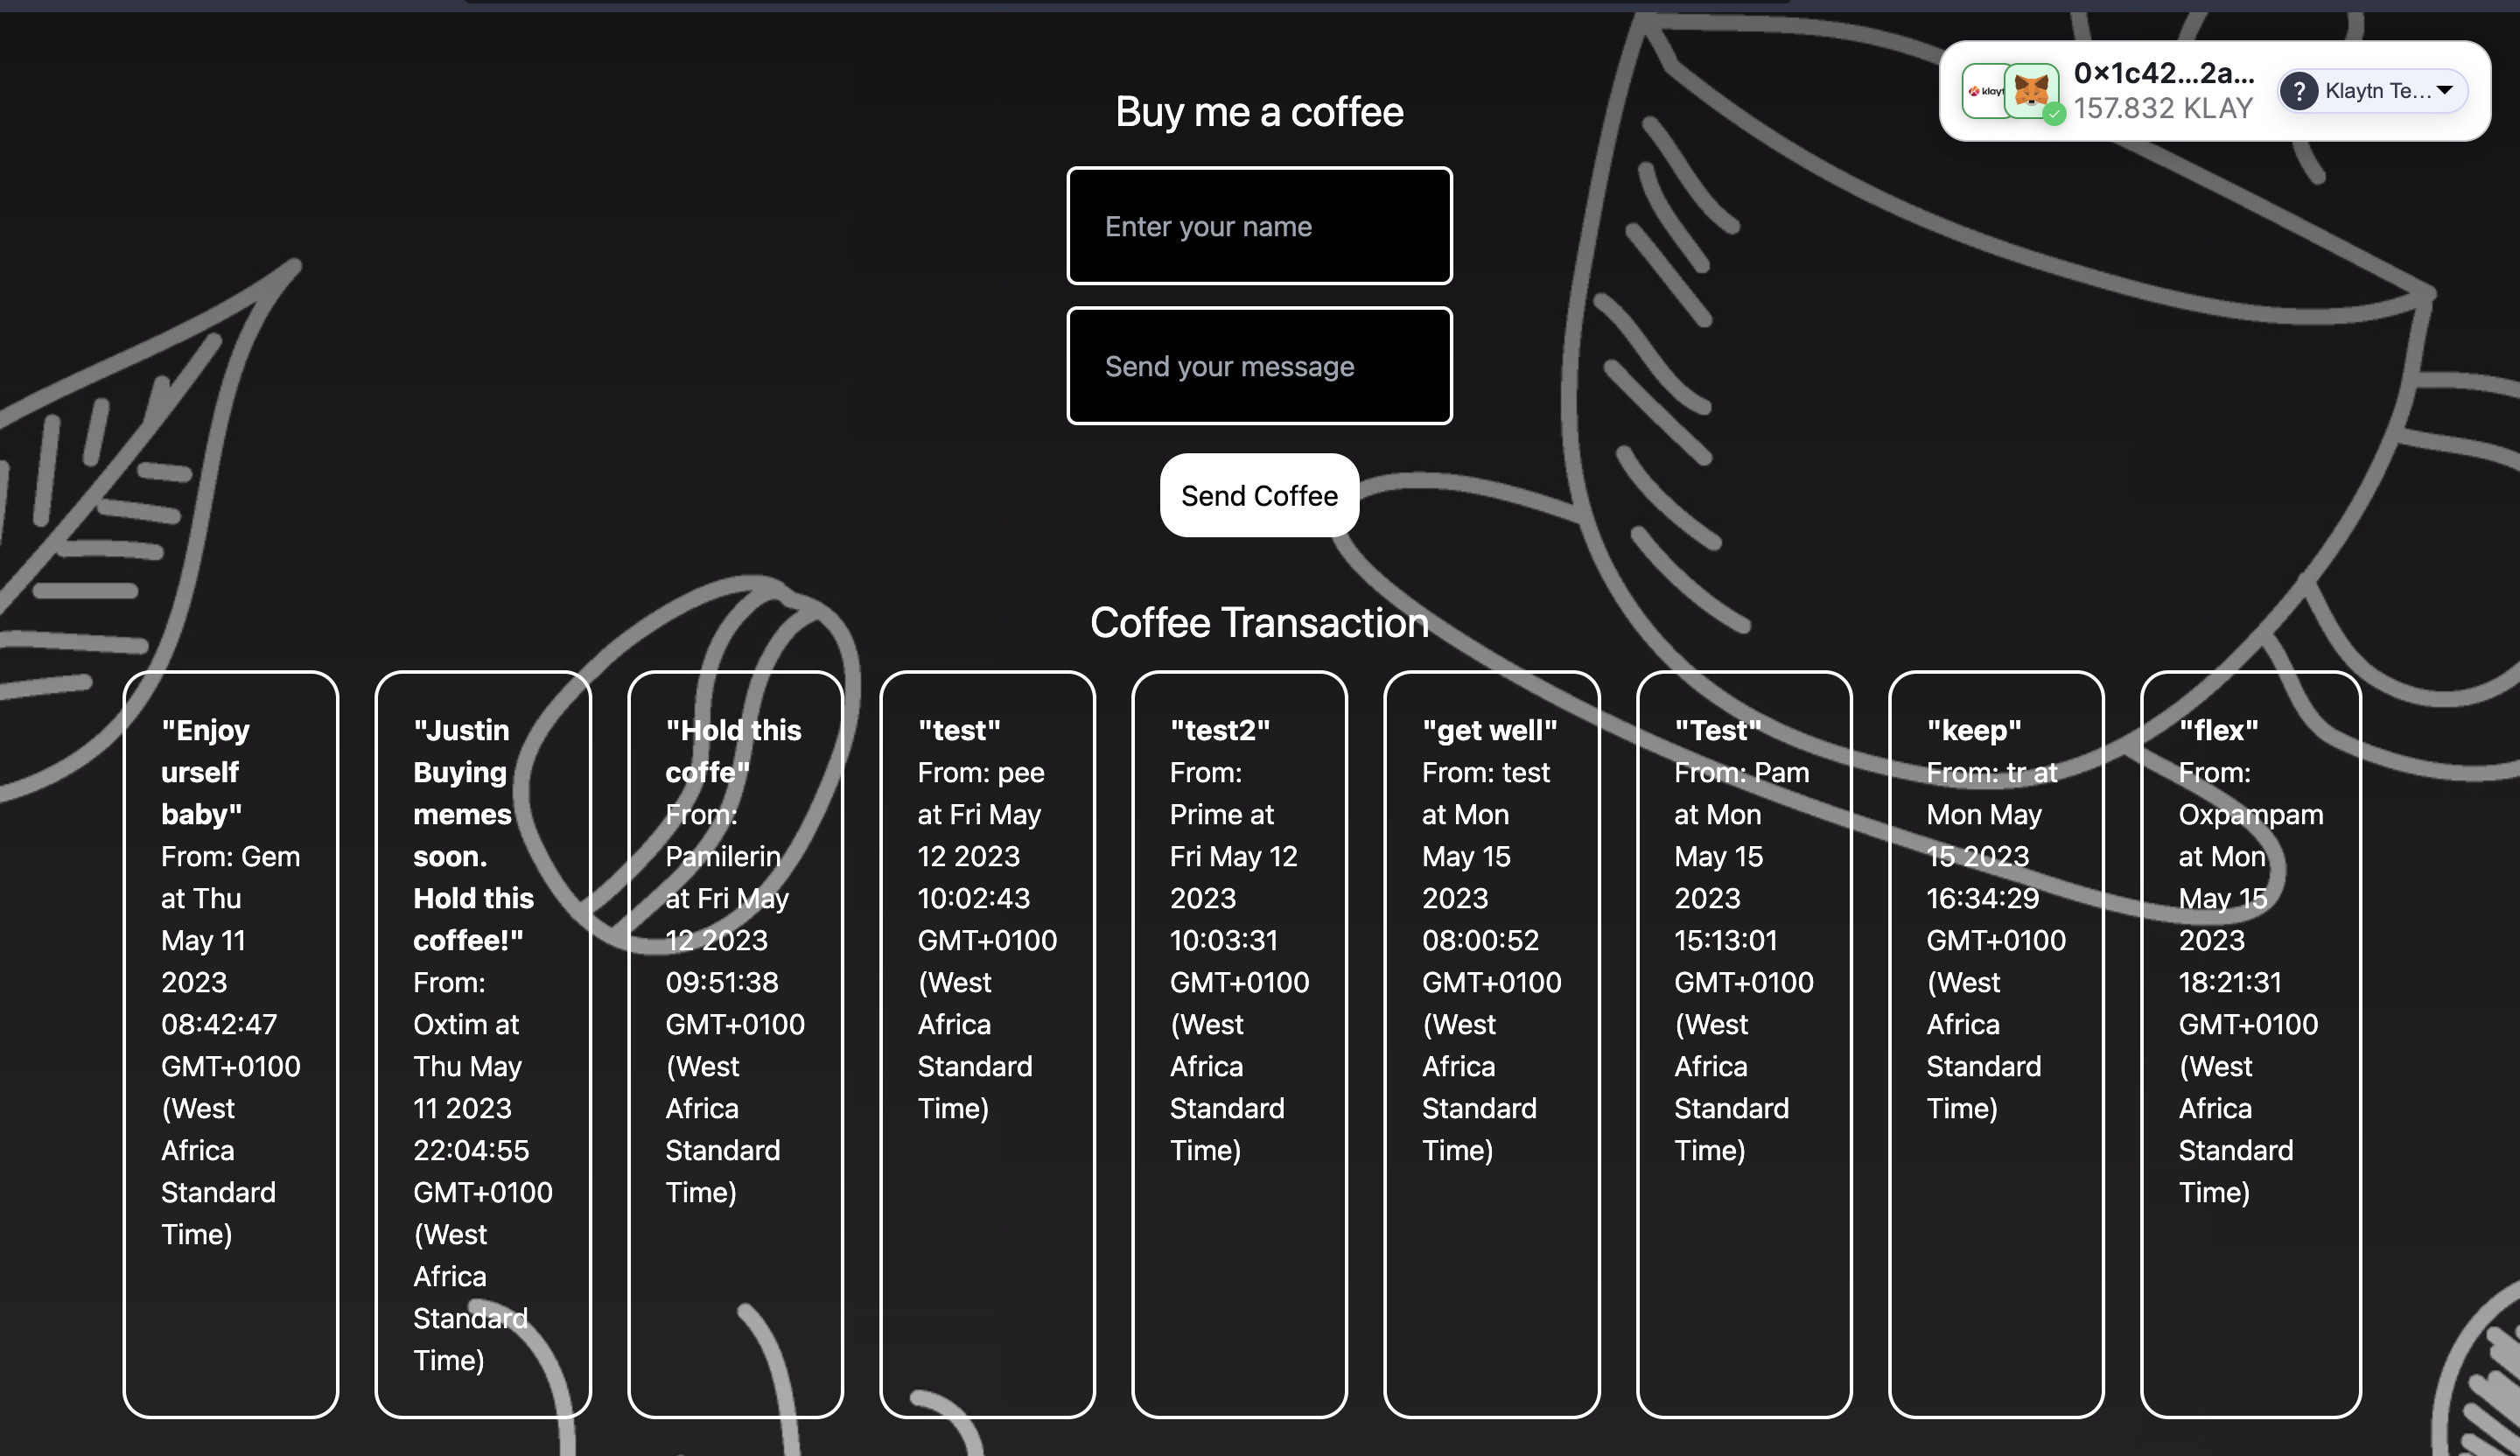
커피를 보내는 프론트엔드 웹사이트:
이제 웹사이트와 코드를 살펴보겠습니다.
위의 스크린샷에서 dApp을 처음 방문하면 지갑을 연결하라는 메시지가 표시되는 것을 이미 보셨을 것입니다. 다음으로 Web3Onboard 인스턴스에서 초기화된 사용 가능한 지갑 목록이 표시됩니다.
위 이미지에서는 MetaMask를 선택했습니다. 지갑을 연결하면 웹사이트 오른쪽 상단에 연결된 지갑의 세부 정보가 포함된 UI 구성 요소가 표시됩니다. 또한 페이지에는 송금자의 이름과 메시지가 포함된 커피 거래 양식과 다른 방문자가 스마트 컨트랙트로 지불한 이전 커피가 표시됩니다.
6. Fleek을 사용하여 IPFS에 프론트엔드 코드 배포하기
Fleek은 IPFS��에서 최신 사이트와 앱을 구축할 수 있는 인프라입니다. Fleek을 사용하면 사이트나 앱이 무허가, 무신뢰, 검열 저항성을 가지며 중앙 집중식 게이트키퍼가 필요 없게 됩니다. 이 튜토리얼에서는 Vercel과 같은 기존 플랫폼이 아닌 Fleek에 Next js 앱을 배포할 것입니다. 알겠습니다! 탈중앙화 애플리케이션을 탈중앙화 호스팅 플랫폼에 배포하고 있습니다!
다음은 BMC dApp을 Fleek에 배포하는 단계입니다:
-
프론트엔드 코드에서 이러한 구성을 확인합니다:
a. package.json을 열고 다음 스크립트를 추가합니다:
"scripts": {"dev": "next","build": "next build","start": "next start","export": "next export"}b. 루트 디렉터리의 next.config.js 파일에 아래 코드를 붙여넣습니다:
module.exports = {exportTrailingSlash: true,};
자세한 내용은 이 가이드를 참조하세요.
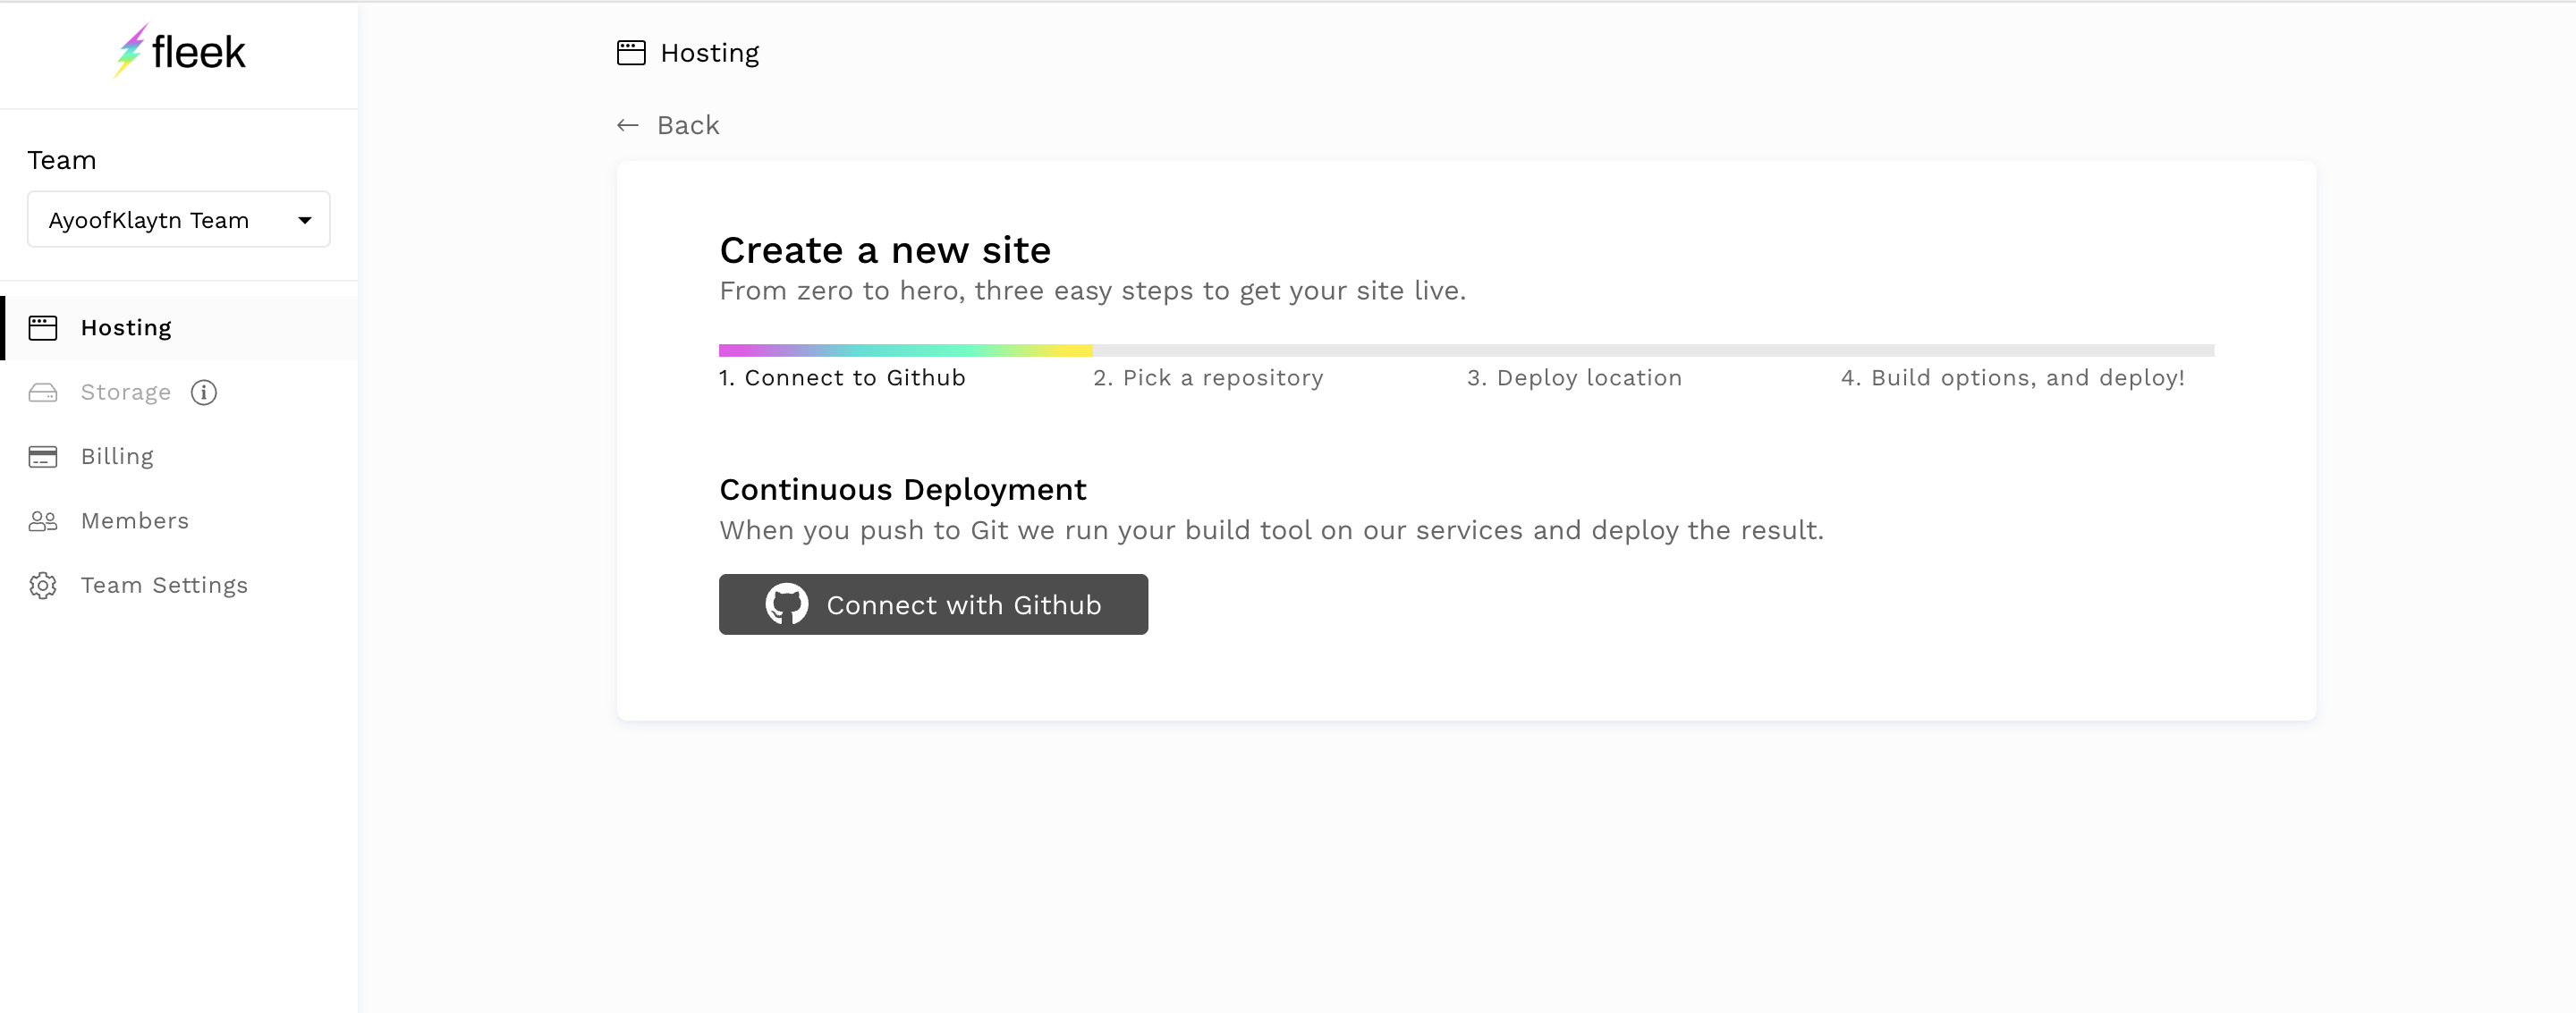
- Fleek의 대시보드로 이동하여 Add new Site를 클릭합니다.
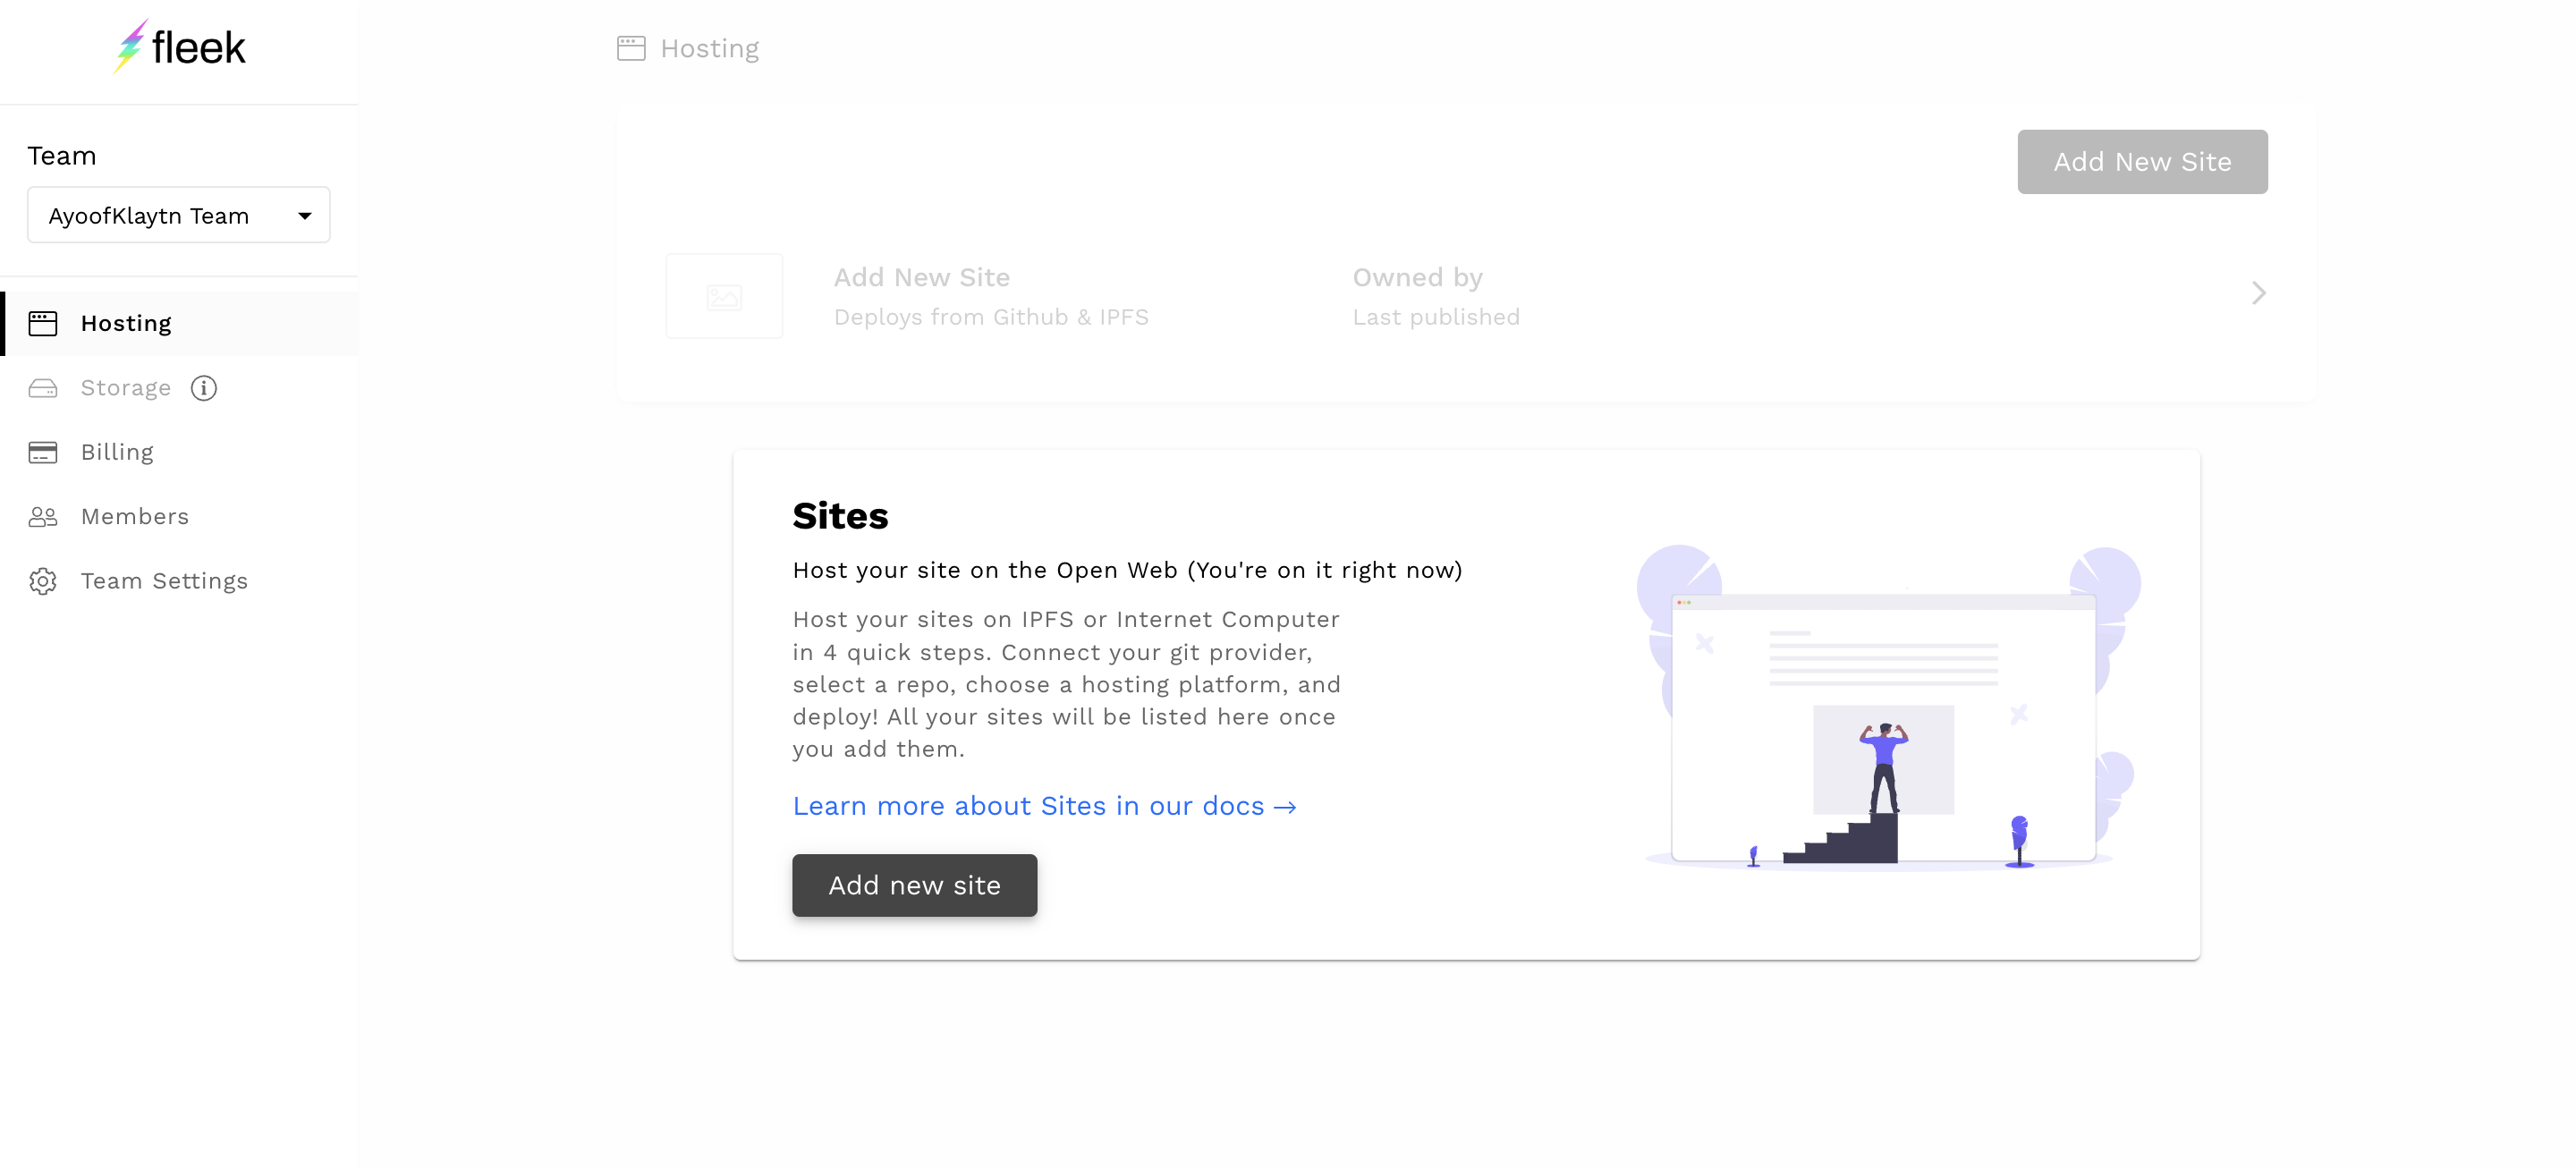
- 리포지토리에 액세스하려면 GitHub 계정을 연결합니다.
-
배포하려는 리포지토리를 선택합니다.
-
다음 페이지에서 Basic build setting 탭에서 Next Js 프레임워크를 선택하면 Fleek이 다른 필드를 자동으로 채웁니다.
-
배포 사이트를 클릭합니다.
-
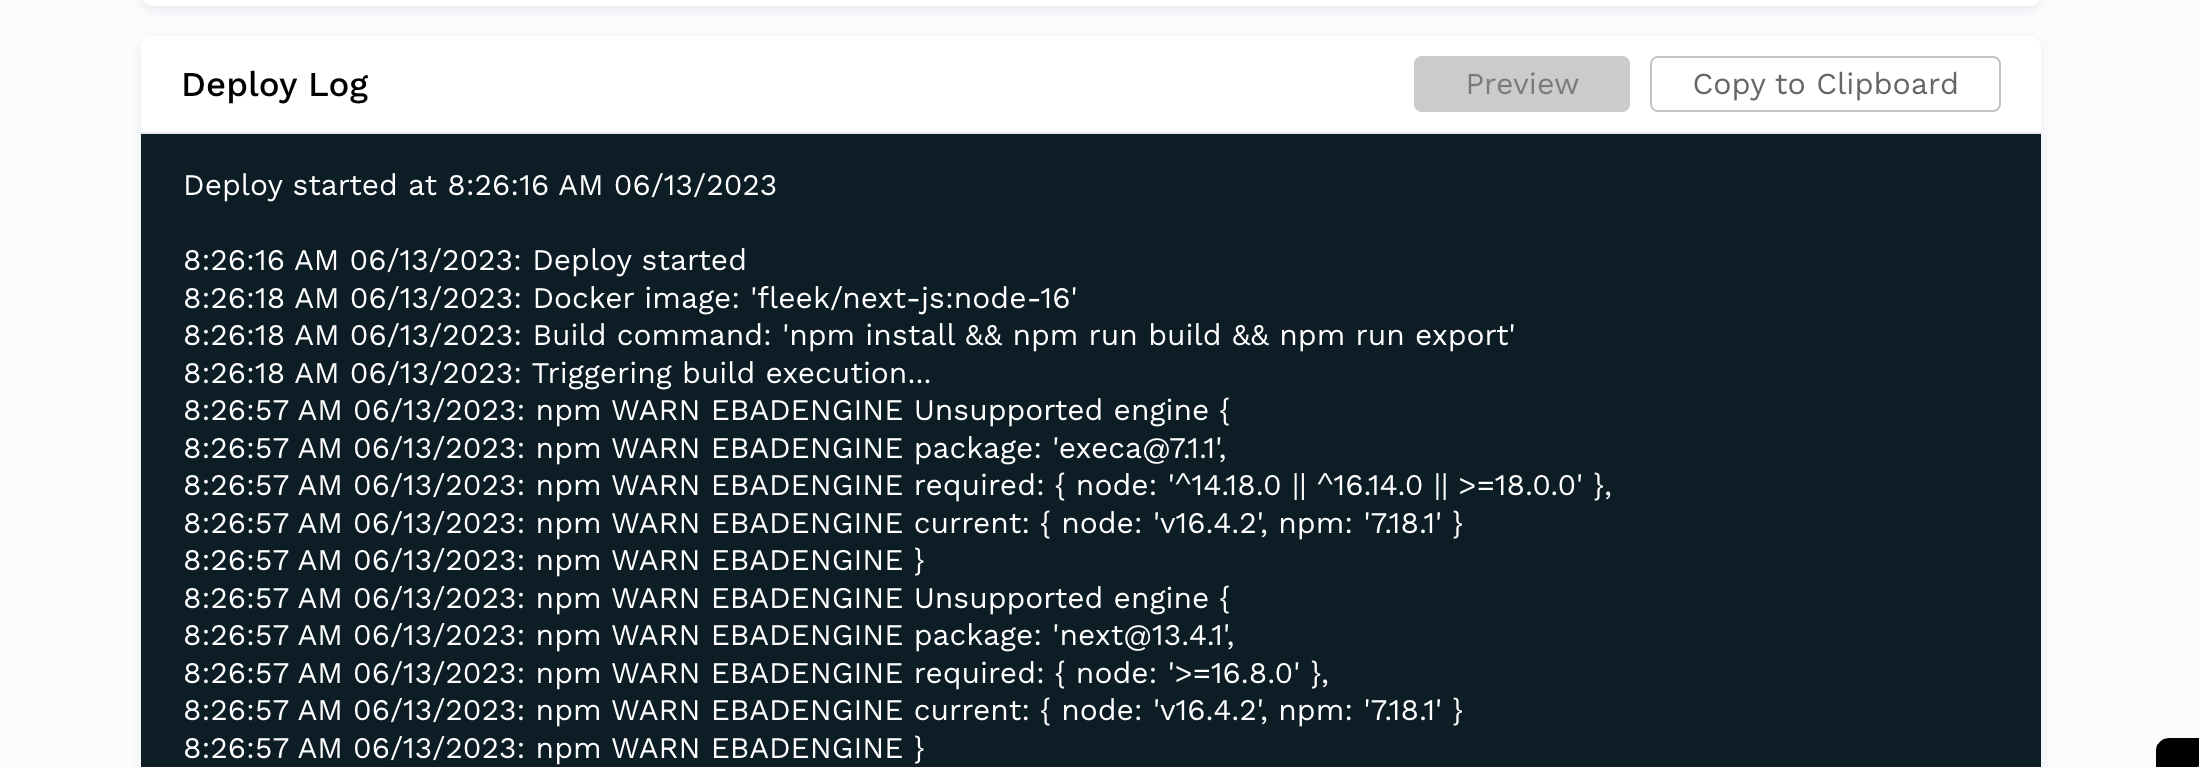
아래 이미지와 같이 npm WARN EBADENGINE 지원되지 않는 엔진이 표시될 경우 배포 사이트를 클릭합니다:
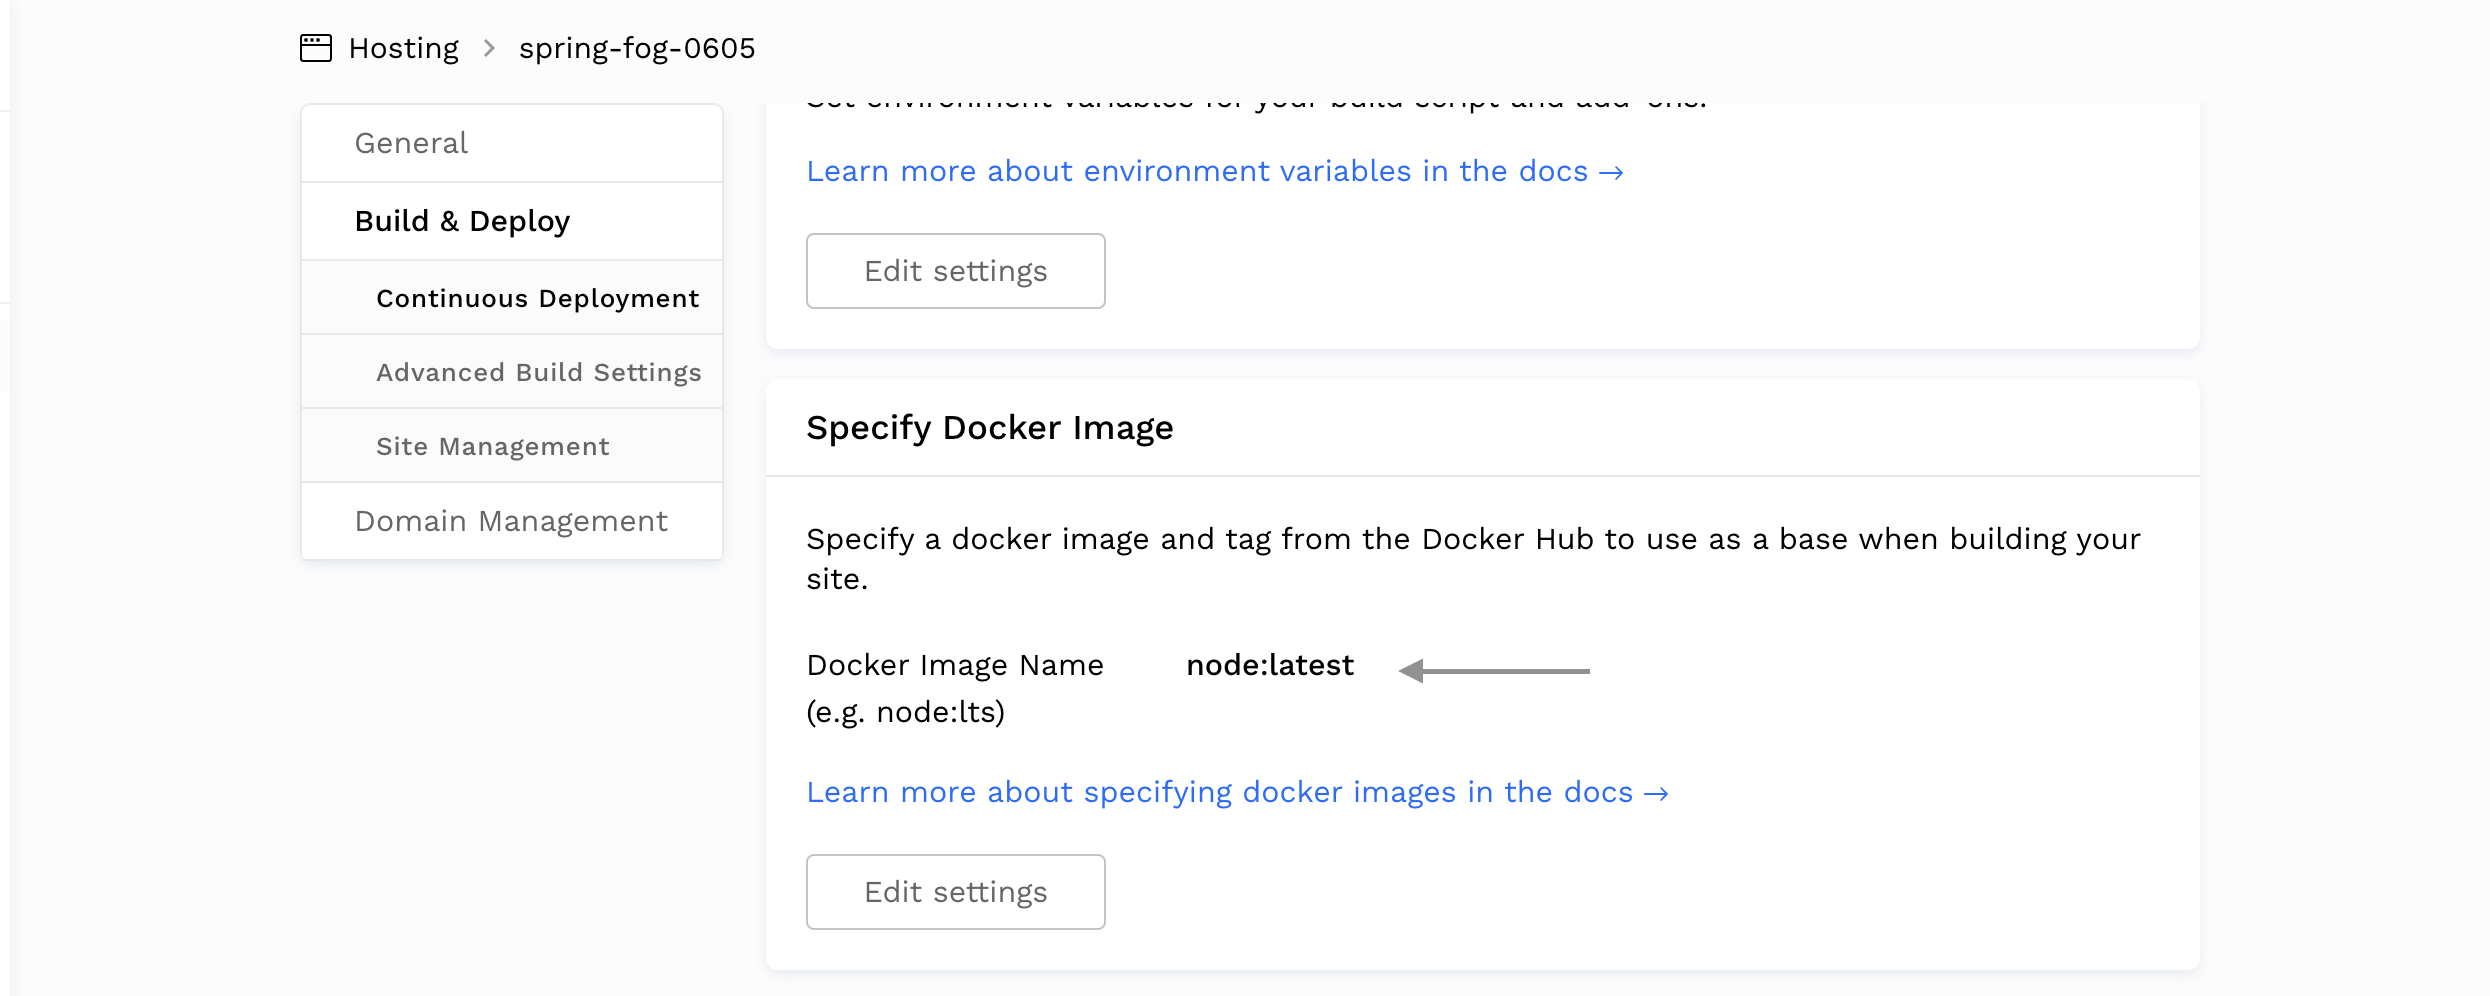
Deploy 탭의 Deploy setting으로 이동하여 아래 이미지와 같이 Docker image Name을 node:latest로 변경합니다:
- 이제 사이트를 쉽게 빌드하고 IPFS에 배포할 수 있습니다.
- 생성된 링크를 클릭하여 웹사이트를 확인합니다.

짜잔! BMC dApp을 IPFS에 배포하고 호스팅했습니다.
7. 결론
여기까지 읽어보셨다면 축하드립니다! 이 튜토리얼에서는 Solidity, NextJs, Web3Onbaord, Fleek을 사용해 풀스택 Buy Me A Coffee dApp을 만드는 방법을 배웠습니다. 이는 탈중앙화 플랫폼에서 호스팅되는 탈중앙화 애플리케이션을 만드는 첫 번째 단계입니다.
여기에서 프런트엔드에서 정적으로 1 KLAY를 보내는 것 외에 커피 양을 입력하는 새로운 입력 필드를 추가하는 등 다른 옵션도 살펴볼 수 있습니다. 전체 코드베이스는 github에서 확인할 수 있으며, 이 링크를 사용하여 웹사이트를 테스트할 수도 있습니다.
더 자세한 내용은 클레이튼 문서, Web3Onbaord 문서, Fleek 문서를 참고하시기 바랍니다. 궁금한 점이 있으시면 Klaytn 포럼를 참조하세요.