Build a Buy-Me-A-Coffee DApp
Table of Contents
- 1. Project Setup
- 2. Creating a Buy Me A Coffee Smart Contract
- 3. Testing the contract’s functionalities using scripts
- 4. Deploying BMC Smart contract to Klaytn Testnet
- 5. Building the BMC Frontend with React and Web3Onboard
- 6. Deploying Frontend code on IPFS using Fleek
- 7. Conclusion
Introduction
Buy Me a Coffee (BMC) is a platform where creators get monetary support and donations from their fans or audience. These creators could be writers, artists, musicians, video creators, et al. With the help of this platform, fans may play a significant role in the success stories of creators, audiences can express their appreciation for the job that creators accomplish, and creators can monetize their work.
On a high level, Buy-me-a-Coffee simplifies the process of accepting payments for creators and enhances interactions between creators and audiences. These and more are some of the exciting features on the BMC platform. On the bright side, imagine this platform on the blockchain. Creators will now get access to more benefits, such as:
- Complete payment, as opposed to traditional BMC, which charges 5% on any support received by the creator.
- Transparency because all transactions are recorded on the blockchain.
- Directly receive support fees from fans without any intermediary.
- Decentralization, i.e., there is no central authority controlling the platform.
In this tutorial. you will build a decentralized version of the Buy Me a Coffee (BMC) platform (frontend + smart contract). This platform will be a minimalistic implementation of the traditional BMC platform where supporters can tip you, and you will be able to withdraw any tips that are delivered to the BMC smart contract as the contract's owner. Supporters will be able to send test KLAY and lovely messages together in a coffee transaction using this site.
By the end of this guide, you will have used the following to create this dApp:
- Solidity: to write the BMC smart contract
- NextJs and Tailwind: for building a frontend website for our BMC dApp
- Web3Onboard: to enable multiple wallet connections to Klaytn Testnet Baobab.
- Fleek: with Fleek we can host our BMC dApp on IPFS.
Prerequisites
To complete this tutorial, you will need:
- Node.js
- Familiarity with Javascript and React basics such as hooks etc
- Installation of the necessary wallets, such as Coinbase Wallet, and Metamask Wallet
- Test KLAY from Faucet.
- RPC Endpoint: you can obtain this from one of the supported endpoint providers.
- Creation of an account on Fleek.
1. Project Setup
In this section, we will initialize our project folder. This folder will contain two separate folders:
- frontend folder - which contains the code for the frontend implementation of our dApp
- smart-contract folder - which contains the smart contract code for our BMC dApp.
To create our project folder, paste this code in your terminal
mkdir BuyMeACoffeecd BuyMeACoffee
1.1. Frontend folder
This folder contains the tools to build our project frontend website. For the sake of this guide, we will be using Next's create-next-app utility to bootstrap our Next.js and Tailwind CSS project. Follow the steps below to install the necessary dependencies and get our frontend folder created:
Step 1 - Creating a frontend folder
Paste the code below in your BuyMeACoffee folder to create a frontend folder using create-next-app utility:
npx create-next-app frontendcd frontend
Step 2 - Downloading the Tailwind dependencies and setting up its config
npm install -D tailwindcss postcss autoprefixernpx tailwindcss init -p
Step 3 - Modifying tailwind.config.js
Navigate to the tailwind.config.js file and replace with the code below:
module.exports = { content: [ "./pages/**/*.{js,ts,jsx,tsx}", "./components/**/*.{js,ts,jsx,tsx}", ], theme: { extend: {}, }, plugins: [],}
Step 4 - Replacing the code in styles/global.css
Navigate to the styles/global.css file and replace with the code below:
@tailwind base;@tailwind components;@tailwind utilities;
We have successfully set up our frontend project folder. More will be discussed later on. The next step is to set up the smart contract folder.
1.2. Smart Contract Folder
This folder contains the smart contract for our BuyMeACoffee functionality. Follow the steps below to install the necessary dependencies and get our smart contract folder created:
Step 1 - Creating the smart contract folder
To create this folder, navigate to the project directory: BuyMeACoffee and create a smart-contract folder by running the command below:
cd ..mkdir smart-contractcd smart-contract
Step 2 - Generating a hardhat project template
This template is suitable for writing, testing and deploying smart contracts. Firstly, start a new npm project by running the code below in your terminal:
npm init -y
This should create a package.json file for you that looks like this:
{ "name": "buymeacoffee", "version": "1.0.0", "description": "", "main": "index.js", "scripts": { "test": "echo \"Error: no test specified\" && exit 1" }, "keywords": [], "author": "", "license": "ISC"}
Then, install hardhat and other dependencies such as hardhat-toolbox and dotenv. To do so, replace your package.json file with the code below:
{ "name": "buymeacoffee", "devDependencies": { "@nomicfoundation/hardhat-toolbox": "^2.0.2", "hardhat": "^2.14.0" }, "dependencies": { "dotenv": "^16.0.3" }}
Finally, run npm install in your terminal.
After successfully installing all the dependencies(hardhat, hardhat-toolbox, dotenv), you can confirm hardhat installation by:
a. Checking the current version:
npx hardhat --version
Your console should print out the current version installed which in our case is 2.14.0.
b. Viewing your project directory. Your current directory should include:
- contracts/ – this is the folder containing the smart contract.
- scripts/ – this folder contains code that deploys your contracts on the blockchain network
- test/ – this folder contains all unit tests that test your smart contract
- hardhat.config.ts – this file contains configurations important for the work of Hardhat and the deployment of smart contracts.
2. Creating a Buy Me A Coffee Smart Contract
In this section we will be creating the smart contract that houses the BMC functionality. To get started, navigate to your contracts folder, create a new file named BuyMeACoffee.sol and paste this code below:
// SPDX-License-Identifier: UNLICENSEDpragma solidity ^0.8.9;contract BuyMeACoffee { // event to emit when a message is sent with tip event NewCoffee(address indexed _sender, string name, string _message, uint256 _timestamp); // address of contract deployer address payable owner; constructor() { // stores deployer as owner owner = payable(msg.sender); } // struct of BuyMeACoffe Tx struct BuyCoffee { address sender; string name; uint timestamp; string message; } // maps id to BuyCoffee struct mapping (uint => BuyCoffee) idToBuyCoffee; // id uint public coffeeId; // buy coffee function function buyCoffee(string memory name, string memory message) public payable { // Must accept more than 0 KLAY for a coffee. require(msg.value > 0, "Tip must be greater than zero"); coffeeId++; // Add the coffee tx to storage BuyCoffee storage coffee = idToBuyCoffee[coffeeId]; coffee.message = message; coffee.name = name; coffee.sender = msg.sender; coffee.timestamp = block.timestamp; // Emit a NewCoffee event with details about the coffee tx. emit NewCoffee(msg.sender, name, message, block.timestamp); } // withdraw coffee tips to the contract owner function withdrawCoffeTips() public { require(_owner == msg.sender, "Not owner"); require(owner.send(address(this).balance) ); } // get all coffee function getAllCoffee(uint _id) public view returns(BuyCoffee[] memory c){ require(_id <= coffeeId, "Non-existent id"); c = new BuyCoffee[](_id); for(uint i = 0; i < _id; i++) { c[i] = idToBuyCoffee[i + 1]; } }}
Let's quickly go over what each line of code does:
The NewCoffee event is emitted when a buyCoffee function is executed. It logs out the address of the sender, the name of the sender, the message sent, and the timestamp.
Next is the owner variable, which represents the contract deployer. We then set the msg.sender to be the owner of the contract in our constructor.
The coffeeId was created to keep track of the coffee transaction created.
Subsequently we declared a buyMeACoffee struct, which stores all the data related to a coffee transaction; address sender, string name, uint timestamp, string message. We then mapped this struct to an id using the idToBuyCoffee variable.
The buyCoffee function is the core implementation of BMC smart contract. It is a payable function which takes in two parameters, the name and address of the sender. It checks if the KLAY amount sent in is greater than zero. Next it increments the coffeeId, then it adds the coffee tx or info to the blockchain. Finally it emits a NewCoffee event, which entails the details of the coffee tx.
We created a withdraw() function to withdraw the total balance of the contract (address(this).balance) to the owner.
Finally, a getAllCoffee() function was created. It returns all the coffee transactions created overtime.
Now that we have completed writing our BMC smart contract, the next step is to test the functionalities of our smart contract, deploy and interact with the smart contract on Klaytn Testnet Baobab.
3. Testing the contract’s functionalities using scripts
In this section, we will be writing scripts to test the functionality of our smart contract . To get started, navigate to your scripts folder, create a new file named bmc-sample.js and paste the following code in it:
const hre = require("hardhat");// Logs the KLAY balances of a specific address.async function getBalance(address) { const balanceBigInt = await hre.ethers.provider.getBalance(address); return hre.ethers.utils.formatEther(balanceBigInt)}// Logs the KLAY balances for a list of addresses.async function getBalances(addresses) { let idx = 0; for (const address of addresses) { console.log(`address ${idx} balances`, await getBalance(address)); idx++; }}// Logs all the coffee info stored on-chain from coffee tx.async function getAllCoffee(memos) { for (const memo of memos) { const timestamp = memo.timestamp; const sender = memo.sender; const name = memo.name; const message = memo.message console.log(`At ${timestamp}, ${name}, with ${sender}, said: "${message}"`); }}async function main() { const [owner, tipper1, tipper2, tipper3 ] = await hre.ethers.getSigners(); const BuyMeACoffee = await hre.ethers.getContractFactory("BuyMeACoffee"); const buyMeACoffe = await BuyMeACoffee.deploy(); await buyMeACoffe.deployed(); console.log(`BuyMeACoffee Contract Address`, buyMeACoffe.address); // (========Check Balance==========) const addressses = [owner.address, tipper1.address, buyMeACoffe.address]; console.log("======GET BALANCE======="); await getBalances(addressses); // Buy Coffee for owner const tip = {value: hre.ethers.utils.parseEther("1")} await buyMeACoffe.connect(tipper1).buyCoffee("Alice", "Hi Jude", tip); await buyMeACoffe.connect(tipper2).buyCoffee("Bob", "Hi Alice", tip); await buyMeACoffe.connect(tipper3).buyCoffee("Japhet", "Hi Ox", tip); // check balance after tipping console.log("======GET BALANCE AFTER TIPPING======="); await getBalances(addressses); // withdraw coffee tips await buyMeACoffe.connect(owner).withdrawCoffeTips(); // check balance after withdrawing tip console.log("======GET BALANCE AFTER WITHDRAWING TIP======="); await getBalances(addressses); // get the current coffee tx id. const coffeeId = await buyMeACoffe.coffeeId() const id = coffeeId.toString(); console.log(coffeeId.toString()); // get all existing coffee tx const allCoffee = await buyMeACoffe.getAllCoffee(id); await getAllCoffee(allCoffee);}// We recommend this pattern to be able to use async/await everywhere// and properly handle errors.main().catch((error) => { console.error(error); process.exitCode = 1;});
As always, lets go over what each line of code does:
You will notice that at the top of the code, there exist some helper functions for getting the balances of both a single address and multiple addresses. Also in the code exists the main function which houses the functionality of testing our smart contract.
Let's do a walk through of the code in the main() function.
First we set the list of accounts (owner, tipper1, tipper2, tipper3) for test purposes by calling await hre.ethers.getSigners()
Next we created a contract instance and deployed it. In this case the BuyMeACoffee.sol contract.
Then, we set a list of addressees, checked their balances using the getBalances() function. We then called the buyCoffee function on three different instances. Next we checked each addresses balance after the coffee transaction.
That said, we then called the withdraw function to withdraw all funds to the owner address. Next we checked the addresses balance after withdrawal.
Finally, we got all the coffee transactions in the smart contract by calling the getAllCoffee() function. To see the script in action, run the command below:
npx hardhat run scripts/bmc-coffee.js
You should have an output in your terminal that looks like this:
Ayomitans-MacBook-Pro:smart-contract oxpampam$ npx hardhat run scripts/bmc-sample.jsBuyMeACoffee Contract Address 0x5FbDB2315678afecb367f032d93F642f64180aa3======GET BALANCE=======address 0 balances 9999.998295071875address 1 balances 10000.0address 2 balances 0.0======GET BALANCE AFTER TIPPING=======address 0 balances 9999.998295071875address 1 balances 9998.999752128832448226address 2 balances 3.0======GET BALANCE AFTER WITHDRAWING TIP=======address 0 balances 10002.998249102355276178address 1 balances 9998.999752128832448226address 2 balances 0.03At 1686307885, Alice, with 0x70997970C51812dc3A010C7d01b50e0d17dc79C8, said: "Hi Jude"At 1686307886, Bob, with 0x3C44CdDdB6a900fa2b585dd299e03d12FA4293BC, said: "Hi Alice"At 1686307887, Japhet, with 0x90F79bf6EB2c4f870365E785982E1f101E93b906, said: "Hi Ox"
4. Deploying BMC Smart contract
4.1 Deploying BMC Smart contract to Klaytn Testnet
After successfully testing the functionalities of our BMC smart contract, let’s proceed to deploy to the Klaytn Testnet Baobab in the following steps:
Step 1 - Creating a .env file
Now create your .env file in the project folder. This file helps us load environment variables from a .env file into process.env.
Paste this command in your terminal to create a .env file
touch .env
After creating your file, lets configure our .env file to look like this:
BAOBAB_URL= "Your RPC URL"PRIVATE_KEY= "your private key copied from metamask wallet"
Step 2 - Setting up Hardhat Configs
Paste this configurations in your hardhat.config.js file
require("@nomicfoundation/hardhat-toolbox");require("dotenv").config();const BAOBAB_URL = process.env.BAOBAB_URL;const PRIVATE_KEY = process.env.PRIVATE_KEY;/** @type import('hardhat/config').HardhatUserConfig */module.exports = { solidity: "0.8.18", defaultNetwork: "hardhat", networks: { baobab: { url: BAOBAB_URL, accounts: [PRIVATE_KEY], } }};
Step 3 - Creating deployment scripts
To create a new deployment script that deploys this smart contract to a specified network, create a new file scripts/deploy.js and paste in the code below:
const hre = require("hardhat");async function main() { const BuyMeACoffee = await hre.ethers.getContractFactory("BuyMeACoffee"); const buyMeACoffe = await BuyMeACoffee.deploy(); await buyMeACoffe.deployed(); console.log(`BuyMeACoffee Contract Address`, buyMeACoffe.address);}// We recommend this pattern to be able to use async/await everywhere// and properly handle errors.main().catch((error) => { console.error(error); process.exitCode = 1;});
Now that we have our configurations all set, let’s deploy to Klaytn Testnet Baobab by running the command below:
npx hardhat run scripts/deploy.js --network baobab
Once the contract deploys successfully, your terminal should look like this:
BuyMeACoffee Contract Address 0x0bEd1ed7B205d8c18e38A20b5BaB6e265A96d1AC
Congratulations on deploying your BMC smart contract on Klaytn Baobab Network! You can verify this transaction on Klaytnscope by pasting your address in the search field.
4.2 Interacting with BMC Smart Contract
In this section, you will learn how to use hardhat scripts to withdraw the coffee tips sent into the smart contract. To get started, create a new file withdraw.js in your scripts folder and paste the code below:
const hre = require("hardhat");// contract address of BMC Contractconst buyMeACoffeAddress = "Paste BMC contract address";// address of the contract deployer// useful when calling the withdrawCoffeTips() function// ensure that this address is the SAME address as the original contract deployerconst deployerAddress = "Paste deployer address";// get the balance of a specified addressasync function getBalance(address) { const balanceBigInt = await hre.ethers.provider.getBalance(address); return hre.ethers.utils.formatEther(balanceBigInt)}async function main() { // initialize the deployerAddress to a signer object // this will be useful when calling the withdrawCoffeTips() to the owner address const signer = await hre.ethers.getSigner(deployerAddress); // instantiate the BMC contract const BuyMeACoffee = await hre.ethers.getContractAt("BuyMeACoffee", buyMeACoffeAddress, signer); const balanceBefore = await getBalance(signer.address); const contractBalance = await getBalance(BuyMeACoffee.address); console.log(`Owner balance before withdrawing tips: ${balanceBefore} KLAY`); console.log(`Contract balance before withdrawing tips: ${contractBalance} KLAY`); // Withdraw funds if there are funds to withdraw. if (contractBalance !== "0.0") { console.log("withdrawing funds..") const withdrawCoffeTxn = await BuyMeACoffee.withdrawCoffeTips(); await withdrawCoffeTxn.wait(); // check owner's balance after withdrawing coffee tips const balanceAfter = await getBalance(signer.address); console.log(`Owner balance after withdrawing tips ${balanceAfter} KLAY`); } else { console.log("no funds to withdraw!"); }}// We recommend this pattern to be able to use async/await everywhere// and properly handle errors.main().catch((error) => { console.error(error); process.exitCode = 1;});
As you can see from the code above, having instantiated the BMC contract, the scripts will execute the withdrawCoffeTips function only when the contract balance is greater than zero. Makes sense right?
Yes! In the event where the contract has no funds, it prints "No funds to withdraw" hence saving us some gas from contract invocation.
To see this in action, lets run the script below:
npx hardhat run scripts/withdraw.js --network baobab
On successful execution of the scripts, your terminal should look like this:
Ayomitans-MacBook-Pro:smart-contract oxpampam$ npx hardhat run scripts/withdraw.js --network baobabOwner balance before withdrawing tips: 155.8337532 KLAYContract balance before withdrawing tips: 2.0 KLAYwithdrawing funds..Owner balance after withdrawing tips 157.83298835 KLAY
You can see from the output that the owner balance increased by 2 KLAY after withdrawing the coffee tips.
Now that we have our contract deployed and all functionalities tested, it is time to build out the frontend.
The frontend will bring the BMC functionality to live i.e we can now visualize how we interact with the BMC smart contract.
5. Building the BMC Frontend with React and Web3Onboard
In this section, we will be building our dApp frontend website with Next.js and Web3Onbaord. To get started, you have to navigate to the frontend folder previously created.
cd ..cd frontend
The next step is to install the necessary dependencies to get our BMC frontend website up and running. The following are the packages to be installed:
- Web3Onboard packages: Web3-Onboard is a chain-agnostic wallet library that supports multi-wallet compatibility in your dApp built on EVM-compatible networks like Klaytn Blockchain.
- ethers.js: Web3-Onboard provider can be used with libraries like ethers.js andweb3.js. In this guide, we will use ethers.js to make Klaytn blockchain calls like getting the user's account, fetch balance, sign transaction, send transaction, read from and write to the smart contract.
Important Note: We need to edit 2 files in the frontend/pages folder
- _app.js
- index.js
5.1 Setting up Web3Onboard Provider and Wallet Modules
Step 1 - Installing @web3-onboard/react
npm install @web3-onboard/react
In your _app.js file, import the web3OnboardProvider and init function. More to be discussed later.
import { Web3OnboardProvider, init } from '@web3-onboard/react'
Step 2 - Installing and Instantiating Wallet Modules
In this step, you can add as many wallets to be supported in your dApp using the wallet modules. But for this guide, you will add Coinbase Wallet, WalletConnect, Injected Wallets to your web3-Onboard implementation.
npm install @web3-onboard/coinbase // Coinbase Walletnpm install @web3-onboard/walletconnect // WalletConnectnpm install @web3-onboard/injected-wallets // Used to connect to Metamask
In your _app.js file, import and instantiate the wallet modules to integrate with your dApp. Note that each module has its own unique options parameters to pass in, such as a fallback JSON RPC URL or default chain ID.
import coinbaseWalletModule from "@web3-onboard/coinbase";import walletConnectModule from "@web3-onboard/walletconnect";import injectedModule from "@web3-onboard/injected-wallets";const coinbaseWalletSdk = coinbaseWalletModule();const walletConnect = walletConnectModule();const injected = injectedModule();const modules = [coinbaseWalletSdk, walletConnect, injected];
Step 3 - Installing ethers
npm install --save ethers
Step 4 - Instantiating Web3Onboard using the Web3OnboardProvider
Web3OnboardProvider provides a better way to manage global state. It simplifies wrapping the provider object around your App and the initialized Web3Onboard instance will be available in all children components.
Init function initializes web3-Onboard and makes it available for all hooks to use.
To see this in action, paste the code below the previous code in your _app.js file:
const ETH_MAINNET_RPC_URL = `https://ethereum-mainnet-rpc.allthatnode.com/1d322388ZEPI2cs0OHloJ6seI4Wfy36N`;const KLAYTN_MAINNET_URL = `https://klaytn-mainnet-rpc.allthatnode.com:8551/1d322388ZEPI2cs0OHloJ6seI4Wfy36N`;const KLAYTN_BAOBAB_URL = `https://klaytn-baobab-rpc.allthatnode.com:8551/1d322388ZEPI2cs0OHloJ6seI4Wfy36N`; const web3Onboard = init({ wallets: modules, chains: [ { id: "0x1", // chain ID must be in hexadecimal token: "ETH", namespace: "evm", label: "Ethereum Mainnet", rpcUrl: ETH_MAINNET_RPC_URL }, { id: "0x2019", // chain ID must be in hexadecimal token: "KLAY", namespace: "evm", label: "Klaytn Mainnet", rpcUrl: KLAYTN_MAINNET_URL }, { id: "0x3e9", // chain ID must be in hexadecimel token: "KLAY", namespace: "evm", label: "Klaytn Testnet", rpcUrl: KLAYTN_BAOBAB_URL }, // you can add as much supported chains as possible ], appMetadata: { name: "Klaytn-web3-onboard-App", // change to your dApp name icon: "paste your icon url" logo: "paste your logo url" description: "Web3Onboard-Klaytn", recommendedInjectedWallets: [ { name: "Coinbase", url: "https://wallet.coinbase.com/" }, { name: "MetaMask", url: "https://metamask.io" } ] } })export default function App({ Component, pageProps }) { return ( <Web3OnboardProvider web3Onboard={web3Onboard}> <Component {...pageProps} /> </Web3OnboardProvider> )}
Having set up our _app.js file which grants our App a provider object and web3Onboard instance available in all children components, next is to build out front-end logic in our index.js file
- Index.js
This page handles wallet connection and sending of coffee to the BMC smart contract which is to be withdrawn by the contract deployer.
import React, { useEffect, useState } from 'react';import { useConnectWallet } from '@web3-onboard/react'import abi from "../utils/BuyMeACoffee.json"import { ethers } from "ethers";export default function Home() { const [name, setName] = useState(""); const [message, setMessage] = useState(""); const [coffee, setGetCoffee] = useState([]); const [coffeeContract, setCoffeeContract] = useState(); const [{ wallet, connecting }, connect, disconnect] = useConnectWallet(); const contractAddress = "Paste BMC contract address"; const contractABI = abi.abi; const getCoffee = async () => { try { console.log("getting coffee Id") const coffeeId = await coffeeContract.coffeeId(); console.log(coffeeId.toString()); const getCoffee = await coffeeContract.getAllCoffee(coffeeId.toString()); setGetCoffee(getCoffee); } catch (error) { console.log(error); } }; useEffect(() => { let ethersProvider if (wallet) { ethersProvider = new ethers.BrowserProvider(wallet.provider, 'any') } if (ethersProvider) { try { const getCoffeContract = async () => { const signer = await ethersProvider.getSigner(); const buyMeACoffee = new ethers.Contract(contractAddress, contractABI, signer); setCoffeeContract(buyMeACoffee) } getCoffeContract(); } catch (error) { console.log(error); } } }, [wallet]) useEffect(() => { const onNewCoffee = (from, timestamp, name, message) => { console.log("Coffee received: ", from, timestamp, name, message); setGetCoffee((prevState) => [ ...prevState, { address: from, timestamp: new Date(timestamp * 1000), message, name } ]); }; if (wallet && coffeeContract) { getCoffee() coffeeContract.on("NewCoffee", onNewCoffee); } else { console.log("provider not initialized yet"); } }, [wallet, coffeeContract]) const onNameChange = (event) => { setName(event.target.value); } const onMessageChange = (event) => { setMessage(event.target.value); } const buyCoffee = async (e) => { e.preventDefault(); try { if (!wallet && !coffeeContract) { console.log("provider not initialized yet"); return; } console.log("buying coffee..") const coffeeTxn = await coffeeContract.buyCoffee(name, message, {value: ethers.parseEther("1.0")}); const coffeTx = await coffeeTxn.wait(); console.log("mined ", coffeTx.hash); console.log("coffee sent!"); // clear target value fields e.target.inputName.value = ""; e.target.inputAmount.value = ""; // Clear the form fields. setName(""); setMessage(""); // set all coffees await getCoffee(); } catch (error) { console.log(error); } }; return ( <main className='coffeeMain max-w-8xl min-h-[100vh] p-10 bg-black mt-0 shadow-2xl m-auto flex flex-col justify-center items-center bg-[url("https://static.vecteezy.com/system/resources/previews/001/330/185/original/coffee-cup-on-hand-drawn-doodle-background-free-vector.jpg")]'> <div className='coffeContent'> <div className='compOne flex flex-col justify-center items-center'> <h1 className='text-white text-center text-2xl'>Buy me a coffee</h1> { wallet ? ( <div> <form onSubmit={buyCoffee} className="flex flex-col justify-center items-center mt-4"> <input type="text" name='inputName' placeholder="Enter your name" className="p-5 rounded-md bg-black text-white border-solid border-2 border-white outline-0" onChange={onNameChange} /> <input type="text" name='inputAmount' placeholder="Send your message" className="p-5 rounded-md bg-black text-white border-solid border-2 border-white mt-3 outline-0" onChange={onMessageChange}/> <input type="submit" value="Send Coffee" className="p-3 mt-4 rounded-2xl bg-white text-black cursor-pointer"/> </form> </div> ) : ( <button className='text-black bg-white p-3 rounded-lg mt-3 cursor-pointer' disabled={connecting} onClick={() => (wallet ? disconnect(wallet) : connect())}> {connecting ? 'Connecting' : wallet ? 'Disconnect' : 'Connect'} </button>) } </div> <div className="comp2 flex flex-col justify-normal items-center py-3 px-10"> {wallet && ( <div className="flex mt-5 mb-3"> <h1 className="text-white text-2xl">Coffee Transaction</h1> </div> ) } <div className="coffeeTransaction w-[1300px] flex flex-row gap-5 overflow-x-scroll"> {/* grid gap-4 grid-cols-2 */} {wallet && (coffee.map((coff, id) => { return ( <div key={id} className=" border-solid border-2 border-white p-5 w-auto rounded-2xl mb-3"> <p className=" text-white font-bold">"{coff.message}"</p> <p className=" text-white">From: {coff.name} at {`${new Date(coff.timestamp.toString() * 1000)}`}</p> </div> ) }))} </div> </div> </div> </main> )}
Important notes from the code above
-
Get your contract ABI: The contract ABI specifies to the frontend code what functions are available to call on the smart contract. To get your contract abi, navigate to your smart-contract folder and copy the text in this file following this path artifacts/contracts/BuyMeACoffee.sol/BuyMeACoffee.json. Next we created a utils folder in the frontend/src folder. Then pasted it in a newly created file named BuyMeACoffee.json file.
-
Change BMC Contract address to the address of your BMC deployed contract.
Now if the app isn't already running, you can go to the shell and use npm run dev to start a local server to test out your changes. The website should load in a few seconds and UI should look like this:
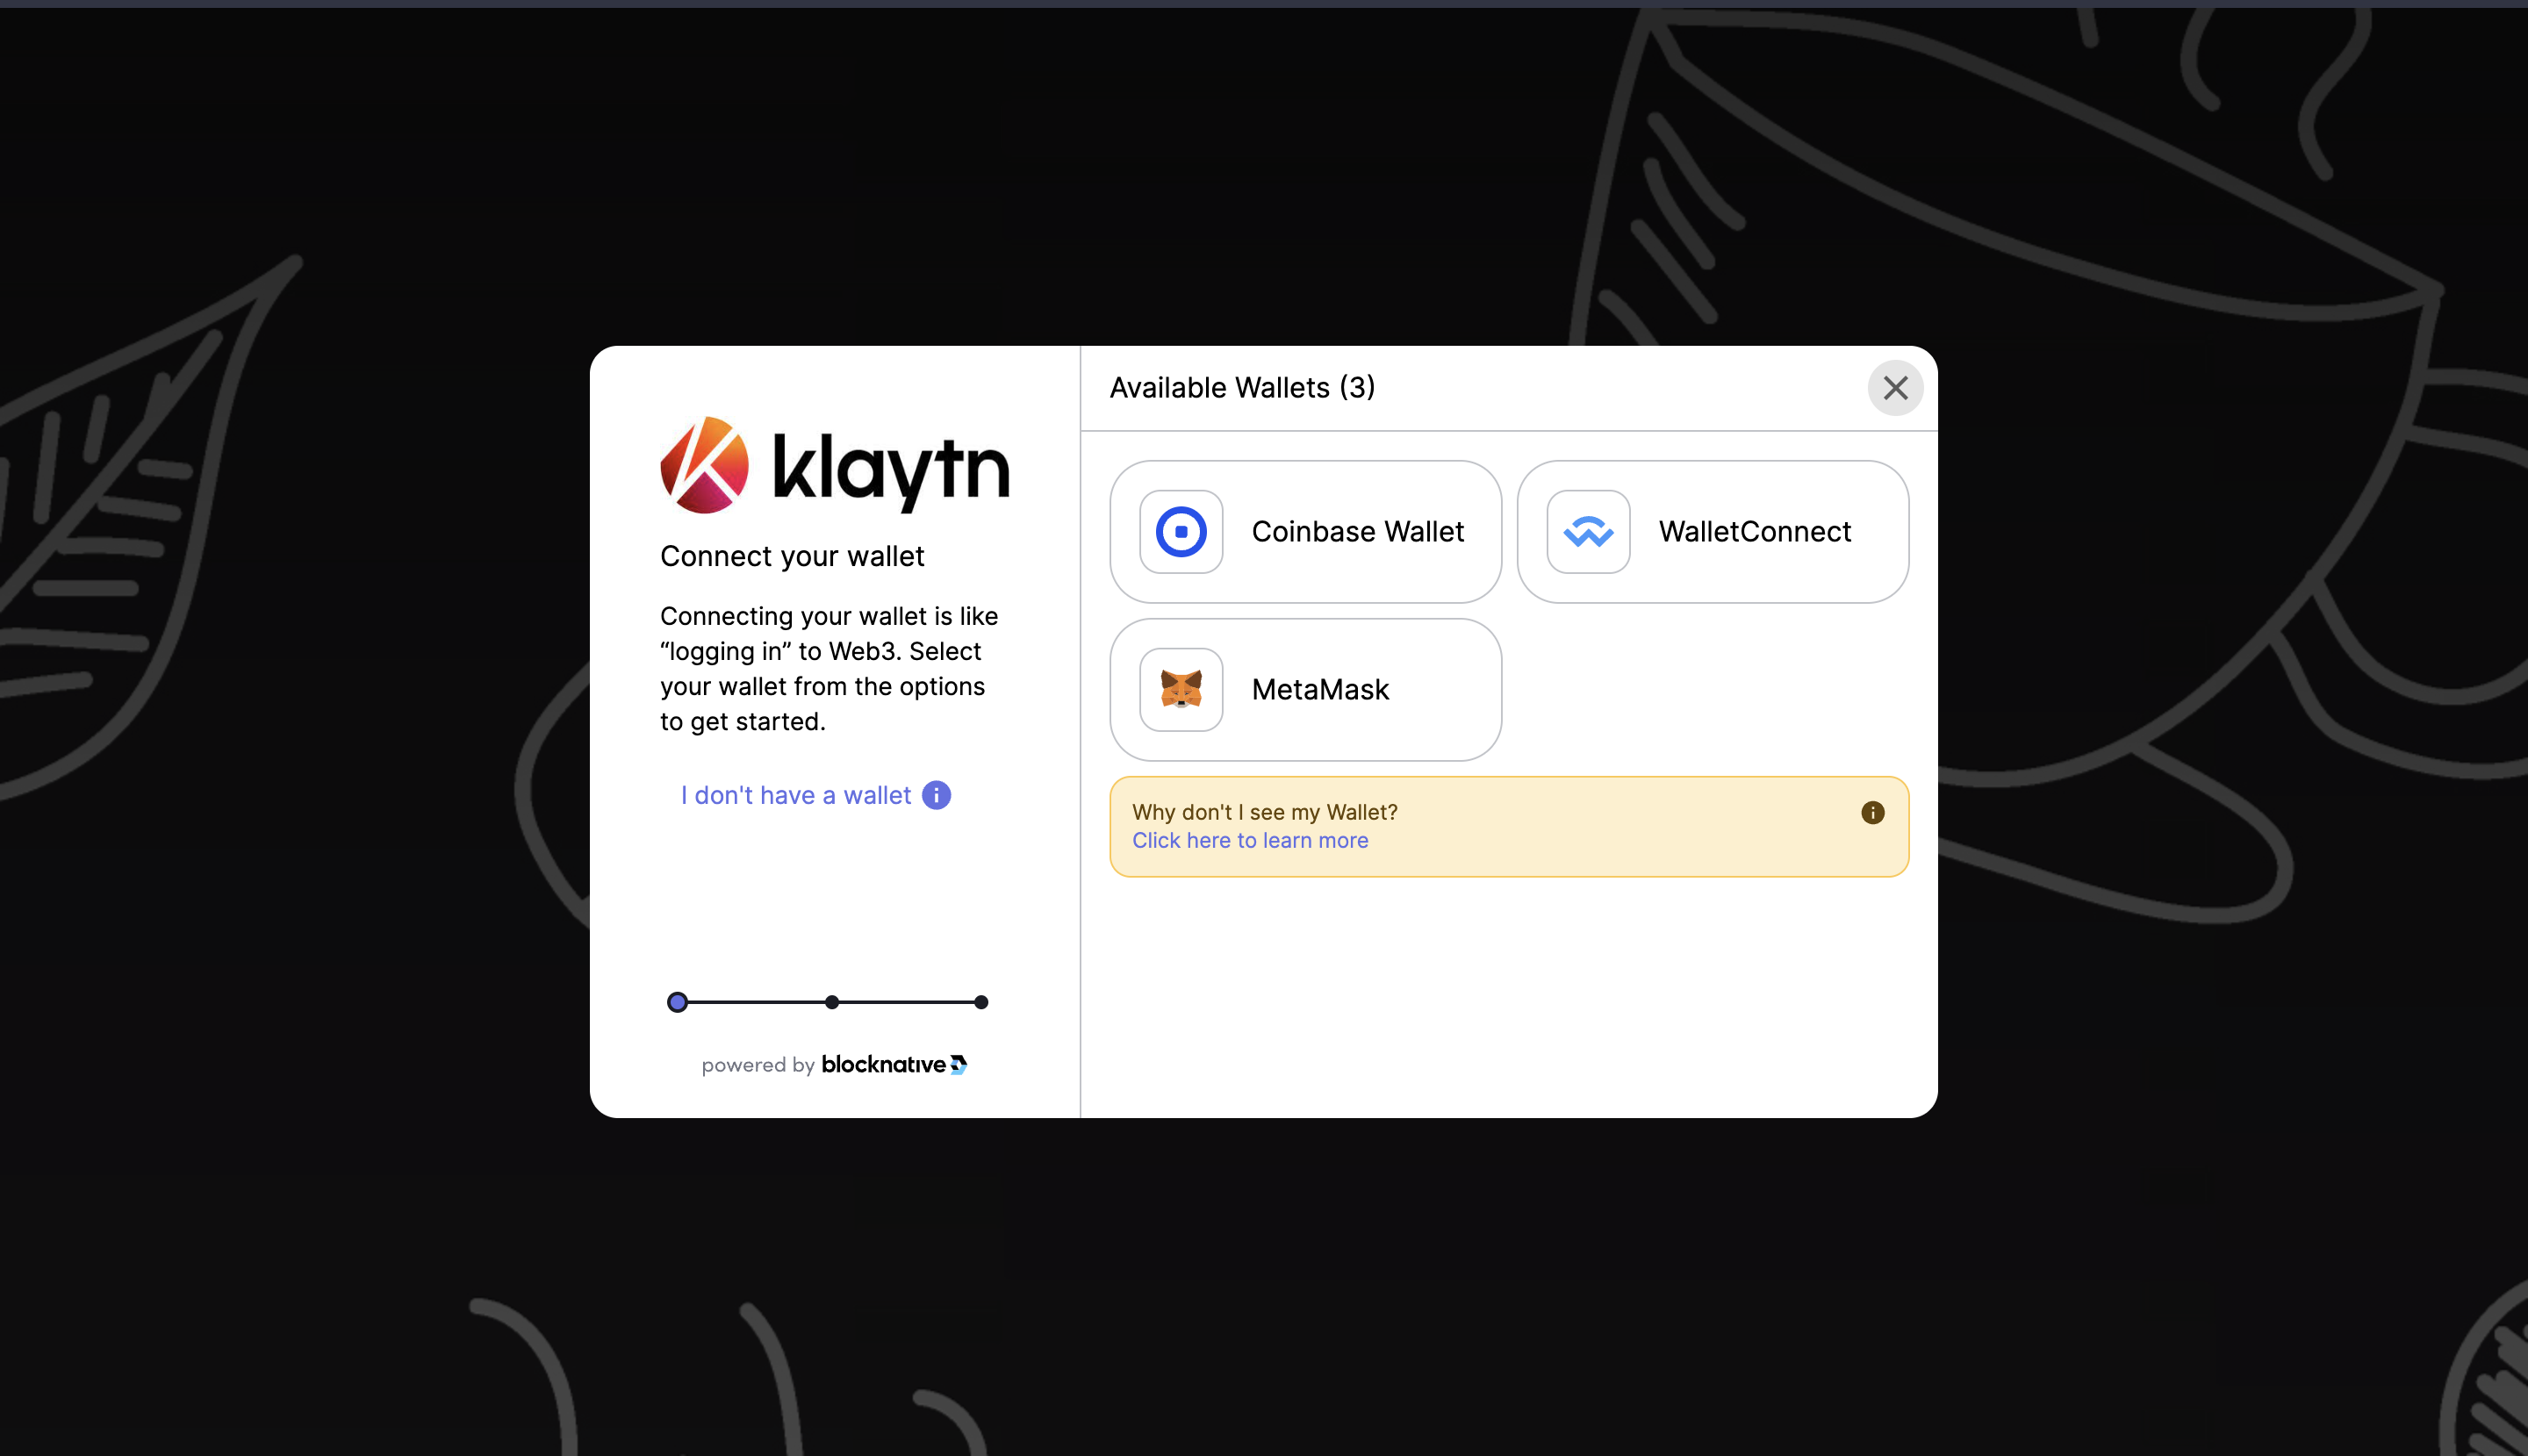
Connect Wallet Page:
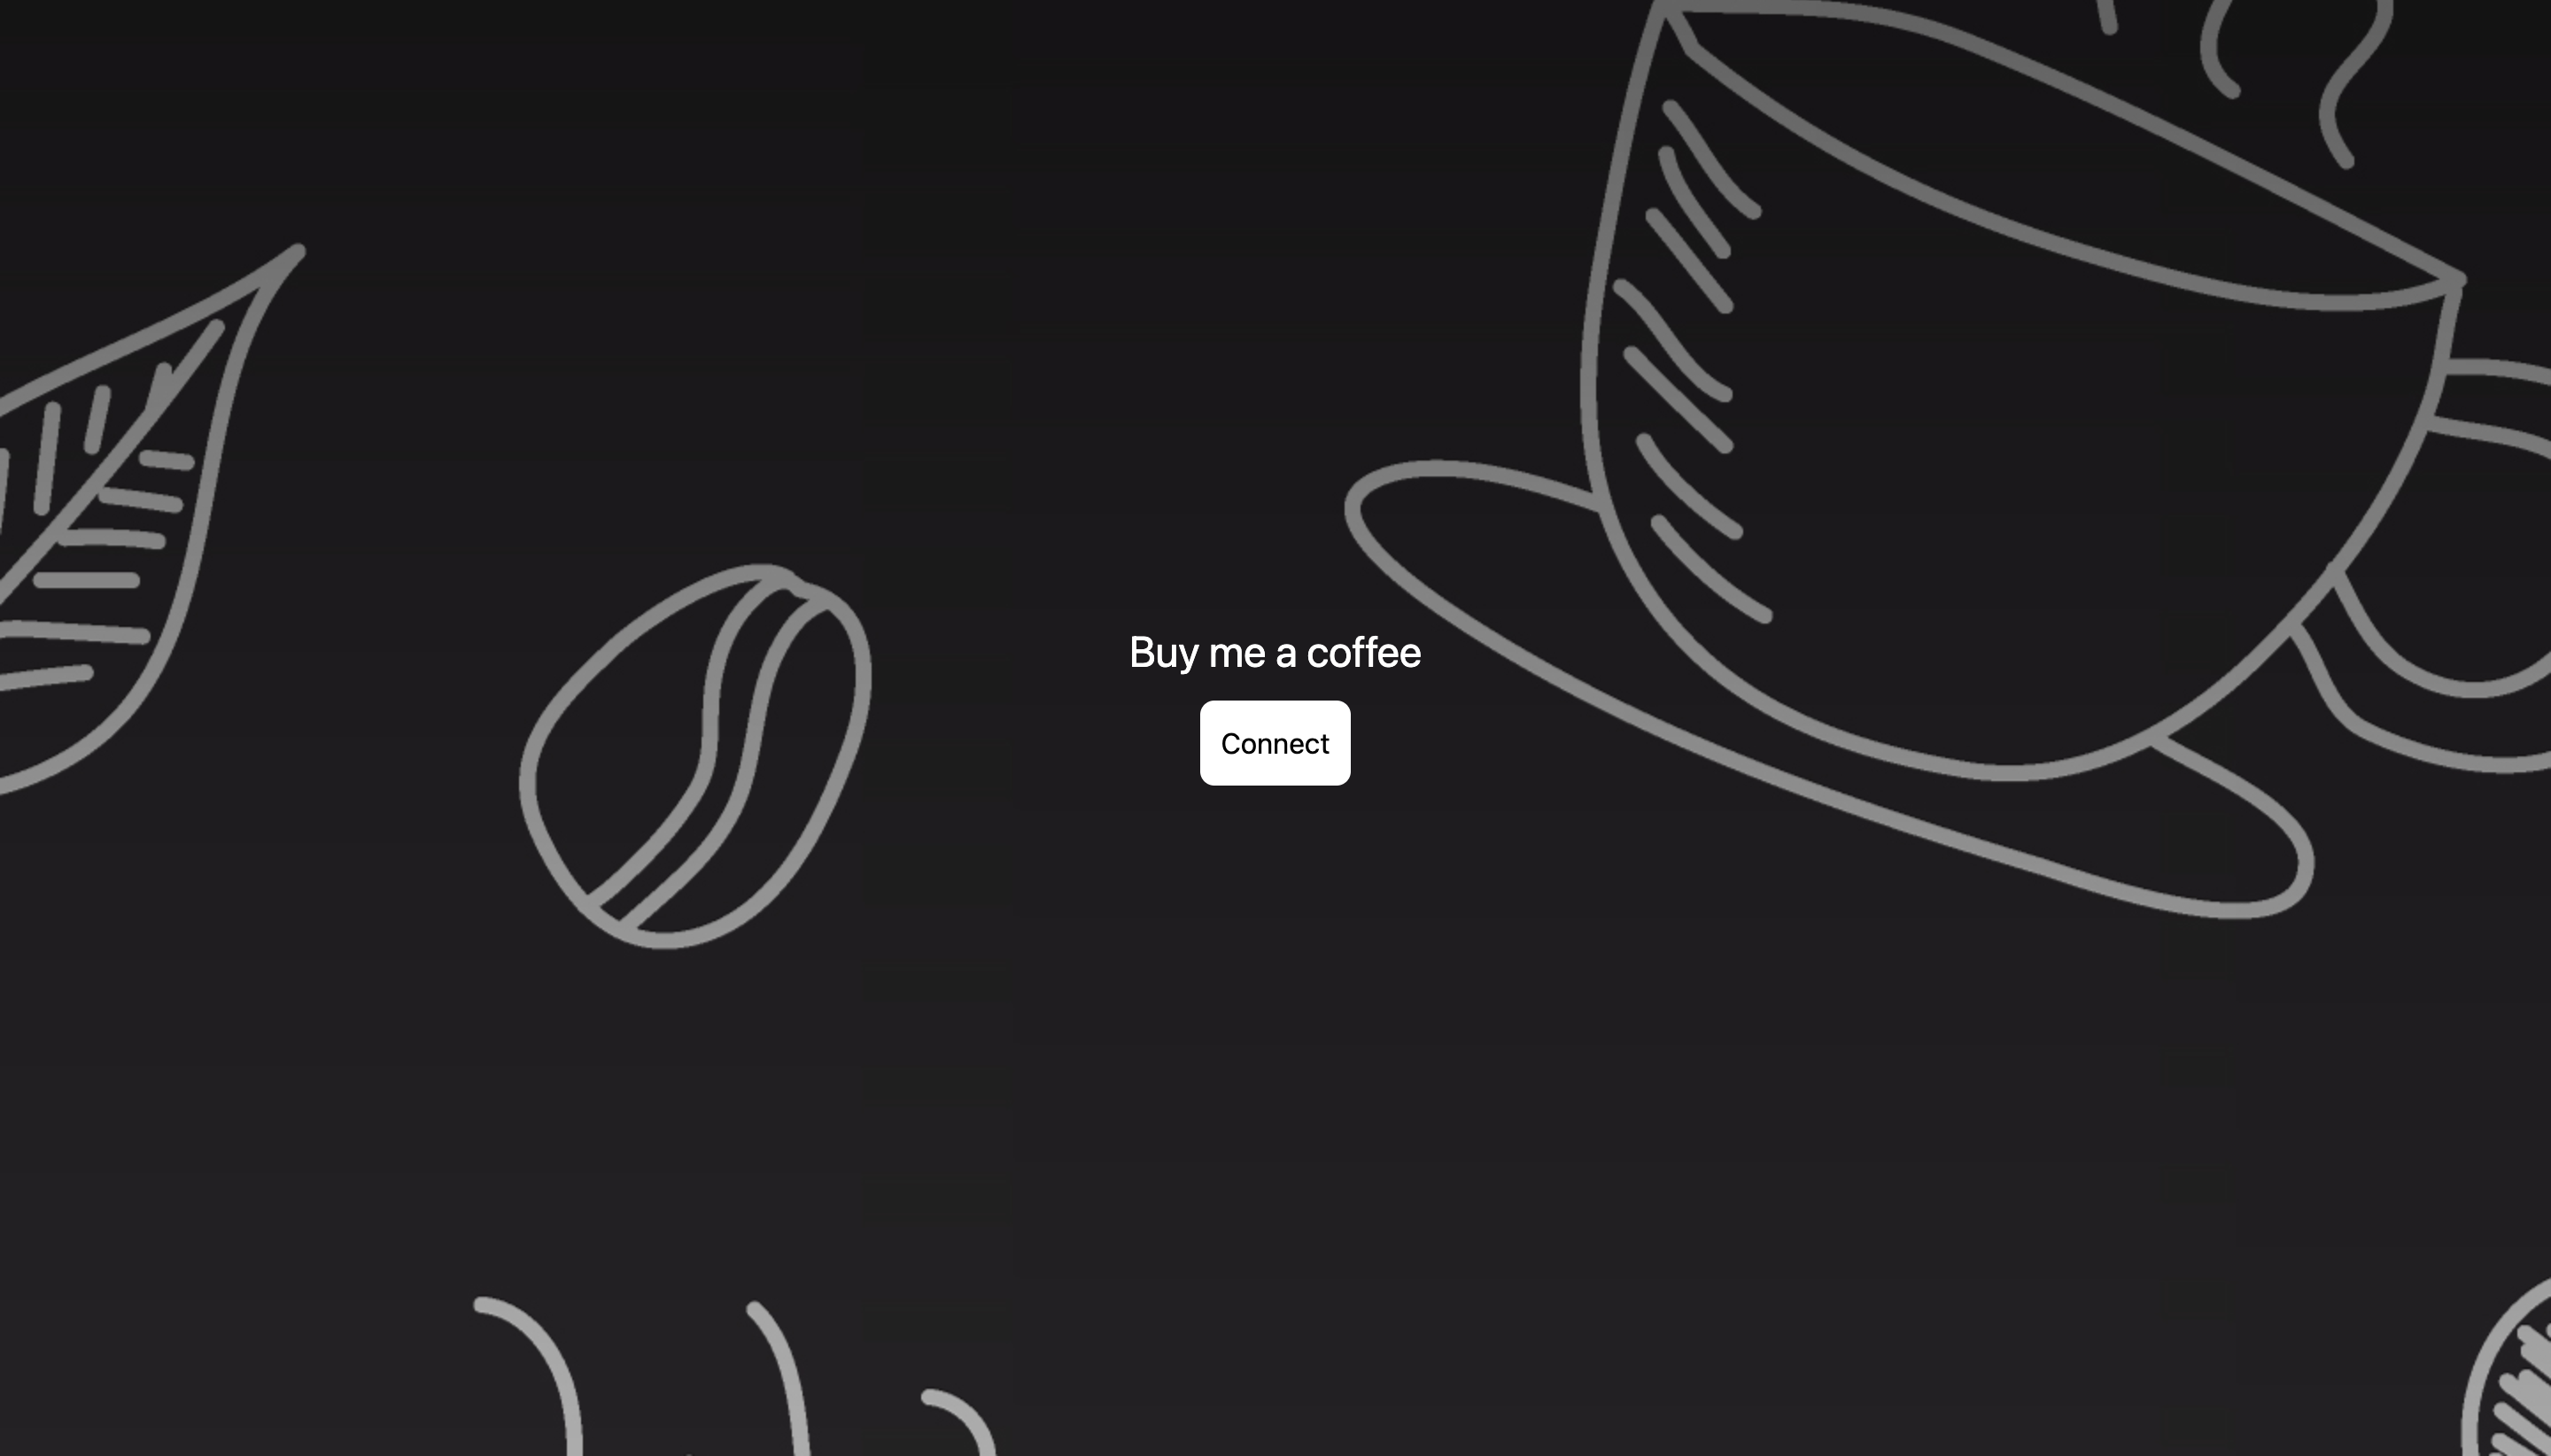
Frontend website to send coffee:

Now let's explore through our website and the code.
You can already see from the above screenshot that when you first visit the dApp, it will ask you to connect a wallet. Next it pops up the list of available wallets initialized in the Web3Onboard instance.
Then you select the wallet of your choice; from the image above, we selected MetaMask. Once you have connected your wallet, you get to see a UI component on the upper right of your website which contains the details of the connected wallet. Also on the page, you will see the coffee transaction form which contains the name and message of the sender, as well as the previous coffee paid into the smart contract by other visitors.
6. Deploying Frontend code on IPFS using Fleek
Fleek is an infrastructure that enables us to build modern sites and apps on IPFS. With fleek your sites or app becomes permissionless, trustless, censorship resistant, and free of centralized gatekeepers. In this tutorial we will be deploying our Next js app to Fleek other than the traditional platforms like Vercel. Yeah you got it! We are deploying a decentralized application to a decentralized hosting platform!
The following are the steps to deploy your BMC dApp to Fleek:
-
Make sure to confirm these configurations in your frontend code:
a. Open package.json and add in the following scripts:
"scripts": {"dev": "next","build": "next build","start": "next start","export": "next export"}b. Paste the code below in your next.config.js file in the root directory:
module.exports = {exportTrailingSlash: true,};
For more information, visit this guide
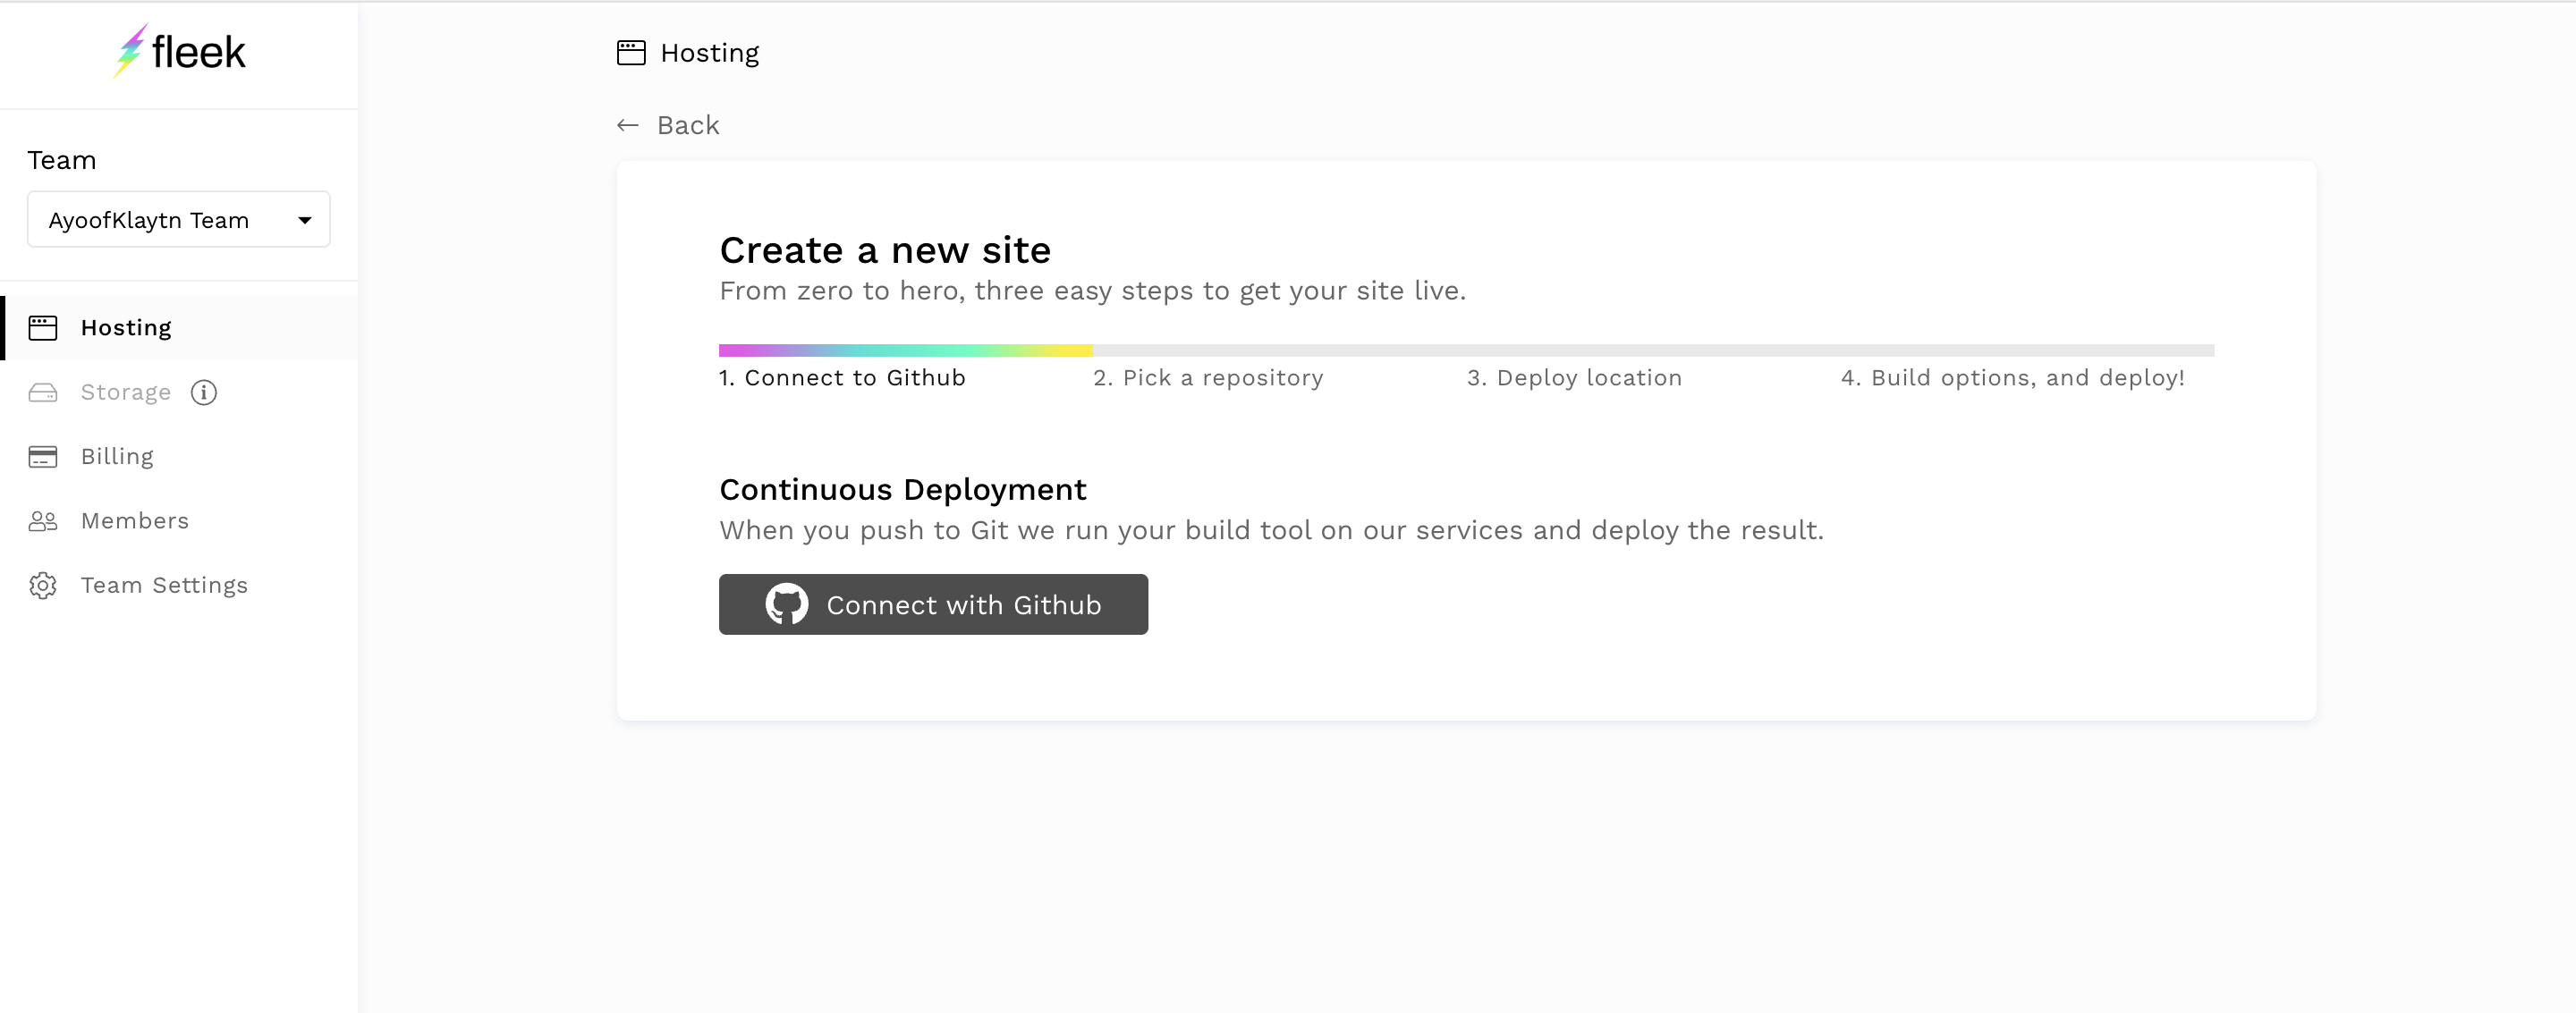
- Navigate to your dashboard on Fleek and click on Add new Site

- Connect your GitHub account to access your repositories.
-
Select the repository you intend to deploy.
-
On the next page,select the Next Js framework in the Basic build setting tab, and Fleek will automatically populate the other fields.
-
Click deploy site
-
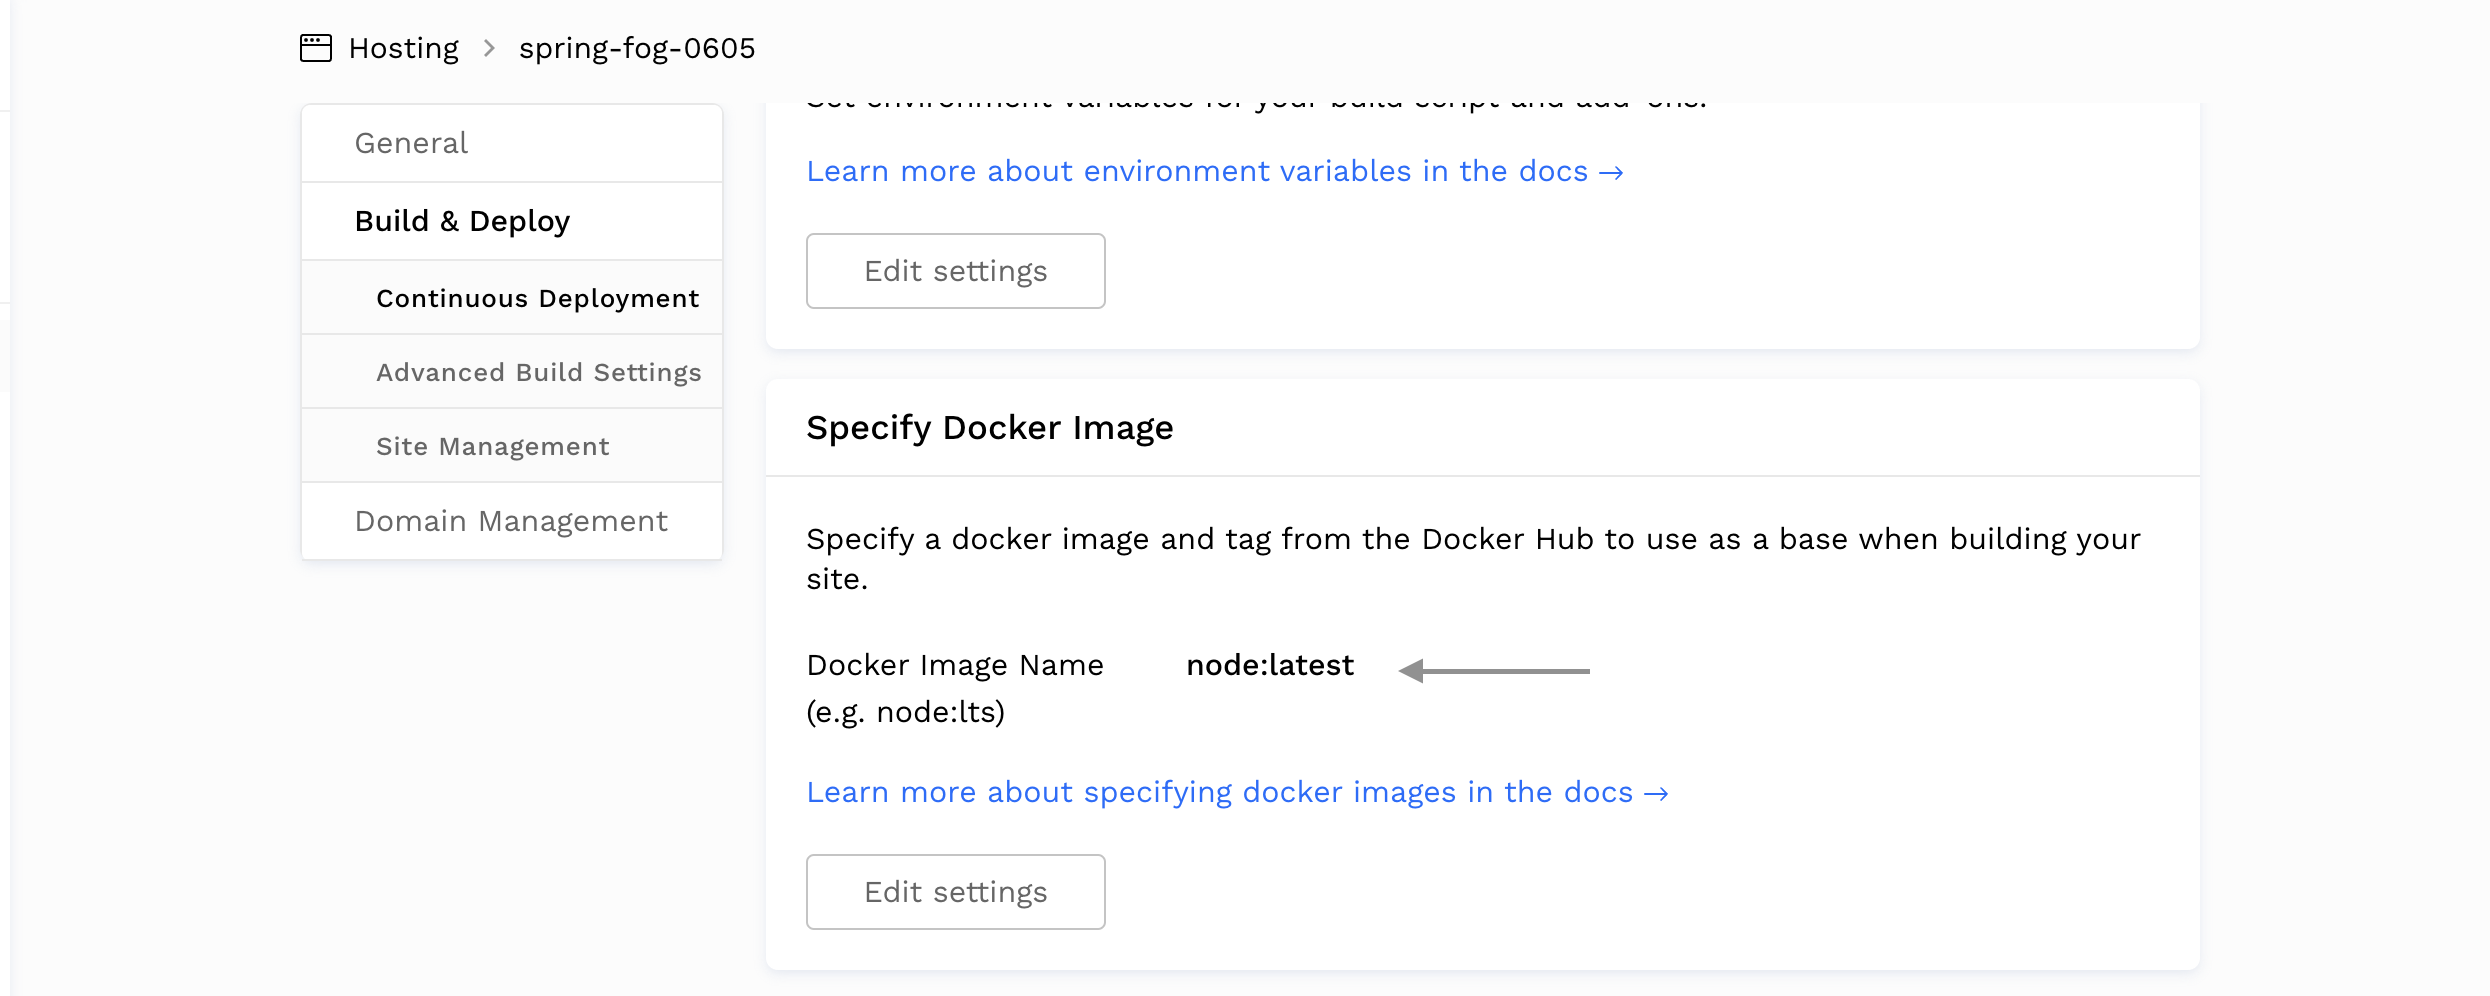
In the event of an npm WARN EBADENGINE Unsupported engine as shown in the image below:
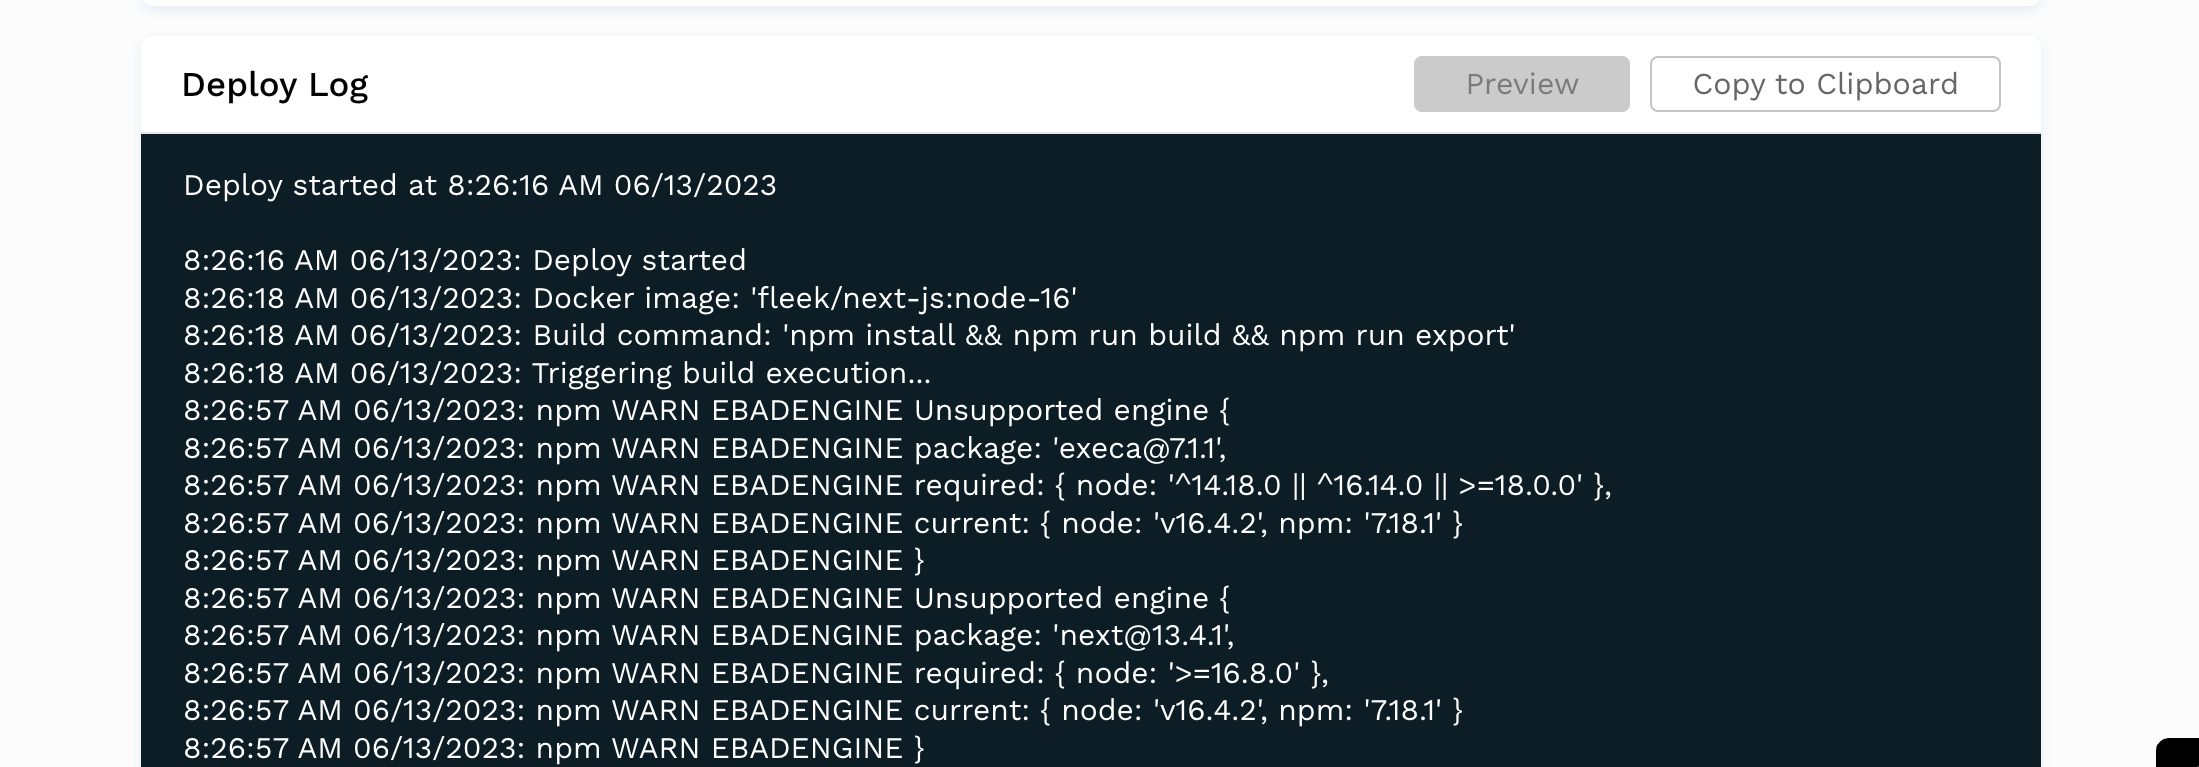
Head over to Deploy setting in the Deploy tab and change the Docker image Name to node:latest as shown in the image below:
- Now your site should build and deploy to IPFS easily.
- Click the link generated to view your website.

Voila! We have our BMC dApp deployed and hosted on IPFS.
7. Conclusion
If you’ve made it this far, congratulations! In this tutorial, you have learned how to create a full stack Buy Me A Coffee dApp using Solidity, NextJs, Web3Onboard and Fleek. This is the first step in creating a decentralized application hosted on a decentralized platform.
From here, you could also explore some other options in your frontend like adding a new input field for the amount of coffee to be sent other than sending 1 KLAY statically. You can have access to the full codebase here on github and also test the website using this link.
If you want more information, visit Klaytn Docs, Web3Onboard Docs, and Fleek Docs. If you have any questions, visit Klaytn Forum.