web3.js

web3.js는 개발자들이 클레이튼과 같은 EVM 호환 블록체인 네트워크와 상호작용할 수 있도록 해주는 JavaScript 라이브러리입니다. 클레이튼은 이더리움 동등성에 대한 기능을 지원하므로, Web3.js와 같은 이더리움 툴을 큰 수정 없이 클레이튼에서 사용할 수 있습니다.
따라서 개발자는 이 호환성을 활용하고 web3.js 라이브러리를 사용하여 Klaytn 노드와 상호작용할 수 있습니다.
In this guide, you'll learn how to use the web3.js library to read data from the blockchain, send a transaction and interact with an existing contract on the Klaytn Network.
전제 조건
- 코드 편집기: VS-Code와 같은 소스 코드 편집기.
- MetaMask: 컨트랙트를 배포하고, 트랜잭션에 서명하고, 컨트랙트와 상호 작용하는 데 사용됩니다.
- RPC 엔드포인트: 지원되는 엔드포인트 공급자 중 하나에서 얻을 수 있습니다.
- Faucet에서 KLAY 테스트: 충분한 KLAY로 계정에 자금을 충전합니다.
- NodeJS 및 NPM
프로젝트 설정
시작하려면 이 가이드에서 생성할 파일을 저장할 프로젝트 디렉터리를 만들어야 합니다.
mkdir web3-jscd web3-js
Web3.js 설치
터미널에서 다음 명령을 실행하여 web3.js를 설치합니다:
npm install web3
Web3.js 초기화하기
In this tutorial, we will create a bunch of scripts file to read data from the blockchain, send transactions, and also interact with existing smart contract. 시작하려면 각 스크립트 파일에 대해 web3.js를 초기화하는 방법을 알아야 합니다.
web3를 스크립트 파일로 가져옵니다.
const { Web3 } = require('web3');
web3 임포트에 성공했다면, 클레이튼 네트워크의 RPC URL로 새로운 web3.js 객체를 인스턴스화하여 클레이튼에 연결해야 합니다. 기존 코드에 아래 코드를 추가합니다:
const url = "RPC URL" const web3 = new Web3(url);
또한 트랜잭션에 서명하려면 개인 키를 추가해야 합니다. 기존 코드에 아래 코드를 추가합니다:
const privateKey = "Paste private key";
블록체인에서 데이터 읽기
블록체인에서 데이터를 읽으려면 다음 명령을 실행하여 프로젝트 폴더에 새 read.js 파일을 생성합니다:
touch read.js
이 파일을 생성한 후 '초기화' 섹션에서 설명한 대로 web3를 초기화합니다. 이 섹션에서는 블록체인에서 데이터(예: blockNumber, KLAY 잔액)를 읽는 방법을 배웁니다.
실제로 작동하는 모습을 보려면 read.js에 다음 코드를 붙여넣으세요.
const { Web3 } = require('web3');const url = "RPC URL"const web3 = new Web3(url);async function getLatestBlock() { const latestBlock = await web3.eth.getBlockNumber(); console.log(latestBlock.toString());}async function getKlayBalance() { const klayBalance = await web3.eth.getBalance("Paste wallet address"); const formatBalance = await web3.utils.fromWei(klayBalance, 'ether'); console.log(`You have ${formatBalance} KLAY`);}// call the following functionsgetLatestBlock();getKlayBalance();
출력
To run the script and read data from the blockchain, run the following command in your terminal:
node read.js
If the transaction was successful, you'll see the block number and user’s KLAY balance logged in your terminal.
블록체인으로 트랜잭션 보내기
블록체인에 트랜잭션을 전송하려면 다음 명령을 실행하여 프로젝트 폴더에 새 send.js 파일을 생성합니다:
touch send.js
이 파일을 생성한 후 '초기화' 섹션에서 설명한 대로 web3를 초기화합니다. 이 섹션에서는 블록체인에 트랜잭션을 전송하는 방법(예: KLAY를 주소로 전송하는 방법)을 배웁니다.
실제로 작동하는 모습을 보려면 send.js에 다음 코드를 붙여넣으세요.
const { Web3 } = require('web3');const url = "RPC URL";const web3 = new Web3(url);const senderPrivateKey = "Paste private key";const senderAddr = "Paste sender address";const recipientAddr = "Paste recipient address";async function sendTx() { const tx = await web3.eth.accounts.signTransaction({ from: senderAddr, to: recipientAddr, value: 90000000000, maxFeePerGas: 250000000000, maxPriorityFeePerGas: 250000000000, gas: 21000, }, privateKey); const receipt = await web3.eth.sendSignedTransaction(tx.rawTransaction); console.log(receipt);}// call functionsendTx();
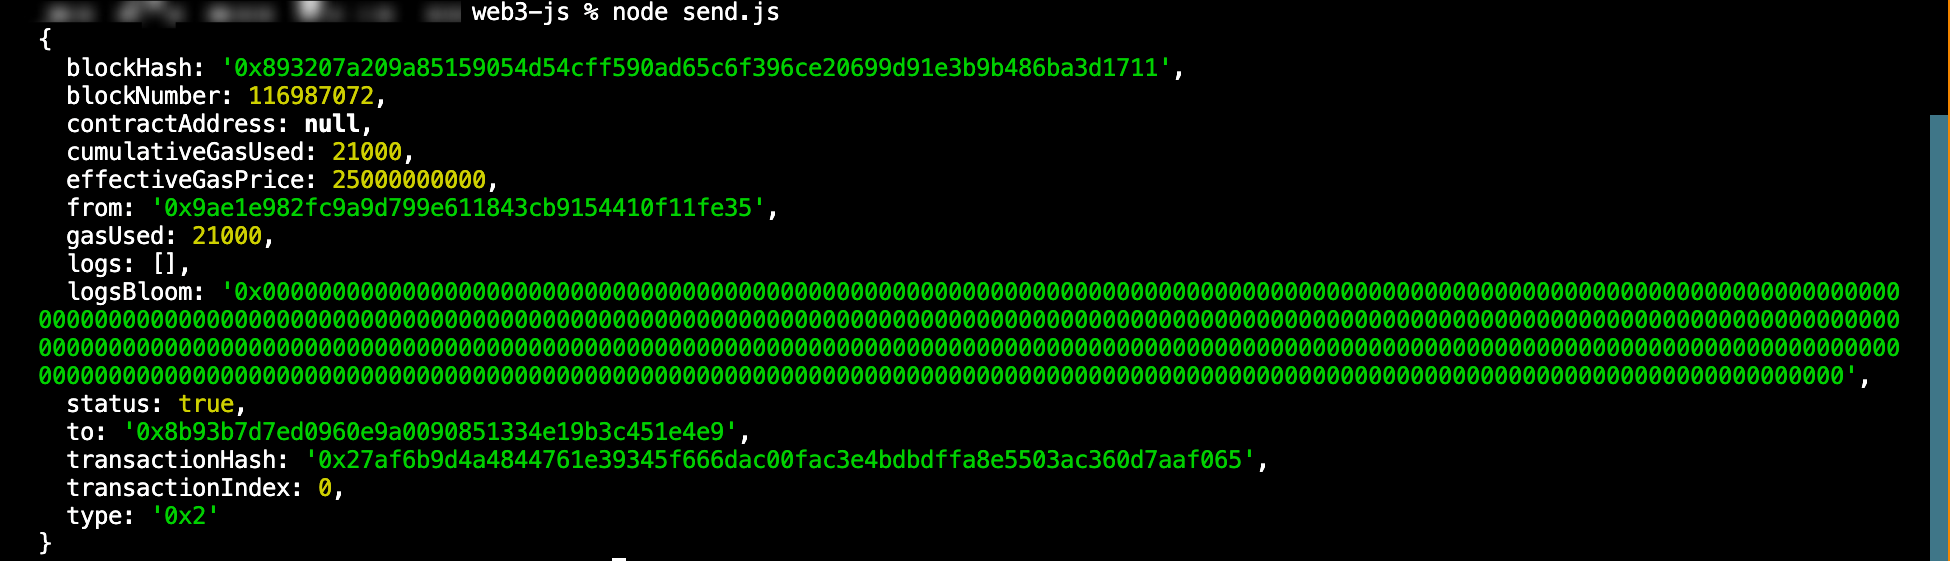
출력
To run the script and send data to the blockchain, run the following command in your terminal:
node send.js
If the transaction was succesful, you'll see the transaction receipt logged in your terminal.
Interacting with smart contracts
클레이튼의 기존 스마트 컨트랙트와 상호작용하려면 다음 명령을 실행하여 프로젝트 폴더에 interact.js 파일을 새로 생성합니다:
touch interact.js
이 파일을 생성한 후 '초기화' 섹션에서 설명한 대로 web3를 초기화합니다. 이 섹션에서는 배포된 컨트랙트의 ABI와 주소를 사용하여 Contract 객체를 인스턴스화하여 Klaytn의 스마트 컨트랙트와 상호작용하기 위해 web3.js를 사용하겠습니다.
이 가이드의 목적을 위해, Remix IDE에 simple_storage 컨트랙트를 컴파일하고 배포했습니다. store 함수를 호출하여 컨트랙트에 트랜잭션을 전송하고 retrieve 함수를 호출하여 컨트랙트에서 트랜잭션을 읽어올 것입니다.
실제로 작동하는 모습을 보려면 interact.js에 다음 코드를 붙여넣으세요.
const { Web3 } = require('web3');const url = "RPC URL" const web3 = new Web3(url);const privateKey = "Paste private key";// replace with your contract ABIconst abi = [ { "inputs": [], "name": "retrieve", "outputs": [ { "internalType": "uint256", "name": "", "type": "uint256" } ], "stateMutability": "view", "type": "function" }, { "inputs": [ { "internalType": "uint256", "name": "num", "type": "uint256" } ], "name": "store", "outputs": [], "stateMutability": "nonpayable", "type": "function" }] // replace with your contract address const contractAddress = "0x472a1226796b6a0918DC78d40b87d750881fdbDC" const contract = new web3.eth.Contract(abi, contractAddress); // Can replace `10` with any value you want to store const storeTx = contract.methods.store(10); // send transaction to smart contract // modify contract async function setValue() { // Sign Tx with private key const createTransaction = await web3.eth.accounts.signTransaction( { to: contractAddress, data: storeTx.encodeABI(), gas: await storeTx.estimateGas(), maxFeePerGas: 250000000000, maxPriorityFeePerGas: 250000000000, }, privateKey ); // Send Tx and Wait for Receipt const createReceipt = await web3.eth.sendSignedTransaction(createTransaction.rawTransaction); console.log(`Tx hash: ${createReceipt.transactionHash}`); } // read contract data async function retrieveValue() { // read from contract const tx = await contract.methods.retrieve().call(); console.log(tx); } // call functions setValue(); retrieveValue();
출력
To run the script and interact with smart contracts, run the following command in your terminal:
node interact.js
If the transaction was succesful, you'll see the transaction hash and the value stored in your terminal.
web3.js에 대한 자세한 가이드는 web3.js docs를 참조하세요. Also, you can find the full implementation of the code for this guide on GitHub