FeedPage
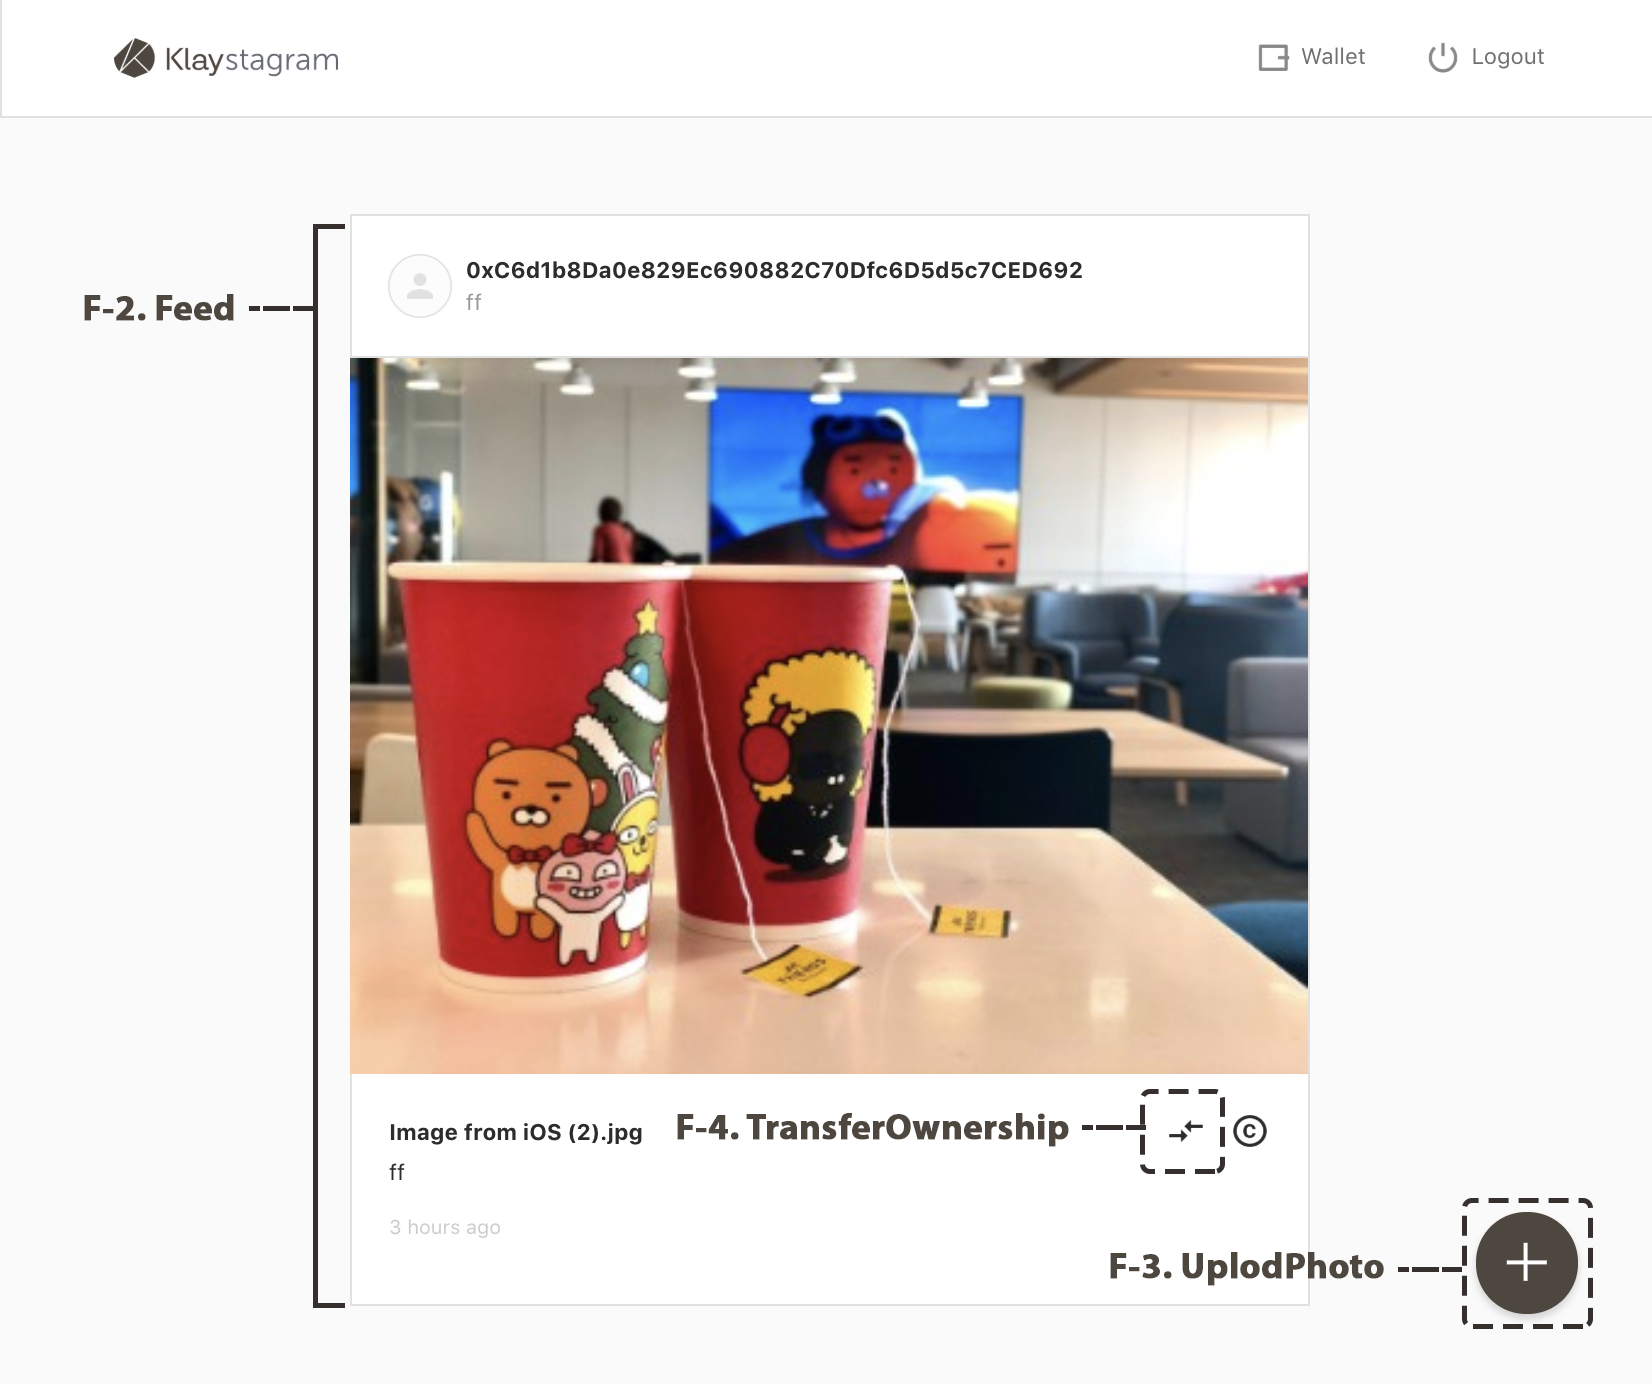
FeedPage is consisted of 3 main components that interact with Klaystagram contract.
UploadPhoto component
Feed component
TransferOwnership component
// src/pages/FeedPage.jsconst FeedPage = () => ( <main className="FeedPage"> <UploadButton /> // 7-2. UploadPhoto <Feed /> // 7-3. Feed </main>)
// src/components/Feed.js<div className="Feed"> {feed.length !== 0 ? feed.map((photo) => { // ... return ( <div className="FeedPhoto" key={id}> // ... { userAddress.toUpperCase() === currentOwner.toUpperCase() && ( <TransferOwnershipButton // 7-4. TransferOwnership className="FeedPhoto__transferOwnership" id={id} issueDate={issueDate} currentOwner={currentOwner} /> ) } // ... </div> ) }) : <span className="Feed__empty">No Photo :D</span> }</div>)
To make component interact with contract, there are 3 steps.
First, create KlaystagramContract instance to connect contract with front-end.
Second, using KlaystagramContract instance, make API functions that interact with contract in redux/actions
Third, call functions in each component
Let's build it!
1. Connect Contract to Frontend
src/klaytn- caver.js
- KlaystagramContract.js
src/redux
1) src/klaytn
src/klaytn: Contains files that help interact with Klaytn blockchain.
-
src/klaytn/caver.js: Instantiates caver within configured setting.cf) caver-js is a RPC library which makes a connection to klaytn node, interacting with node or smart contract deployed on Klaytn.
-
src/klaytn/Klaystagram.js: Creates an instance of contract using caver-js API. You can interact with contract through the instance
caver.js
/** * caver-js library helps making connection with klaytn node. * You can connect to specific klaytn node by setting 'rpcURL' value. * default rpcURL is 'https://public-en-baobab.klaytn.net'. */import Caver from 'caver-js'export const config = { rpcURL: 'https://public-en-baobab.klaytn.net'}export const cav = new Caver(config.rpcURL)export default cav
After making the connection, you can call methods on smart contract with caver.
KlaystagramContract.js
// klaytn/KlaystagramContract.jsimport { cav } from 'klaytn/caver'/** * 1. Create contract instance * ex:) new cav.klay.Contract(DEPLOYED_ABI, DEPLOYED_ADDRESS) * You can call contract method through this instance. */const KlaystagramContract = DEPLOYED_ABI && DEPLOYED_ADDRESS && new cav.klay.Contract(DEPLOYED_ABI, DEPLOYED_ADDRESS)export default KlaystagramContract
To interact with contract, we need a contract instance.
KlaystagramContract creates a contract instance to interact with Klaystagram contract, by providing DEPLOYED_ABI(Application Binary Interface) and DEPLOYED_ADDRESS to cav.klay.Contract API.
When compiling & deploying Klaystagram.sol contract (5. Deploy Contract), we already created deployedABI and deployedAddress files. They contain ABI of Klaystagram contract and deployed contract address.
And thanks to webpack's configuration, we can access it as variable.(DEPLOYED_ADDRESS, DEPLOYED_ABI)
DEPLOYED_ADDRESSreturns deployed AddressDEPLOYED_ABIreturns Klaystagram contract ABI
cf) contract ABI(Application Binary Interface)
contract ABI is the interface for calling contract methods. With this interface, we can call contract methods as below
contractInstance.methods.methodName().call()contractInstance.methods.methodName().send({ ... })
Now we are ready to interact with contract in the application.
cf. For more information, refer to caver.klay.Contract.
2) src/redux
We are going to make API functions with Klaystagram instance. After calling API functions, we use redux store to controls all data flow.
-
Import contract instance
By using
KlaystagramContractinstance, we can call contract's methods when components need to interact with contract. -
Call contract method
-
Store data from contract
If transaction is successful, we will call redux action to save information from contract to redux store.
// src/redux/actions/photos.js// 1. Import contract instanceimport KlaystagramContract from 'klaytn/KlaystagramContract'const setFeed = (feed) => ({ type: SET_FEED, payload: { feed },})const updateFeed = (tokenId) => (dispatch, getState) => { // 2. Call contract method (CALL): getPhoto() KlaystagramContract.methods.getPhoto(tokenId).call() .then((newPhoto) => { const { photos: { feed } } = getState() const newFeed = [feedParser(newPhoto), ...feed] // 3. Store data from contract dispatch(setFeed(newFeed)) })}
Redux store controls all data flow in front-end
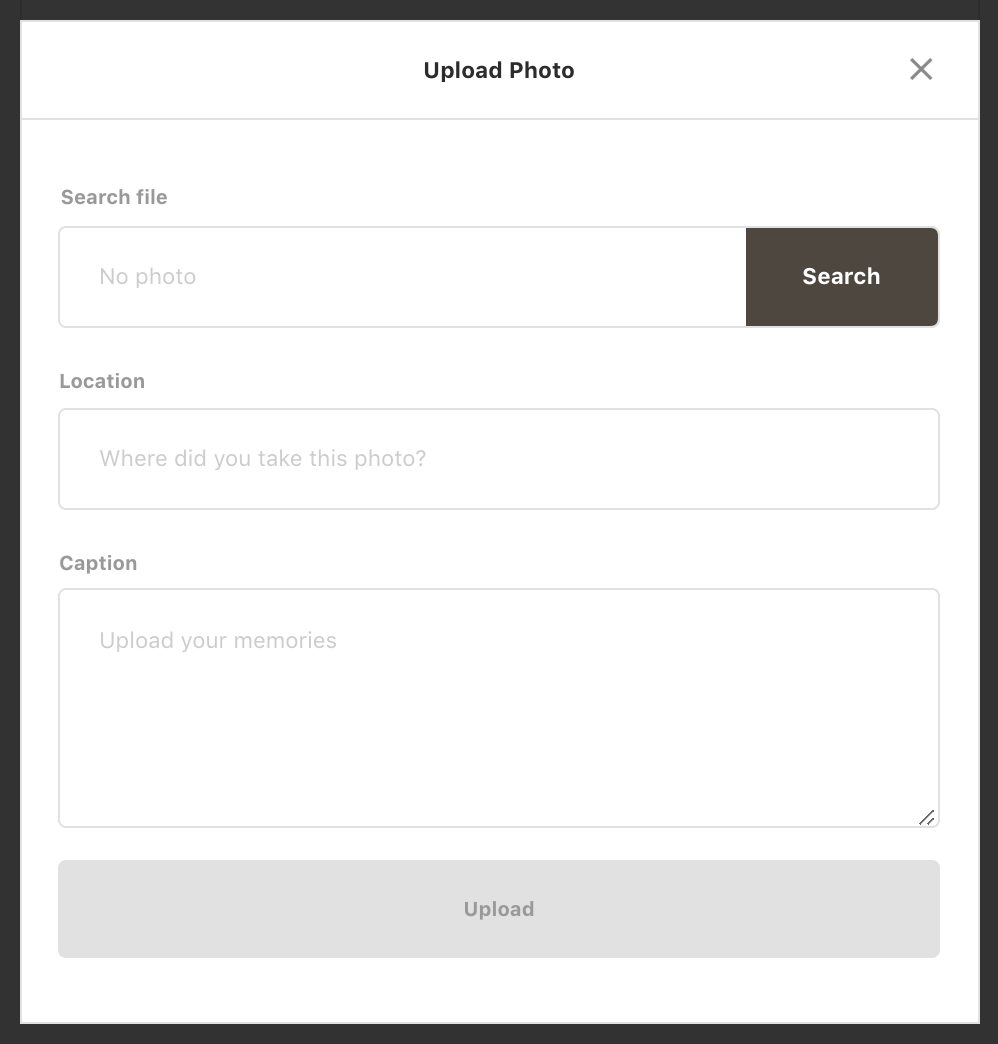
2. UploadPhoto Component
UploadPhotocomponent's role- Component code
- Interact with contract
- Update data to store:
updateFeedfunction
1) UploadPhoto component's role
UploadPhoto component handles the photo upload request to the Klaytn blockchain. The process is as follows:
- Invoke
uploadPhotomethod of the smart contract by sending a transaction. Inside theuploadPhotocontract method, a new ERC-721 token is minted. - After sending a transaction, show the progress along the transaction life cycle using the
Toastcomponent. - When the transaction gets into a block, update the new
PhotoDatain the local redux store.
Limiting content size
The maximum size of a single transaction is 32KB. So we restrict the input data (photo and descriptions) not to exceed 30KB to send it over safely.
- The string data size is restricted to
2KB - Photo is compressed to be less than
28KBusingimageCompression()function.
2) Component code
// src/components/UploadPhoto.jsimport React, { Component } from 'react'import { connect } from 'react-redux'import imageCompression from 'utils/imageCompression';import ui from 'utils/ui'import Input from 'components/Input'import InputFile from 'components/InputFile'import Textarea from 'components/Textarea'import Button from 'components/Button'import * as photoActions from 'redux/actions/photos'import './UploadPhoto.scss'// Set a limit of contentsconst MAX_IMAGE_SIZE = 30 * 1024 // 30KBconst MAX_IMAGE_SIZE_MB = 30 / 1024 // 30KBclass UploadPhoto extends Component { state = { file: '', fileName: '', location: '', caption: '', warningMessage: '', isCompressing: false, } handleInputChange = (e) => { this.setState({ [e.target.name]: e.target.value, }) } handleFileChange = (e) => { const file = e.target.files[0] /** * If image size is bigger than MAX_IMAGE_SIZE(30KB), * Compress the image to load it on transaction * cf. Maximum transaction input data size: 32KB */ if (file.size > MAX_IMAGE_SIZE) { this.setState({ isCompressing: true, }) return this.compressImage(file) } return this.setState({ file, fileName: file.name, }) } handleSubmit = (e) => { e.preventDefault() const { file, fileName, location, caption } = this.state this.props.uploadPhoto(file, fileName, location, caption) ui.hideModal() } compressImage = async (imageFile) => { try { const compressedFile = await imageCompression(imageFile, MAX_IMAGE_SIZE_MB) this.setState({ isCompressing: false, file: compressedFile, fileName: compressedFile.name, }) } catch (error) { this.setState({ isCompressing: false, warningMessage: '* Fail to compress image' }) } } render() { const { fileName, location, caption, isCompressing, warningMessage } = this.state return ( <form className="UploadPhoto" onSubmit={this.handleSubmit}> <InputFile className="UploadPhoto__file" name="file" label="Search file" fileName={isCompressing ? 'Compressing image...' : fileName} onChange={this.handleFileChange} err={warningMessage} accept=".png, .jpg, .jpeg" required /> <Input className="UploadPhoto__location" name="location" label="Location" value={location} onChange={this.handleInputChange} placeholder="Where did you take this photo?" required /> <Textarea className="UploadPhoto__caption" name="caption" value={caption} label="Caption" onChange={this.handleInputChange} placeholder="Upload your memories" required /> <Button className="UploadPhoto__upload" type="submit" title="Upload" /> </form> ) }}const mapDispatchToProps = (dispatch) => ({ uploadPhoto: (file, fileName, location, caption) => dispatch(photoActions.uploadPhoto(file, fileName, location, caption)),})export default connect(null, mapDispatchToProps)(UploadPhoto)
3) Interact with contract
Let's make a function to write photo data on Klaytn. Send transaction to contract: uploadPhoto
Unlike read-only function calls, writing data incurs a transaction fee. The transaction fee is determined by the amount of used gas. gas is a measuring unit representing how much calculation is needed to process the transaction.
For these reasons, sending a transaction needs two property from and gas.
-
Convert photo file as a bytes string to load on transaction
(In Klaystagram contract, we defined photo fotmat as bytes in
PhotoDatastruct)- Read photo data as an ArrayBuffer using
FileReader - Convert ArrayBuffer to hex string
- Add Prefix
0xto satisfy bytes format
- Read photo data as an ArrayBuffer using
-
Invoke the contract method:
uploadPhotofrom: An account that sends this transaction and pays the transaction fee.gas: The maximum amount of gas that thefromaccount is willing to pay for this transaction.
-
After sending the transaction, show progress along the transaction lifecycle using
Toastcomponent. -
If the transaction successfully gets into a block, call
updateFeedfunction to add the new photo into the feed page.
// src/redux/actions/photo.jsexport const uploadPhoto = ( file, fileName, location, caption) => (dispatch) => { // 1. Convert photo file as a hex string to load on transaction const reader = new window.FileReader() reader.readAsArrayBuffer(file) reader.onloadend = () => { const buffer = Buffer.from(reader.result) // Add prefix `0x` to hexString to recognize hexString as bytes by contract const hexString = "0x" + buffer.toString('hex') // 2. Invoke the contract method: uploadPhoto // Send transaction with photo file(hexString) and descriptions try{ KlaystagramContract.methods.uploadPhoto(hexString, fileName, location, caption).send({ from: getWallet().address, gas: '200000000', }, (error, txHash) => { if (error) throw error; // 3. After sending the transaction, // show progress along the transaction lifecycle using `Toast` component. ui.showToast({ status: 'pending', message: `Sending a transaction... (uploadPhoto)`, txHash, }) }) .then((receipt) => { ui.showToast({ status: receipt.status ? 'success' : 'fail', message: `Received receipt! It means your transaction is in klaytn block (#${receipt.blockNumber}) (uploadPhoto)`, link: receipt.transactionHash, }) // 4. If the transaction successfully gets into a block, // call `updateFeed` function to add the new photo into the feed page. if(receipt.status) { const tokenId = receipt.events.PhotoUploaded.returnValues[0] dispatch(updateFeed(tokenId)) } }) } catch (error) { ui.showToast({ status: 'error', message: error.toString(), }) } }}
cf) Transaction life cycle
After sending transaction, you can get transaction life cycle (transactionHash, receipt, error).
transactionHashevent is fired once your signed transaction instance is properly constructed. You can get the transaction hash before sending the transaction over the network.receiptevent is fired when you get a transaction receipt. It means your transaction is included in a block. You can check the block number byreceipt.blockNumber.errorevent is fired when something goes wrong.
4. Update photo in the feed page: updateFeed
After successfully sending the transaction to the contract, FeedPage needs to be updated.
In order to update the photo feed, we need to get the new photo data we've just uploaded. Let's call getPhoto() with tokenId. tokenId can be retrieved from the transaction receipt. Then add the new photo data in the local redux store.
// src/redux/actions/photo.js/** * 1. Call contract method: getPhoto() * To get new photo data we've just uploaded, * call `getPhoto()` with tokenId from receipt after sending transaction*/const updateFeed = (tokenId) => (dispatch, getState) => { KlaystagramContract.methods.getPhoto(tokenId).call() .then((newPhoto) => { const { photos: { feed } } = getState() const newFeed = [feedParser(newPhoto), ...feed] // 2. update new feed to store dispatch(setFeed(newFeed)) })}
3. Feed Component

Feedcomponent's role- Read data from contract:
getFeedmethod - Save data to store:
setFeedaction - Show data in component:
Feedcomponent
1) Feed component's role
In chapter 4. Write Klaystagram Smart Contract, we wrote PhotoData struct, and located it inside _photoList mapping. Feed component's role is as follows:
- Read
PhotoDatavia calling Klaystagram contract method (redux/actions/photos.js) - Show
PhotoData(feed) with its owner information (components/Feed.js)
2) Read data from contract: getPhoto method
-
Call contract method:
getTotalPhotoCount()If there are zero photos, call
setFeedaction with an empty array. -
Call contract method:
getPhoto(id)If there are photos, get each photo data as a promise and push it in the feed array. When all promises have resolved, return the feed array.
-
Call redux action:
setFeed(feed)Get resolved feed array and save it to redux store.
// src/redux/actions/photos.jsconst setFeed = (feed) => ({ type: SET_FEED, payload: { feed },})export const getFeed = () => (dispatch) => { // 1. Call contract method(READ): `getTotalPhotoCount()` // If there is no photo data, call `setFeed` action with empty array KlaystagramContract.methods.getTotalPhotoCount().call() .then((totalPhotoCount) => { if (!totalPhotoCount) return [] const feed = [] for (let i = totalPhotoCount; i > 0; i--) { // 2. Call contract method(READ):`getPhoto(id)` // If there is photo data, call all of them const photo = KlaystagramContract.methods.getPhoto(i).call() feed.push(photo) } return Promise.all(feed) }) .then((feed) => { // 3. Call actions: `setFeed(feed)` // Save photo data(feed) to store dispatch(setFeed(feedParser(feed)) })}
3) Save data to store: setFeed action
After we successfully fetch photo data (feed) from the Klaystagram contract, we call setFeed(feed) action. This action takes the photo data as a payload and saves it in a redux store.
4) Show data in component: Feed component
// src/components/Feed.jsimport React, { Component } from 'react'import { connect } from 'react-redux'import moment from 'moment'import Loading from 'components/Loading'import PhotoHeader from 'components/PhotoHeader'import PhotoInfo from 'components/PhotoInfo'import CopyrightInfo from 'components/CopyrightInfo'import TransferOwnershipButton from 'components/TransferOwnershipButton'import { drawImageFromBytes} from 'utils/imageUtils'import { last } from 'utils/misc'import * as photoActions from 'redux/actions/photos'import './Feed.scss'class Feed extends Component { constructor(props) { super(props) this.state = { isLoading: !props.feed, } } static getDerivedStateFromProps = (nextProps, prevState) => { const isUpdatedFeed = (nextProps.feed !== prevState.feed) && (nextProps.feed !== null) if (isUpdatedFeed) { return { isLoading: false } } return null } componentDidMount() { const { feed, getFeed } = this.props if (!feed) getFeed() } render() { const { feed, userAddress } = this.props if (this.state.isLoading) return <Loading /> return ( <div className="Feed"> {feed.length !== 0 ? feed.map(({ id, ownerHistory, data, name, location, caption, timestamp, }) => { const originalOwner = ownerHistory[0] const currentOwner = last(ownerHistory) const imageUrl = drawImageFromBytes(data) const issueDate = moment(timestamp * 1000).fromNow() return ( <div className="FeedPhoto" key={id}> <PhotoHeader currentOwner={currentOwner} location={location} /> <div className="FeedPhoto__image"> <img src={imageUrl} alt={name} /> </div> <div className="FeedPhoto__info"> <PhotoInfo name={name} issueDate={issueDate} caption={caption} /> <CopyrightInfo className="FeedPhoto__copyrightInfo" id={id} issueDate={issueDate} originalOwner={originalOwner} currentOwner={currentOwner} /> { userAddress.toUpperCase() === currentOwner.toUpperCase() && ( <TransferOwnershipButton className="FeedPhoto__transferOwnership" id={id} issueDate={issueDate} currentOwner={currentOwner} /> ) } </div> </div> ) }) : <span className="Feed__empty">No Photo :D</span> } </div> ) }}const mapStateToProps = (state) => ({ feed: state.photos.feed, userAddress: state.auth.address,})const mapDispatchToProps = (dispatch) => ({ getFeed: () => dispatch(photoActions.getFeed()),})export default connect(mapStateToProps, mapDispatchToProps)(Feed)
At the first time, you can only see the text "No photo :D" because there is no photo data in contract yet.
Let's make a UploadPhoto component to send photo data to contract!
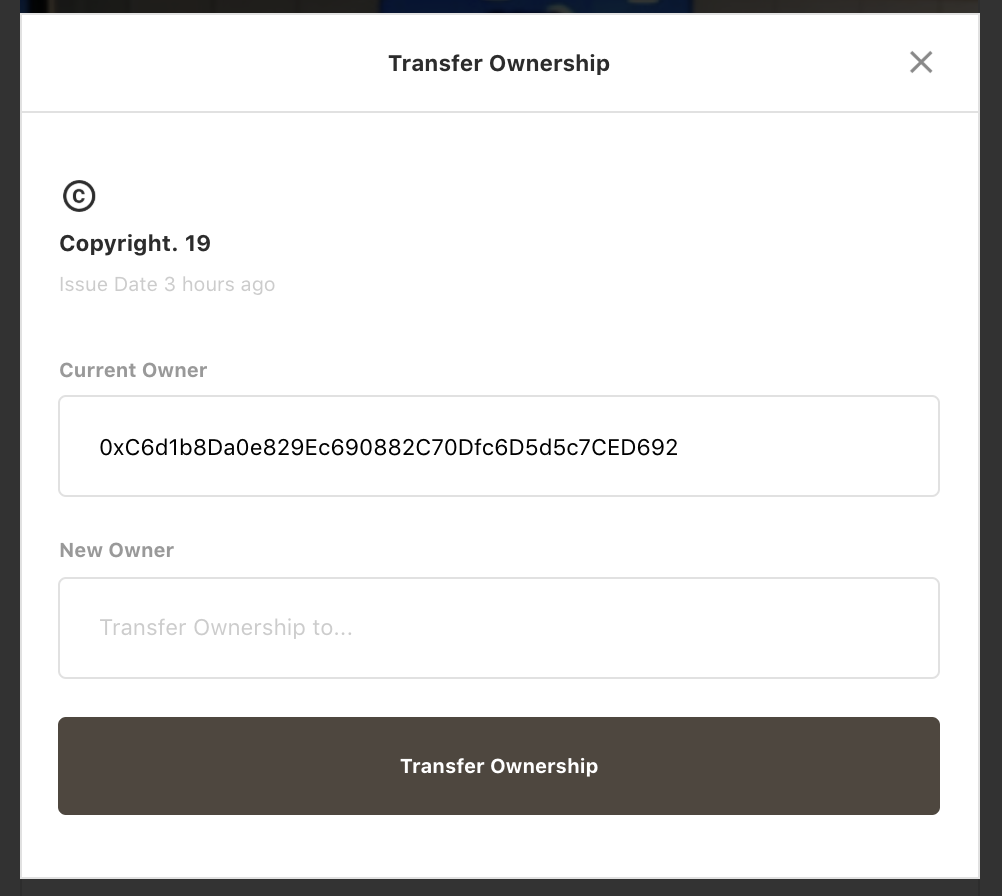
4. TransferOwnership Component
-
TransferOwnershipcomponent's role -
Component code
2-1. Rendering
transferOwnershipbutton2-2.
TransferOwnershipcomponent -
Interact with contract:
transferOwnershipmethod -
Update data to store:
updateOwnerAddressaction
1) TransferOwnership component's role
The owner of photo can transfer photo's ownership to another user. By sending transferOwnership transaction, new owner's address will be saved in ownership history, which keep tracks of past owner addresses.
2) Component code
2-1) Rendering TransferOwnership button
We are going to render TransferOwnership button on the FeedPhoto component only when photo's owner address matches with logged-in user's address (which means you are the owner).
// src/components/Feed.js<div className="FeedPhoto"> // ... { userAddress.toUpperCase() === currentOwner.toUpperCase() && ( <TransferOwnershipButton className="FeedPhoto__transferOwnership" id={id} issueDate={issueDate} currentOwner={currentOwner} /> ) } // ...</div>
2-2) TransferOwnership component
// src/components/TransferOwnership.jsimport React, { Component } from 'react'import { connect } from 'react-redux'import * as photoActions from 'redux/actions/photos'import ui from 'utils/ui'import { isValidAddress } from 'utils/crypto'import Input from 'components/Input'import Button from 'components/Button'import './TransferOwnership.scss'class TransferOwnership extends Component { state = { to: null, warningMessage: '', } handleInputChange = (e) => { this.setState({ [e.target.name]: e.target.value, }) } handleSubmit = (e) => { e.preventDefault() const { id, transferOwnership } = this.props const { to } = this.state if (!isValidAddress(to)) { return this.setState({ warningMessage: '* Invalid wallet address', }) } transferOwnership(id, to) ui.hideModal() } render() { const { id, issueDate, currentOwner } = this.props return ( <div className="TransferOwnership"> <h3 className="TransferOwnership__copyright">Copyright. {id}</h3> <p className="TransferOwnership__issueDate">Issue Date {issueDate}</p> <form className="TransferOwnership__form" onSubmit={this.handleSubmit}> <Input className="TransferOwnership__from" name="from" label="Current Owner" value={currentOwner} readOnly /> <Input className="TransferOwnership__to" name="to" label="New Owner" onChange={this.handleInputChange} placeholder="Transfer Ownership to..." err={this.state.warningMessage} required /> <Button type="submit" title="Transfer Ownership" /> </form> </div> ) }}const mapDispatchToProps = (dispatch) => ({ transferOwnership: (id, to) => dispatch(photoActions.transferOwnership(id, to)),})export default connect(null, mapDispatchToProps)(TransferOwnership)
3) Interact with contract: transferOwnership method
We already made transferOwnership function in Klaystagram contract at chapter 4. Write Klaystagram Smart Contract. Let's call it from application.
- Invoke the contract method:
transferOwnershipid:Photo's tokenIdto:Address to transfer photo's ownership
- Set transaction options
from: An account that sends this transaction and pays the transaction fee.gas: The maximum amount of gas that thefromaccount is willing to pay for this transaction.
- After sending the transaction, show progress along the transaction lifecycle using
Toastcomponent. - If the transaction successfully gets into a block, call
updateOwnerAddressfunction to update new owner's address into the feed page.
// src/redux/actions/photo.jsexport const transferOwnership = (tokenId, to) => (dispatch) => { // 1. Invoke the contract method: transferOwnership try{ KlaystagramContract.methods.transferOwnership(tokenId, to).send({ // 2. Set transaction options from: getWallet().address, gas: '20000000', }, (error, txHash) => { if (error) throw error; // 3. After sending the transaction, // show progress along the transaction lifecycle using `Toast` component. ui.showToast({ status: 'pending', message: `Sending a transaction... (transferOwnership)`, txHash, }) }) .then((receipt) => { ui.showToast({ status: receipt.status ? 'success' : 'fail', message: `Received receipt! It means your transaction is in klaytn block (#${receipt.blockNumber}) (transferOwnership)`, link: receipt.transactionHash, }) // 4. If the transaction successfully gets into a block, // call `updateOwnerAddress` function to update new owner's address into the feed page. dispatch(updateOwnerAddress(tokenId, to)) }) } catch (error) { ui.showToast({ status: 'error', message: error.toString(), }) }}
4) Update information in redux store: updateOwnerAddress action
After transferring ownership, FeedPhoto needs to be rerendered with new owner's address.
To update new owner's address, let's call feed data from store and find the photo that has the tokenId from the receipt. Then push new owner's address to photo's ownerHistory and setFeed.
const updateOwnerAddress = (tokenId, to) => (dispatch, getState) => { const { photos: { feed } } = getState() const newFeed = feed.map((photo) => { if (photo['id'] !== tokenId) return photo photo['ownerHistory'] = [...photo['ownerHistory'], to] return photo }) dispatch(setFeed(newFeed))}