Create nested service chain
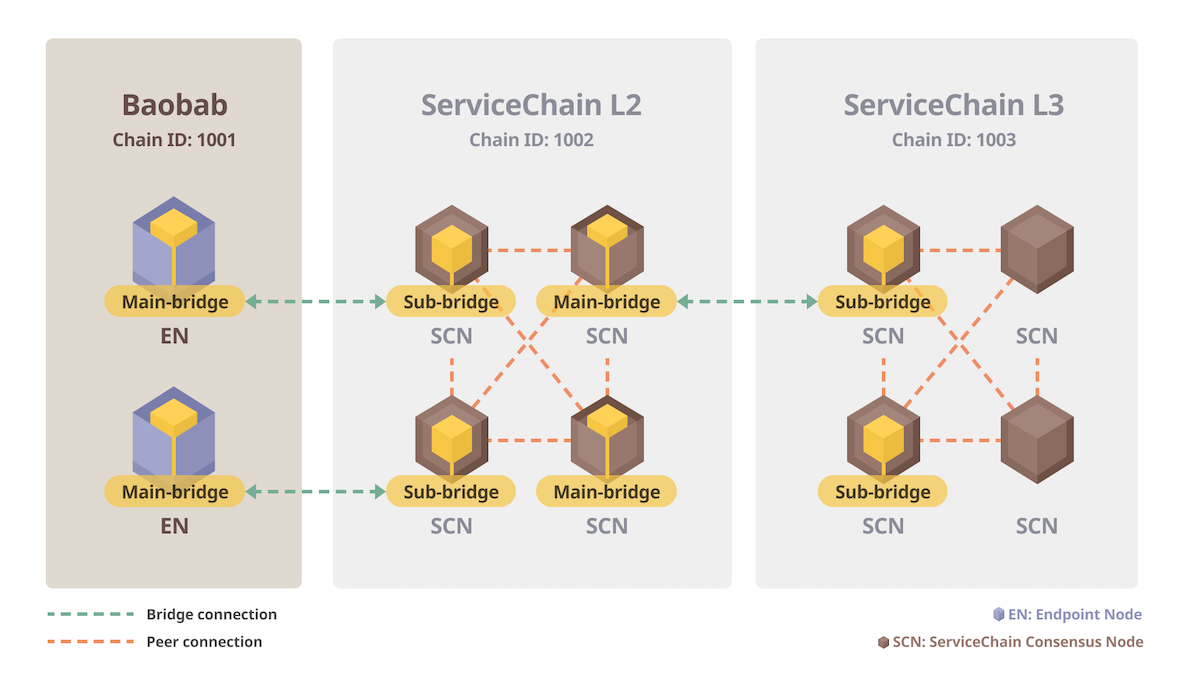
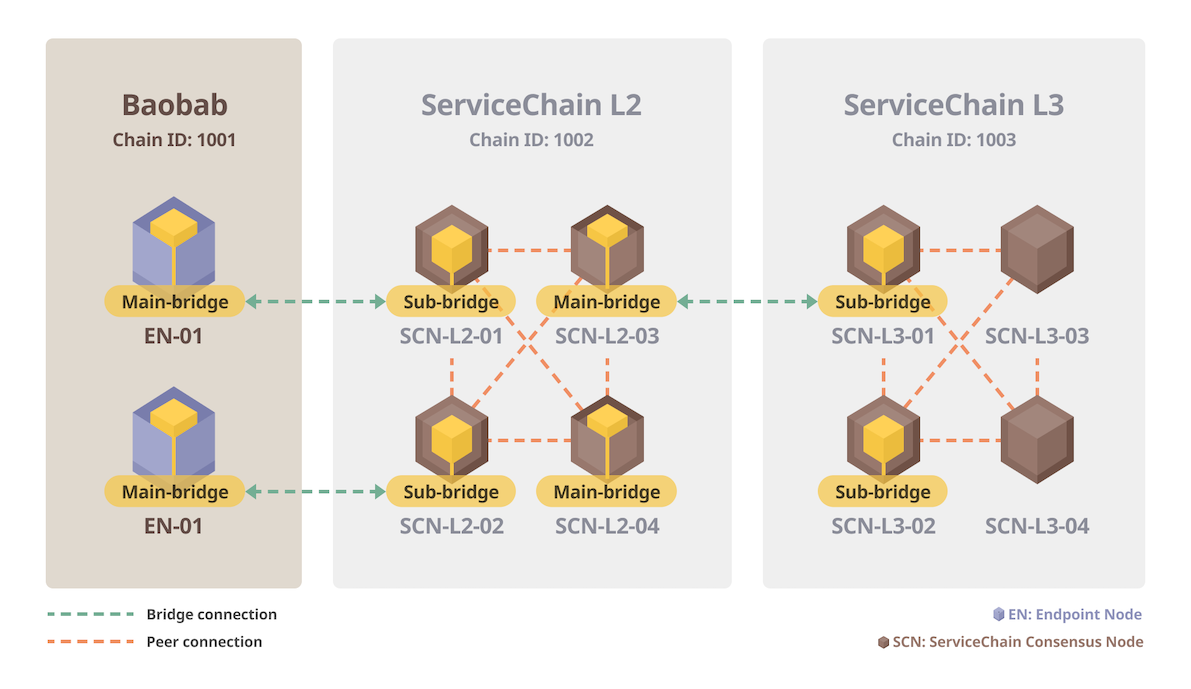
This chapter explains how to build ServiceChain networks in a hierarchical structure by adding a new ServiceChain network to the ServiceChain network built in the previous chapter. The ServiceChain network to be added also consists of 4 SCNs in this example. The ServiceChain network constructed in the previous chapter is defined as L2, and the ServiceChain network to be newly constructed is defined as L3. We are going to connect a bridge between L2 and L3 to create a hierarchical structure. The overall structure of the ServiceChain network to be constructed in this chapter is shown in the figure below.

Prerequisites
- Assume that you have progressed to the ServiceChain configuration and Baobab EN described in Nested ServiceChain. So we will briefly explain what was explained in the previous section.
- Assumptions and Limitations
- One EN can bridge one-to-one to one of the SCNs of the ServiceChain L2. Similarly, one SCN in L2 of the ServiceChain can bridge one-to-one to one of the SCNs in L3.
- An SCN node can have a main bridge and a sub bridge at the same time. However, the port numbers of the main bridge and the sub bridge must be set differently. (eg main-bridge: 50505, sub-bridge:50506)
- Not all SCNs in L2 need to be bridged to EN, and likewise SCNs in L3 need not all be bridged to L2. However, for high availability, it is recommended that there are two or more main-bridge and sub-bridge pairs between chains. In this chapter, only one pair will be connected between L2 and L3, and the high availability between L2 and L3 is same to the HA between Baobab and L2.
Step 1: Create and update Homi data for L3
As when configuring ServiceChain L2, execute the homi command to create scripts and configuration files for building L3. You can run homi on any Linux/Mac PC. Baobab's chainID is 1001, and L2's chainID was set to 1002 in the previous example, so for convenience, L3's chainID is set to 1003. When operating a blockchain for an actual service, you must register a new chainID value at https://chainlist.defillama.com/ to avoid the chainID conflict with other ServiceChains and EVM chains.
$ ./homi setup --gen-type local --cn-num 4 --test-num 1 --servicechain --chainID 1003 --p2p-port 22323 -o homi-outputCreated : homi-output/keys/passwd1Created : homi-output/keys/passwd2Created : homi-output/keys/passwd3Created : homi-output/keys/passwd4Created : homi-output/scripts/genesis.jsonCreated : homi-output/keys/nodekey1Created : homi-output/keys/validator1Created : homi-output/keys/nodekey2Created : homi-output/keys/validator2Created : homi-output/keys/nodekey3Created : homi-output/keys/validator3Created : homi-output/keys/nodekey4Created : homi-output/keys/validator4Created : homi-output/scripts/static-nodes.jsonCreated : homi-output/keys_test/testkey1Created : homi-output/keys_test/keystore1/0xdC7218621513f71d609653d22C39d79d558d9CDCCreated : homi-output/Klaytn.jsonCreated : homi-output/Klaytn_txpool.json

Update IP address and port information of ServiceChain L3 nodes in homi-output/scripts/static-nodes.json.
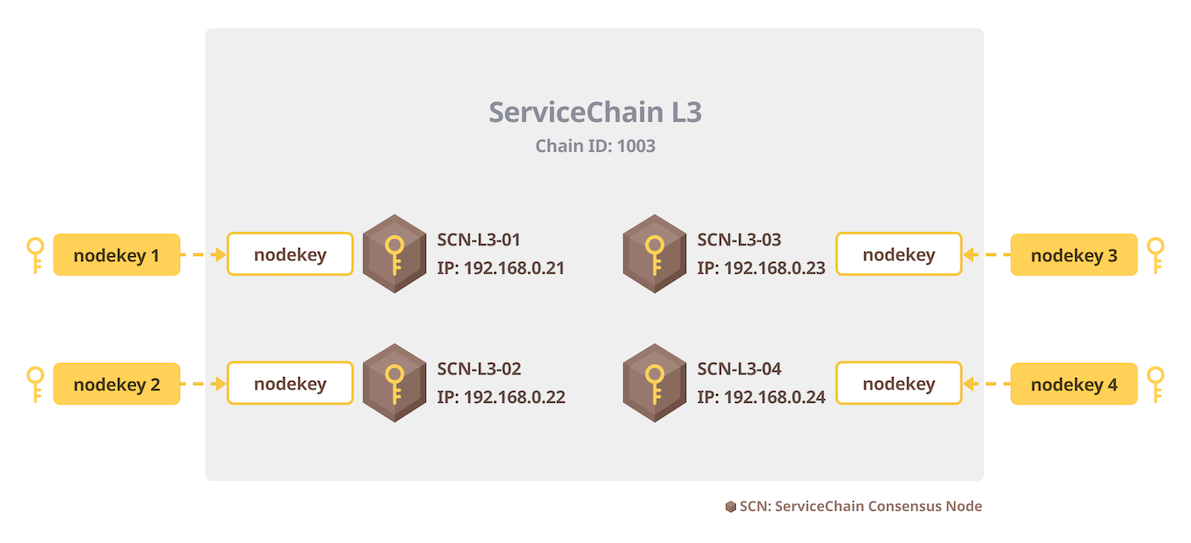
[ "kni://358235ccbf97a1f...787f7@192.168.0.21:22323?discport=0&type=cn", "kni://14ac4e3d53de5c7...6c91d@192.168.0.22:22323?discport=0&type=cn", "kni://5f36a456d93da09...8e216@192.168.0.23:22323?discport=0&type=cn", "kni://d62fd0928b9b6e5...6badf@192.168.0.24:22323?discport=0&type=cn"]
Copy homi-output to all SCN nodes (SCN-L3-01, SCN-L3-02, SCN-L3-03, SCN-L3-04) of ServiceChain L3.
$ scp -r path/to/homi-output user@192.168.0.21:~/ $ scp -r path/to/homi-output user@192.168.0.22:~/ $ scp -r path/to/homi-output user@192.168.0.23:~/ $ scp -r path/to/homi-output user@192.168.0.24:~/
Initialize all nodes.
$ kscn --datadir ~/data init ~/homi-output/scripts/genesis.json$ ls ~/datakeystore klay kscn
Connect to all SCNs (SCN-L3-01, SCN-L3-02, SCN-L3-03, and SCN-L3-04), copy static-nodes.json to the data folder ~/data, and copy nodekeys one by one.
$ cp ~/homi-output/scripts/static-nodes.json ~/data/$ cp ~/homi-output/keys/nodekey{1..4} ~/data/klay/nodekey
Step 2: SCN configuration in L3
Edit conf/kscnd.conf on all SCNs in ServiceChain L3 as follows: The PORT uses 22323, the default port of the ServiceChain. DATA_DIR is ~/data.
...PORT=22323...DATA_DIR=~/data...
Run the ServiceChain on all SCN nodes in L3 and check if it works properly.
$ kscnd startStarting kscnd: OK$ kscn attach --datadir ~/data> klay.blockNumber10
Step 3: Restart after setting L2 main bridge
Connect to the console of SCN-L2-03 node, (Note: this is not in L3 but in L2) that will act as the main bridge in the ServiceChain L2.

Edit the kscn configuration file conf/kscnd.conf of SCN-L2-03 as follows.
SC_MAIN_BRIDGE=1
Restart kscnd on SCN-L2-03.
SCN-L2-03$ kscnd stopSCN-L2-03$ kscnd start
Step 4: Check KNI of Main Bridge Node
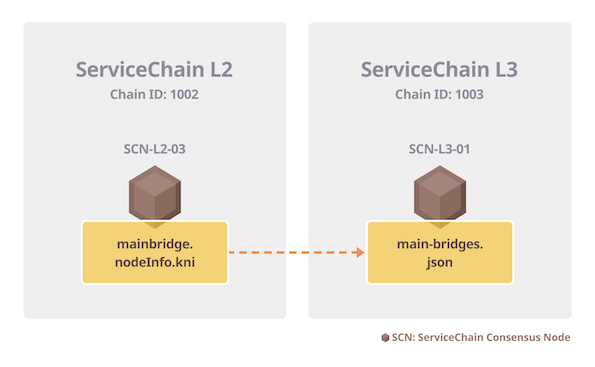
Check the KNI information of SCN-L2-03 node. This value will be used to create the main-bridges.json file of SCN-L2-03 node, which will be set up the subbridge in the ServiceChain L3.

SCN-L2-03$ kscn attach --datadir ~/data> mainbridge.nodeInfo.kni"kni://87989a5a5dcc165...85b16b@[::]:50505?discport=0"
Step 5: Configure L3 sub-bridge
Connect to SCN-L3-01 node that will have a subbridge of the ServiceChain L3 (Note: this is not L2). Create main-bridges.json under ~/data folder. Replace [::] after @ with the IP address of the node you checked in step 4.
SCN-L3-01$ echo '["kni://87989a5a5dcc165...85b16b@192.168.0.13:50505?discport=0"]' > ~/data/main-bridges.json
Edit the configuration file conf/kscnd.conf of the SCN-L3-01 node with subbridge as follows. set SC_SUB_BRIDGEto 1 for activating the bridge connection, and SC_PARENT_CHAIN_ID is 1002, chainID of L2, Set SC_ANCHORING to 1 to automatically anchor data upon restart. You can also access the SCN-L3-01 shell and turn on data anchoring with the subbridge.anchoring(true) command or turn it off with the subbridge.anchoring(false) command. SC_ANCHORING_PERIOD is a parameter that determines how often anchoring transactions are sent to the parent chain. Set the node to anchor every 10 blocks by specifying a value of 10. Default is 1.
SC_SUB_BRIDGE=1…SC_PARENT_CHAIN_ID=1002…SC_ANCHORING=1SC_ANCHORING_PERIOD=10
Restart kscnd on SCN-L3-01 after completing the setup.
SCN-L3-01$ kscnd stopShutting down kscnd: KilledSCN-L3-01$ kscnd startStarting kscnd: OK
Check subbridge.peers.length to see if SCN-L3-01 is connected to SCN-L2-03, check subbridge.latestAnchoredBlockNumber to check the latest anchored block number to see if anchoring is in progress.
SCN-L3-01$ kscn attach --datadir ~/data> subbridge.peers.length1> subbridge.latestAnchoredBlockNumber5010