Triển khai hợp đồng thông minh
1. Sao chép Klaystagram DApp
1) Sao chép kho Klaystagram
$ git clone https://github.com/klaytn/klaystagram
2) Cài đặt & Chạy Klaystagram DApp
Gói bạn vừa sao chép đã sẵn sàng khởi chạy mà không cần sửa đổi gì.
Hợp đồng mẫu đã được triển khai cho testnet Baobab và ABI hợp đồng đã bao gồm trong gói của chúng tôi.
Mã frontend Klaystagram ban đầu được định cấu hình để kết nối với hợp đồng thông minh trên testnet Baobab.
Nếu bạn muốn chạy ứng dụng ngay lập tức và xem ứng dụng hoạt động, hãy nhập bên dưới.
Bạn NÊN tuân thủ môi trường thử nghiệm được đề cập ở trang đầu tiên.
$ npm install$ npm run local
⚠ Vui lòng kiểm tra quyền truy cập vào tập tin và thư mục nếu không thành công.
Ứng dụng sẽ bật lên ngay lập tức! (Ban đầu, việc tải nhiều nguồn cấp dữ liệu có thể mất thời gian.)
2. Soạn hợp đồng thông minh Klaystagram
- Background
- Contract setup
- Set events and data structure
- Write functions
4.1.uploadPhoto
4.2.transferOwnership
4.3.getPhoto
1) Hình nền
We will make a simple contract called "Klaystagram".
PhotoDatastruct is defined to store various photo data.- User can upload photo and transfer the ownership photo via
uploadPhotoandtransferOwnershipfunctions.
2) Thiết lập hợp đồng
- Specify solidity version. We recommend using 0.5.6 stable version.
- We will make use of ERC721 standard to build non-fungible tokens.
- Import
ERC721.solandERC721Enumerable.sol - Check out detailed information about ERC721 at erc721.org
- Import
pragma solidity 0.5.6;import "./ERC721/ERC721.sol";import "./ERC721/ERC721Enumerable.sol";contract Klaystagram is ERC721, ERC721Enumerable {
3) Đặt sự kiện và cấu trúc dữ liệu
We need to set up an event to keep track of activities on blockchain.
As for data structure, mapping _photoList takes a uint256 tokenId to map a specific PhotoData struct. By defining PhotoUploaded event, transaction receipt will log this event whenever function containing this is called.
event PhotoUploaded (uint indexed tokenId, bytes photo, string title, string location, string description, uint256 timestamp);mapping (uint256 => PhotoData) private _photoList;struct PhotoData { uint256 tokenId; // Unique token id, starts from 1 and increases by 1 address[] ownerHistory; // History of all previous owners bytes photo; // Image source string title; // Title of photo string location; // Location where photo is taken string description; // Short description about the photo uint256 timestamp; // Uploaded time}
4) Viết hàm
Let's write some functions that interact with the contract. In this tutorial let us only consider two functions: uploadPhoto and transferOwnership. Check out Klaystagram.sol to see the whole set of functions.
4-1) uploadPhoto
uploadPhoto function takes 4 arguments including photo's image source. To keep things simple, tokenId will start from 1 and will increase by 1.
_mint function is from ERC721 contract. It creates a new token and assign it to a specific address, which in this case, msg.sender. In this application, logged in user will create transaction with their own private key. So msg.sender will be the user's public address.
Finally, initialize PhotoData struct, locate it inside _photoList mapping, and push the owner address into ownerHistory array. And don't forget to emit the event we just created. As mentioned above, this event will be included in transaction receipt.
function uploadPhoto(bytes memory photo, string memory title, string memory location, string memory description) public { uint256 tokenId = totalSupply() + 1; _mint(msg.sender, tokenId); address[] memory ownerHistory; PhotoData memory newPhotoData = PhotoData({ tokenId : tokenId, ownerHistory : ownerHistory, photo : photo, title: title, location : location, description : description, timestamp : now }); _photoList[tokenId] = newPhotoData; _photoList[tokenId].ownerHistory.push(msg.sender); emit PhotoUploaded(tokenId, photo, title, location, description, now);}
4-2) transferOwnership
Let's take a look at transferOwnership function. When transferring photo ownership, we need to do two things. First, we have to reassign the owner, and then we have to push new owner address into ownerHistory array.
To do this, transferOwnership first calls safeTransferFrom function from ERC721 standard, which eventually calls transferFrom function. As mentioned above, right after token transfer is successfully done, we have to push new owner information into ownerHistory array, and that is exactly why transferFrom is overridden as below.
/** * @notice safeTransferFrom function checks whether receiver is able to handle ERC721 tokens, * thus less possibility of tokens being lost. After checking is done, it will call transferFrom function defined below */function transferOwnership(uint256 tokenId, address to) public returns(uint, address, address, address) { safeTransferFrom(msg.sender, to, tokenId); uint ownerHistoryLength = _photoList[tokenId].ownerHistory.length; return ( _photoList[tokenId].tokenId, //original owner _photoList[tokenId].ownerHistory[0], //previous owner, length cannot be less than 2 _photoList[tokenId].ownerHistory[ownerHistoryLength-2], //current owner _photoList[tokenId].ownerHistory[ownerHistoryLength-1]);}/** * @notice Recommend using transferOwnership, which uses safeTransferFrom function * @dev Override transferFrom function to make sure that every time ownership transfers * new owner address gets pushed into ownerHistory array */function transferFrom(address from, address to, uint256 tokenId) public { super.transferFrom(from, to, tokenId); _photoList[tokenId].ownerHistory.push(to);}
4-3) getPhoto
Finally, let's make a getter function that fetches data stored in the smart contract. By calling a single function, we want to fetch every information regarding a specific photo. So getPhoto function takes an index(token id) as an argument and returns every element in PhotoData struct.
function getPhoto(uint tokenId) public viewreturns(uint256, address[] memory, bytes memory, string memory, string memory, string memory, uint256) { require(_photoList[tokenId].tokenId != 0, "Photo does not exist"); return ( _photoList[tokenId].tokenId, _photoList[tokenId].ownerHistory, _photoList[tokenId].photo, _photoList[tokenId].title, _photoList[tokenId].location, _photoList[tokenId].description, _photoList[tokenId].timestamp);}
This is it, now we can deploy this contract!
3. Triển khai hợp đồng
- Nhận testnet KLAY để triển khai hợp đồng
- Cấu hình Truffle
- Thiết lập triển khai (chọn hợp đồng bạn muốn triển khai)
- Triển khai
1) Nhận KLAY
Để triển khai hợp đồng, ta cần có KLAY trong tài khoản của bạn để trả phí gas. Bạn có thể nhận 150 KLAY qua Ví Klaytn trong testnet.
-
Tạo tài khoản Klaytn của bạn tại Ví Baobab Klaytnkhóa riêng tư ->
PRIVATE KEYsẽ được dùng trong cấu hình Truffle. Sao chép khóa riêng tư vào đâu đó 2. -
Sau khi tạo tài khoản Klaytn, chạy Faucet để nhận 5 KLAY từ testnet Baobab trong Vòi Baobab Klaytn

2. Cấu hình Truffle
truffle-config.js là tập tin cấu hình có chứa cấu hình triển khai. Ta sẽ triển khai hợp đồng bằng cách dùng Private key vừa tạo ở bước trước. Dán Private key có đủ KLAY của bạn vào truffle-config.js
CẢNH BÁO: Bạn không nên để lộ khóa riêng tư của mình. Nếu không tài khoản của bạn sẽ bị xâm nhập.
// truffle-config.jsconst HDWalletProvider = require("truffle-hdwallet-provider-klaytn");/** * truffle network variables * for deploying contract to klaytn network. */const NETWORK_ID = '1001'/** * URL: URL for the remote node you will be using * PRIVATE_KEY: Private key of the account that pays for the transaction (Change it to your own private key) */const URL = 'https://public-en-baobab.klaytn.net'// Paste your `Private key` that has enough KLAY to truffle.jsconst PRIVATE_KEY = 'your_private_key'module.exports = { networks: { klaytn: { provider: () => new HDWalletProvider(PRIVATE_KEY, URL), network_id: NETWORK_ID, gas: '8500000', gasPrice: null, }, }, // Specify the version of compiler, we use 0.5.6 compilers: { solc: { version: '0.5.6', }, },}
Thuộc tính networks
Xem thuộc tính networks ở trên. Mạng lưới klaytn có 4 thuộc tính,
provider, network_id, gas, gasPrice.
provider: () => new HDWalletProvider(PRIVATE_KEY, URL)Như tên gọi, thuộc tính này tích hợp khóa riêng tư và url được định nghĩa ở trên.network_id: NETWORK_IDChỉ ra ID của mạng lưới trong Klaytn, bạn nên đặt thành1001để sử dụng mạng lưới Baobab Klaytn (testnet).gas: GASLIMITPhí gas tối đa bạn sẵn sàng chi trả.gasPrice: nullĐây là mức giá trên mỗi đơn vị gas. Hiện giá gas trong Klaytn được cố định ở mức'25000000000'. Bằng cách đặt thànhnull, truffle sẽ tự động đặt giá gas.
Thuộc tính compiler
Hãy nhớ rằng ta đã dùng phiên bản 0.5.6 cho hợp đồng Solidity, đồng thời chỉ ra phiên bản trình biên dịch ở đây.
3. Thiết lập triển khai
migrations/2_deploy_contracts.js:
const Klaystagram = artifacts.require('./Klaystagram.sol')const fs = require('fs')module.exports = function (deployer) { deployer.deploy(Klaystagram) .then(() => { if (Klaystagram._json) { // 1. Record recently deployed contract's abi file to 'deployedABI' fs.writeFile( 'deployedABI', JSON.stringify(Klaystagram._json.abi, 2), (err) => { if (err) throw err console.log(`The abi of ${Klaystagram._json.contractName} is recorded on deployedABI file`) }) } // 2. Record recently deployed contract's address to 'deployedAddress' fs.writeFile( 'deployedAddress', Klaystagram.address, (err) => { if (err) throw err console.log(`The deployed contract address * ${Klaystagram.address} * is recorded on deployedAddress file`) }) })}
Bạn có thể chỉ ra mã hợp đồng bạn sẽ triển khai trong thư mục contracts/.
-
Nhập tập tin hợp đồng của bạn (
Klaystagram.sol) quaconst Klaystagram = artifacts.require('./Klaystagram.sol') -
Dùng
deployerđể triển khai hợp đồng của bạn,deployer.deploy(Klaystagram). -
Nếu bạn muốn thêm logic sau khi triển khai hợp đồng, hãy dùng
.then()(không bắt buộc) -
Để lưu
deployedABIvàdeployedAddresscủa hợp đồng, hãy dùngfsmô-đun node.jsfs.writeFile(filename, content, callback)(không bắt buộc)
cf. Để biết thêm thông tin về artifacts.require(), hãy tham chiếu tài liệu chính thức của truffle tại truffle docs
4. Triển khai
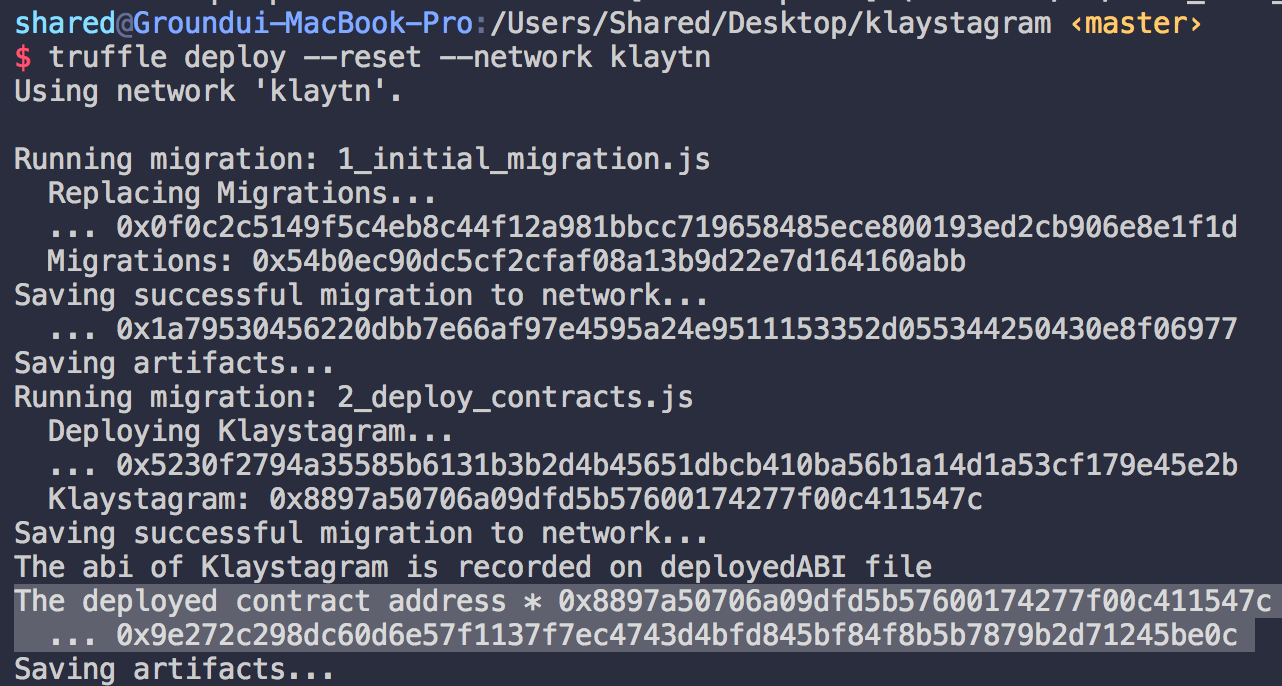
Trong cửa sổ lệnh của bạn, hãy gõ $ truffle deploy --network baobab.
Hệ thống sẽ triển khai hợp đồng của bạn theo cấu hình truffle-config.js và migrations/2_deploy_contracts.js.
Cửa sổ lệnh sẽ hiển thị địa chỉ hợp đồng đã triển khai nếu triển khai thành công.
cf) --reset option
Nếu bạn đưa ra tùy chọn này, Truffle sẽ biên dịch và triển khai lại hợp đồng của bạn ngay cả khi hợp đồng không thay đổi.\ ex) $ truffle deploy --reset --network baobab
4. Chạy ứng dụng
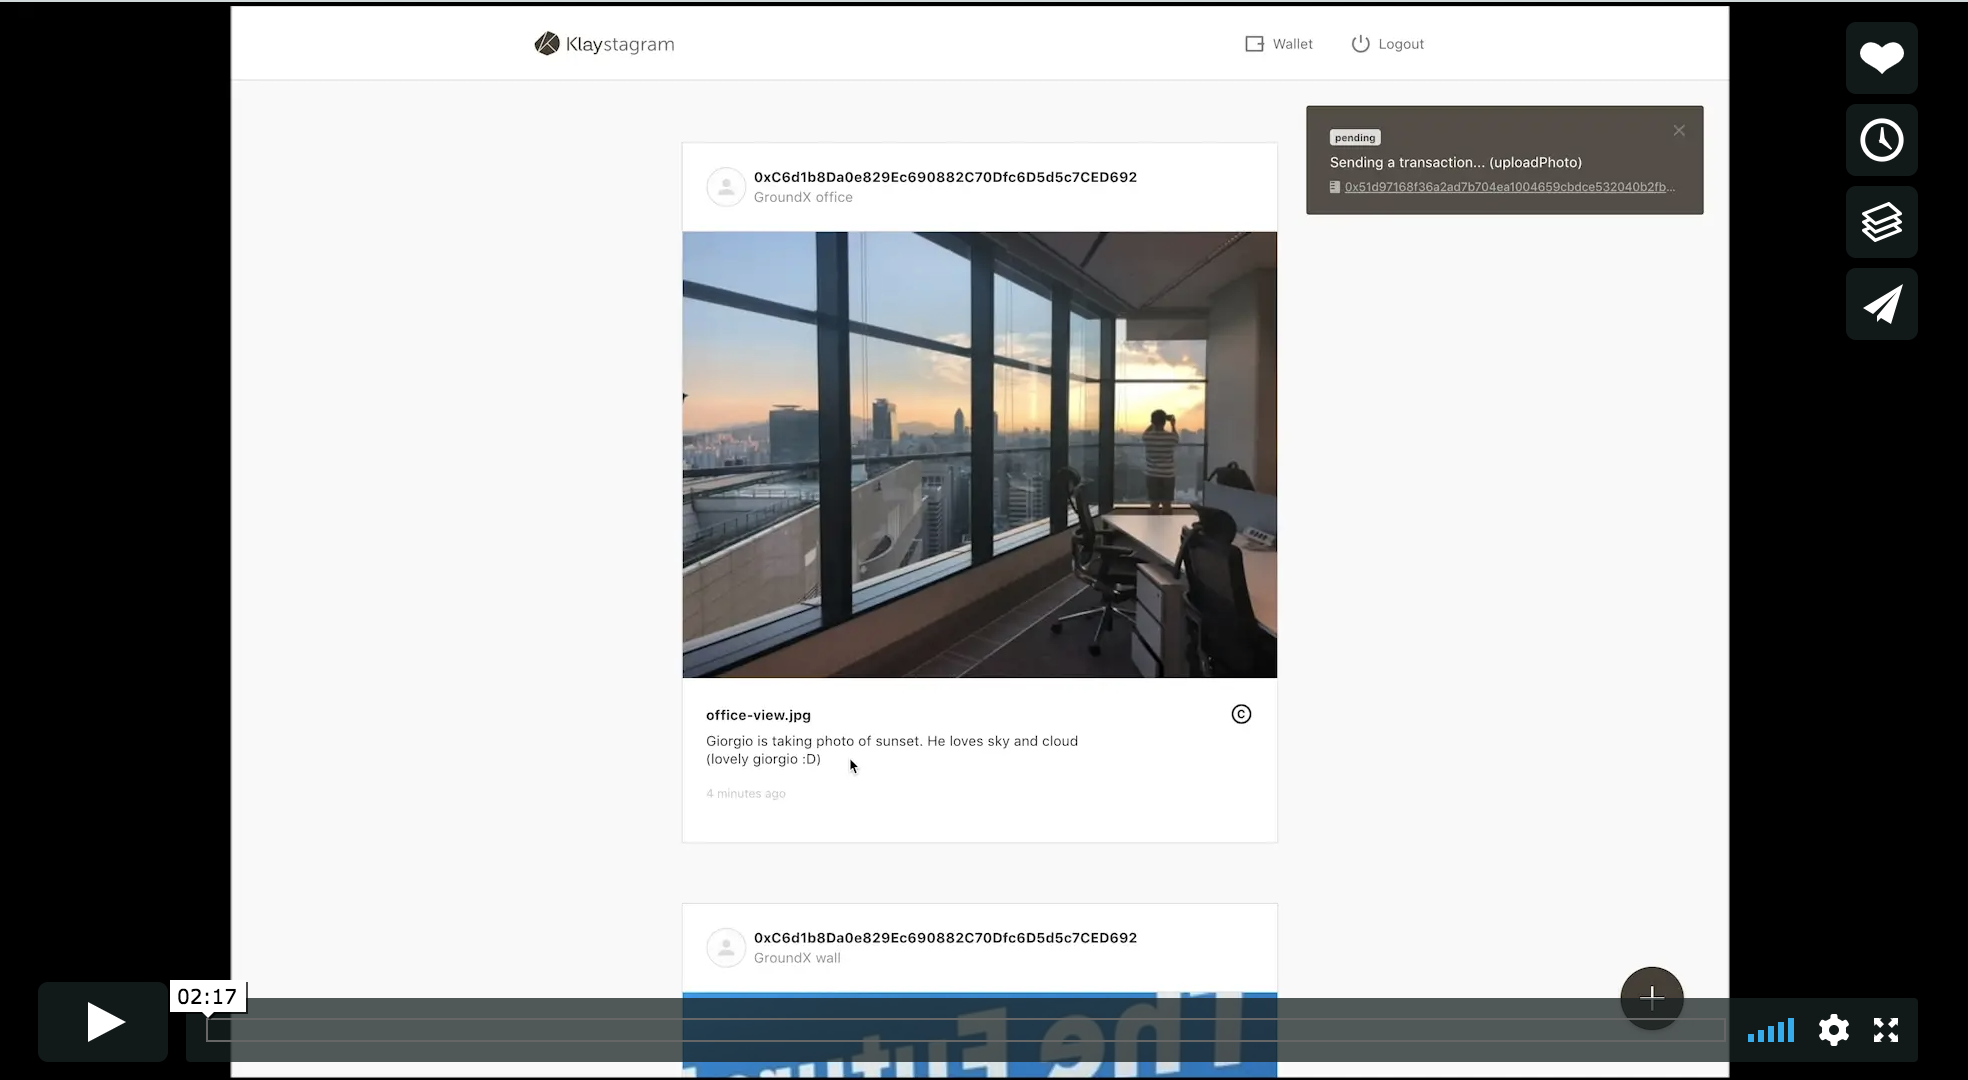
Chạy ứng dụng của chúng tôi trong trình duyệt.
Lệnh $ npm run local sẽ mở một trình duyệt và chạy ứng dụng.