Trang thông tin
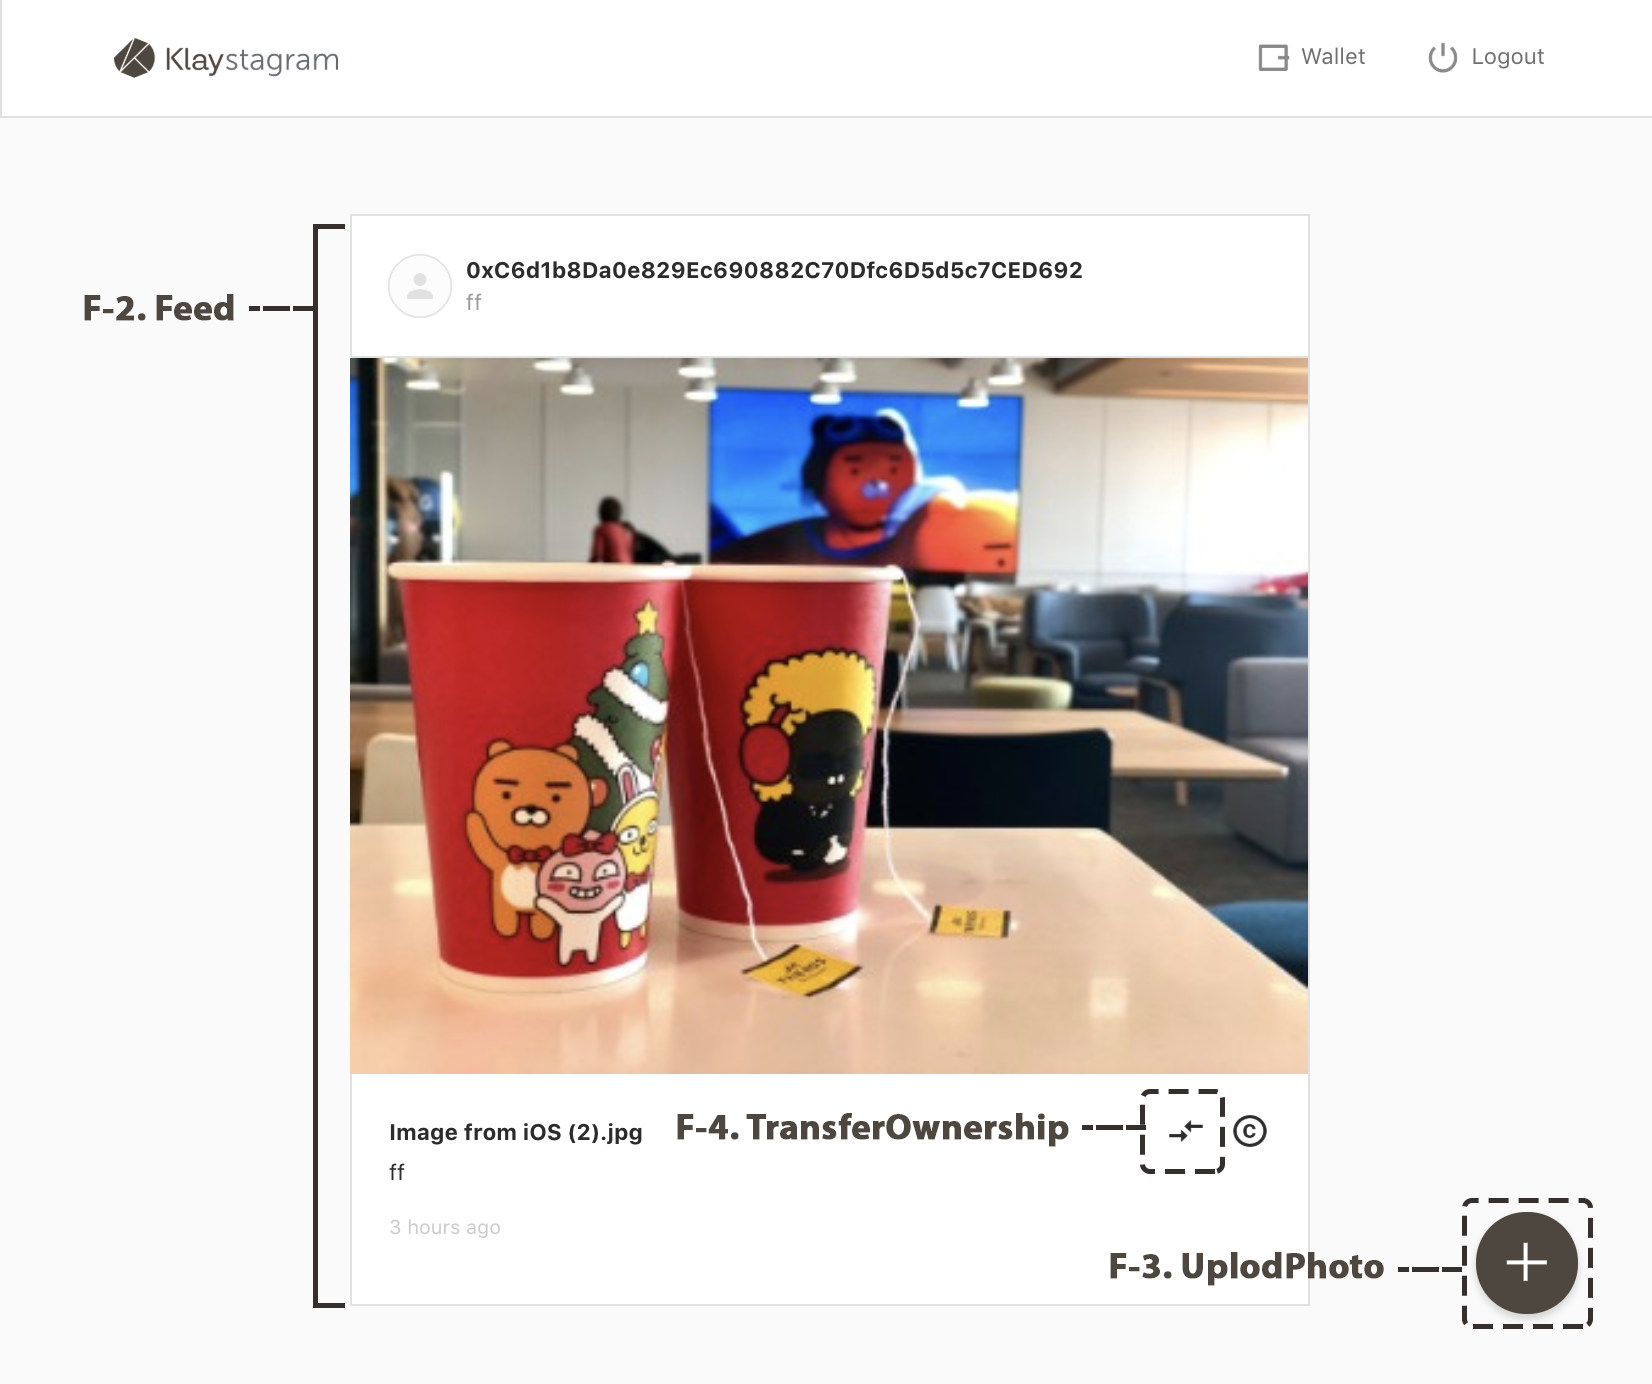
FeedPage chứa 3 thành phần chính tương tác với hợp đồng Klaystagram.
Thành phầnUploadPhoto
Thành phầnFeed
Thành phầnTransferOwnership
// src/pages/FeedPage.jsconst FeedPage = () => ( <main className="FeedPage"> <UploadButton /> // 7-2. UploadPhoto <Feed /> // 7-3. Feed </main>)
// src/components/Feed.js<div className="Feed"> {feed.length !== 0 ? feed.map((photo) => { // ... return ( <div className="FeedPhoto" key={id}> // ... { userAddress.toUpperCase() === currentOwner.toUpperCase() && ( <TransferOwnershipButton // 7-4. TransferOwnership className="FeedPhoto__transferOwnership" id={id} issueDate={issueDate} currentOwner={currentOwner} /> ) } // ... </div> ) }) : <span className="Feed__empty">No Photo :D</span> }</div>)
Có 3 bước để khiến thành phần tương tác với hợp đồng.
First, tạo phiên bản KlaystagramContract để kết nối hợp đồng với giao diện.
Second, dùng phiên bản KlaystagramContract, tạo các hàm API tương tác với hợp đồng trong redux/actions\
Third, gọi các hàm trong mỗi thành phần
Hãy cùng nhau xây dựng nào!
1. Kết nối hợp đồng với Frontend
-
src/klaytn- caver.js
- KlaystagramContract.js
-
src/redux
1) src/klaytn
src/klaytn: Chứa các tập tin giúp tương tác với chuỗi khối Klaytn.
-
src/klaytn/caver.js: Khởi tạo caver trong cài đặt đã định cấu hình.cf) caver-js là thư viện RPC tạo kết nối với nút Klaytn, tương tác với nút hoặc hợp đồng thông minh được triển khai trên Klaytn.
-
src/klaytn/Klaystagram.js: Tạo một phiên bản hợp đồng bằng cách sử dụng API caver-js. Bạn có thể tương tác với hợp đồng thông qua phiên bản này
caver.js
/** * caver-js library helps making connection with klaytn node. * You can connect to specific klaytn node by setting 'rpcURL' value. * default rpcURL is 'https://public-en-baobab.klaytn.net'. */import Caver from 'caver-js'export const config = { rpcURL: 'https://public-en-baobab.klaytn.net'}export const cav = new Caver(config.rpcURL)export default cav
Sau khi tạo kết nối, bạn có thể gọi phương pháp trên hợp đồng thông minh bằng caver.
KlaystagramContract.js
// klaytn/KlaystagramContract.jsimport { cav } from 'klaytn/caver'/** * 1. Create contract instance * ex:) new cav.klay.Contract(DEPLOYED_ABI, DEPLOYED_ADDRESS) * You can call contract method through this instance. */const KlaystagramContract = DEPLOYED_ABI && DEPLOYED_ADDRESS && new cav.klay.Contract(DEPLOYED_ABI, DEPLOYED_ADDRESS)export default KlaystagramContract
Để tương tác với hợp đồng, ta cần một phiên bản hợp đồng.
KlaystagramContract tạo một phiên bản hợp đồng để tương tác với hợp đồng Klaystagram bằng cách cung cấp DEPLOYED_ABI(giao diện nhị phân ứng dụng) và DEPLOYED_ADDRESS cho API cav.klay.Contract.
Khi lập & triển khai hợp đồng Klaystagram.sol (5. Triển khai hợp đồng), ta đã tạo các tập tin deployedABI và deployedAddress. Các tập tin này chứa ABI của hợp đồng Klaystagram và địa chỉ hợp đồng đã triển khai.
Nhờ có cấu hình của webpack, chúng ta có thể truy cập dưới dạng một biến.(DEPLOYED_ADDRESS, DEPLOYED_ABI)
-
DEPLOYED_ADDRESStrả về địa chỉ đã triển khai -
DEPLOYED_ABItrả về ABI hợp đồng Klaystagram
cf) ABI hợp đồng(giao diện nhị phân ứng dụng)
ABI hợp đồng là giao diện để gọi các phương pháp hợp đồng. Với giao diện này, ta có thể gọi các phương pháp hợp đồng sau đây
-
contractInstance.methods.methodName().call() -
contractInstance.methods.methodName().send({ ... })
Giờ chúng ta đã sẵn sàng để tương tác với hợp đồng trong ứng dụng.
cf. Để biết thêm thông tin, hãy tham chiếu caver.klay.Contract.
2) src/redux
Chúng ta sẽ tạo các hàm API với phiên bản Klaystagram. Sau khi gọi các hàm API, chúng ta dùng cửa hàng redux để kiểm soát tất cả các luồng dữ liệu.
-
Nhập phiên bản hợp đồng
Bằng cách sử dụng phiên bản
KlaystagramContract, chúng ta có thể gọi phương pháp hợp đồng khi các thành phần cần tương tác với hợp đồng. -
Gọi phương pháp hợp đồng
-
Lưu trữ dữ liệu từ hợp đồng
Nếu giao dịch của bạn thành công, chúng ta sẽ gọi hành động redux để lưu thông tin từ hợp đồng vào c�ửa hàng redux.
// src/redux/actions/photos.js// 1. Import contract instanceimport KlaystagramContract from 'klaytn/KlaystagramContract'const setFeed = (feed) => ({ type: SET_FEED, payload: { feed },})const updateFeed = (tokenId) => (dispatch, getState) => { // 2. Call contract method (CALL): getPhoto() KlaystagramContract.methods.getPhoto(tokenId).call() .then((newPhoto) => { const { photos: { feed } } = getState() const newFeed = [feedParser(newPhoto), ...feed] // 3. Store data from contract dispatch(setFeed(newFeed)) })}
Cửa hàng redux kiểm soát tất cả dữ liệu ở giao diện
2. Thành phần UploadPhoto
- Chức năng của thành phần
UploadPhoto - Mã thành phần
- Tương tác với hợp đồng
- Cập nhật dữ liệu vào cửa hàng: hàm
updateFeed
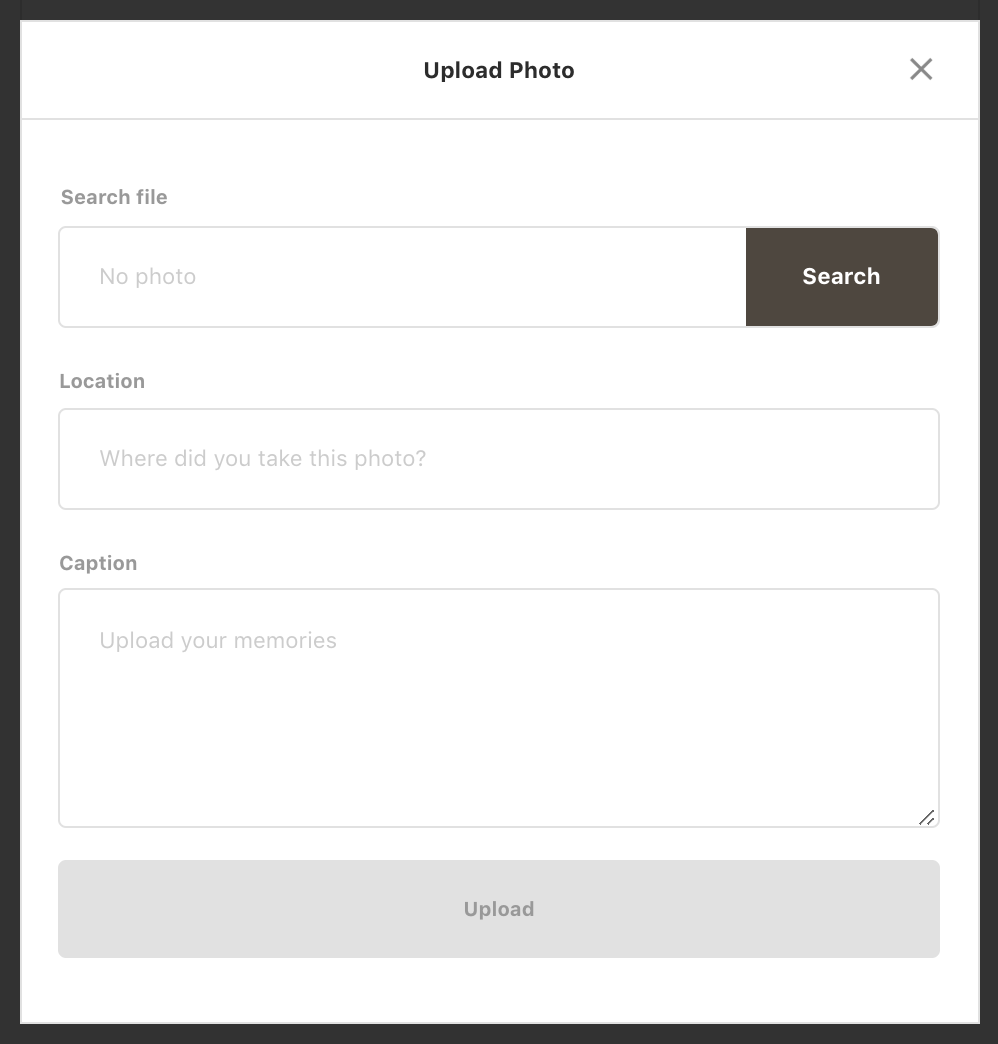
1) Chức năng của thành phần UploadPhoto
Thành phần UploadPhoto xử lý yêu cầu tải ảnh lên blockchain Klaytn. Quy trình như sau:
- Gọi phương pháp
uploadPhotocủa hợp đồng thông minh bằng cách gửi một giao dịch. Trong phương pháp hợp đồnguploadPhoto, một token ERC-721 mới được tạo. - Sau khi gửi một giao dịch, hãy cho thấy tiến trình cùng vòng đời giao dịch bằng thành phần
Toast. - Khi giao dịch tiến vào một khối, hãy cập nhật
PhotoDatamới trong cửa hàng redux cục bộ.
Limiting content size
Kích thước tối đa của một giao dịch là 32KB. Do đó, chúng tôi hạn chế kích thước của dữ liệu đầu vào (ảnh và mô tả) không vượt quá 30KB để quá trình gửi đi diễn ra an toàn.
-
Quy mô dữ liệu chuỗi được giới hạn ở
2KB -
Ảnh được nén để có kích thước nhỏ hơn
28KBbằng hàmimageCompression().
2. Mã thành phần
// src/components/UploadPhoto.jsimport React, { Component } from 'react'import { connect } from 'react-redux'import imageCompression from 'utils/imageCompression';import ui from 'utils/ui'import Input from 'components/Input'import InputFile from 'components/InputFile'import Textarea from 'components/Textarea'import Button from 'components/Button'import * as photoActions from 'redux/actions/photos'import './UploadPhoto.scss'// Set a limit of contentsconst MAX_IMAGE_SIZE = 30 * 1024 // 30KBconst MAX_IMAGE_SIZE_MB = 30 / 1024 // 30KBclass UploadPhoto extends Component { state = { file: '', fileName: '', location: '', caption: '', warningMessage: '', isCompressing: false, } handleInputChange = (e) => { this.setState({ [e.target.name]: e.target.value, }) } handleFileChange = (e) => { const file = e.target.files[0] /** * If image size is bigger than MAX_IMAGE_SIZE(30KB), * Compress the image to load it on transaction * cf. Maximum transaction input data size: 32KB */ if (file.size > MAX_IMAGE_SIZE) { this.setState({ isCompressing: true, }) return this.compressImage(file) } return this.setState({ file, fileName: file.name, }) } handleSubmit = (e) => { e.preventDefault() const { file, fileName, location, caption } = this.state this.props.uploadPhoto(file, fileName, location, caption) ui.hideModal() } compressImage = async (imageFile) => { try { const compressedFile = await imageCompression(imageFile, MAX_IMAGE_SIZE_MB) this.setState({ isCompressing: false, file: compressedFile, fileName: compressedFile.name, }) } catch (error) { this.setState({ isCompressing: false, warningMessage: '* Fail to compress image' }) } } render() { const { fileName, location, caption, isCompressing, warningMessage } = this.state return ( <form className="UploadPhoto" onSubmit={this.handleSubmit}> <InputFile className="UploadPhoto__file" name="file" label="Search file" fileName={isCompressing ? 'Compressing image...' : fileName} onChange={this.handleFileChange} err={warningMessage} accept=".png, .jpg, .jpeg" required /> <Input className="UploadPhoto__location" name="location" label="Location" value={location} onChange={this.handleInputChange} placeholder="Where did you take this photo?" required /> <Textarea className="UploadPhoto__caption" name="caption" value={caption} label="Caption" onChange={this.handleInputChange} placeholder="Upload your memories" required /> <Button className="UploadPhoto__upload" type="submit" title="Upload" /> </form> ) }}const mapDispatchToProps = (dispatch) => ({ uploadPhoto: (file, fileName, location, caption) => dispatch(photoActions.uploadPhoto(file, fileName, location, caption)),})export default connect(null, mapDispatchToProps)(UploadPhoto)
3. Tương tác với hợp đồng
Hãy tạo một hàm để viết dữ liệu ảnh lên Klaytn. Send transaction to contract: uploadPhoto
Không giống các lệnh gọi hàm Read-only, việc viết dữ liệu làm phát sinh phí giao dịch. Phí giao dịch được xác định bằng lượng gas đã sử dụng. gas là đơn vị đo thể hiện số lượng phép tính cần để xử lý giao dịch.
Vì những lý do này, việc gửi một giao dịch cần hai thuộc tính from và gas.
-
Chuyển đổi tập tin ảnh thành một chuỗi byte để tải trên giao dịch
(Trong Klaystagram contract, chúng ta đã định nghĩa định dạng ảnh là byte trong cấu trúc
PhotoData)- Đọc dữ liệu ảnh dưới dạng ArrayBuffer bằng
FileReader - Chuyển đổi ArrayBuffer thành chuỗi số hex
- Thêm tiền tố
0xđể thỏa mãn định dạng byte
- Đọc dữ liệu ảnh dưới dạng ArrayBuffer bằng
-
Gọi phương pháp hợp đồng:
uploadPhotofrom: Một tài khoản gửi giao dịch này và thanh toán phí giao dịch.gas: Lượng gas tối đa mà tài khoảnfromsẵn sàng thanh toán cho giao dịch này.
-
Sau khi gửi giao dịch, hiển thị tiến trình cùng vòng đời giao dịch bằng thành phần
Toast. -
Nếu giao dịch thành công tiến vào một khối, gọi hàm
updateFeedđể thêm ảnh mới vào trang nguồn cấp dữ liệu.
// src/redux/actions/photo.jsexport const uploadPhoto = ( file, fileName, location, caption) => (dispatch) => { // 1. Convert photo file as a hex string to load on transaction const reader = new window.FileReader() reader.readAsArrayBuffer(file) reader.onloadend = () => { const buffer = Buffer.from(reader.result) // Add prefix `0x` to hexString to recognize hexString as bytes by contract const hexString = "0x" + buffer.toString('hex') // 2. Invoke the contract method: uploadPhoto // Send transaction with photo file(hexString) and descriptions try{ KlaystagramContract.methods.uploadPhoto(hexString, fileName, location, caption).send({ from: getWallet().address, gas: '200000000', }, (error, txHash) => { if (error) throw error; // 3. After sending the transaction, // show progress along the transaction lifecycle using `Toast` component. ui.showToast({ status: 'pending', message: `Sending a transaction... (uploadPhoto)`, txHash, }) }) .then((receipt) => { ui.showToast({ status: receipt.status ? 'success' : 'fail', message: `Received receipt! It means your transaction is in klaytn block (#${receipt.blockNumber}) (uploadPhoto)`, link: receipt.transactionHash, }) // 4. If the transaction successfully gets into a block, // call `updateFeed` function to add the new photo into the feed page. if(receipt.status) { const tokenId = receipt.events.PhotoUploaded.returnValues[0] dispatch(updateFeed(tokenId)) } }) } catch (error) { ui.showToast({ status: 'error', message: error.toString(), }) } }}
cf) Vòng đời giao dịch
Sau khi gửi giao dịch, bạn có thể lấy vòng đời giao dịch (transactionHash, receipt, error).
-
Sau khi phiên bản giao dịch đã ký của bạn được xây dựng đúng cách, sự kiện
transactionHashsẽ được kích hoạt. Bạn có thể lấy hàm băm của giao dịch trước khi gửi giao dịch lên mạng lưới. -
Sự kiện
receiptsẽ được kích hoạt khi bạn nhận được biên lai giao dịch. Điều đó nghĩa là giao dịch của bạn ở trong một khối. Bạn có thể xem số khối bằngreceipt.blockNumber. -
Sự kiện
errorđược kích hoạt khi có lỗi xảy ra.
4. Tải ảnh lên trang nguồn cấp dữ liệu: updateFeed
Sau khi thành công gửi giao dịch vào hợp đồng, FeedPage cần được cập nhật.
Để cập nhật nguồn cấp dữ liệu ảnh, ta cần lấy dữ liệu ảnh mới ta vừa tải lên. Hãy gọi getPhoto() bằng tokenId. tokenId có thể được truy xuất từ biên lai giao dịch. Sau đó, thêm dữ liệu ảnh mới vào cửa hàng redux c�ục bộ.
// src/redux/actions/photo.js/** * 1. Call contract method: getPhoto() * To get new photo data we've just uploaded, * call `getPhoto()` with tokenId from receipt after sending transaction*/const updateFeed = (tokenId) => (dispatch, getState) => { KlaystagramContract.methods.getPhoto(tokenId).call() .then((newPhoto) => { const { photos: { feed } } = getState() const newFeed = [feedParser(newPhoto), ...feed] // 2. update new feed to store dispatch(setFeed(newFeed)) })}
3. Thành phần nguồn cấp dữ liệu

- Vai trò của thành phần
Feed - Đọc dữ liệu từ hợp đồng: phương pháp
getFeed - Lưu dữ liệu vào cửa hàng: hàm
setFeed - Thể hiện dữ liệu trong thành phần: thành phần
Feed
1) Vai trò của thành phần Feed
Trong chương 4. Soạn hợp đồng thông minh Klaystagram, ta đã viết cấu trúc PhotoData và đặt nó trong ánh xạ _photoList. Vai trò của thành phần Feed như sau:
- Đọc
PhotoDatathông qua gọi phương pháp hợp đồng Klaystagram (redux/actions/photos.js) - Thể hiện
PhotoData(nguồn cấp dữ liệu) với thông tin của chủ sở hữu (components/Feed.js)
2) Đọc dữ liệu từ hợp đồng: phương pháp getPhoto
-
Gọi phương pháp hợp đồng:
getTotalPhotoCount()Nếu không có ảnh, hãy gọi hàm
setFeedvới một mảng trống. -
Gọi phương pháp hợp đồng:
getPhoto(id)Nếu có ảnh, lấy dữ liệu mỗi ảnh làm promise và đẩy nó vào mảng nguồn cấp dữ liệu. Khi tất cả promise đã được xử lý, quay lại mảng nguồn cấp dữ liệu.
-
Gọi hoạt động redux:
setFeed(feed)Lấy mảng nguồn cấp dữ liệu đã xử lý và lưu vào cửa hàng redux.
// src/redux/actions/photos.jsconst setFeed = (feed) => ({ type: SET_FEED, payload: { feed },})export const getFeed = () => (dispatch) => { // 1. Call contract method(READ): `getTotalPhotoCount()` // If there is no photo data, call `setFeed` action with empty array KlaystagramContract.methods.getTotalPhotoCount().call() .then((totalPhotoCount) => { if (!totalPhotoCount) return [] const feed = [] for (let i = totalPhotoCount; i > 0; i--) { // 2. Call contract method(READ):`getPhoto(id)` // If there is photo data, call all of them const photo = KlaystagramContract.methods.getPhoto(i).call() feed.push(photo) } return Promise.all(feed) }) .then((feed) => { // 3. Call actions: `setFeed(feed)` // Save photo data(feed) to store dispatch(setFeed(feedParser(feed)) })}
3. Lưu dữ liệu vào cửa hàng: hành động setFeed
Sau khi tìm nạp thành công dữ liệu ảnh (nguồn cấp dữ liệu) từ hợp đồng Klaystagram, ta gọi hành động setFeed(feed). Hành động này lấy dữ liệu ảnh làm tải trọng và lưu vào cửa hàng redux.
4. Hiển thị dữ liệu trong thành phần: thành phần Feed
// src/components/Feed.jsimport React, { Component } from 'react'import { connect } from 'react-redux'import moment from 'moment'import Loading from 'components/Loading'import PhotoHeader from 'components/PhotoHeader'import PhotoInfo from 'components/PhotoInfo'import CopyrightInfo from 'components/CopyrightInfo'import TransferOwnershipButton from 'components/TransferOwnershipButton'import { drawImageFromBytes} from 'utils/imageUtils'import { last } from 'utils/misc'import * as photoActions from 'redux/actions/photos'import './Feed.scss'class Feed extends Component { constructor(props) { super(props) this.state = { isLoading: !props.feed, } } static getDerivedStateFromProps = (nextProps, prevState) => { const isUpdatedFeed = (nextProps.feed !== prevState.feed) && (nextProps.feed !== null) if (isUpdatedFeed) { return { isLoading: false } } return null } componentDidMount() { const { feed, getFeed } = this.props if (!feed) getFeed() } render() { const { feed, userAddress } = this.props if (this.state.isLoading) return <Loading /> return ( <div className="Feed"> {feed.length !== 0 ? feed.map(({ id, ownerHistory, data, name, location, caption, timestamp, }) => { const originalOwner = ownerHistory[0] const currentOwner = last(ownerHistory) const imageUrl = drawImageFromBytes(data) const issueDate = moment(timestamp * 1000).fromNow() return ( <div className="FeedPhoto" key={id}> <PhotoHeader currentOwner={currentOwner} location={location} /> <div className="FeedPhoto__image"> <img src={imageUrl} alt={name} /> </div> <div className="FeedPhoto__info"> <PhotoInfo name={name} issueDate={issueDate} caption={caption} /> <CopyrightInfo className="FeedPhoto__copyrightInfo" id={id} issueDate={issueDate} originalOwner={originalOwner} currentOwner={currentOwner} /> { userAddress.toUpperCase() === currentOwner.toUpperCase() && ( <TransferOwnershipButton className="FeedPhoto__transferOwnership" id={id} issueDate={issueDate} currentOwner={currentOwner} /> ) } </div> </div> ) }) : <span className="Feed__empty">No Photo :D</span> } </div> ) }}const mapStateToProps = (state) => ({ feed: state.photos.feed, userAddress: state.auth.address,})const mapDispatchToProps = (dispatch) => ({ getFeed: () => dispatch(photoActions.getFeed()),})export default connect(mapStateToProps, mapDispatchToProps)(Feed)
Ở lần đầu tiên, bạn chỉ có thể thấy lời nhắn "Không có ảnh :D" vì chưa có dữ liệu ảnh trong hợp đồng.
Hãy tạo một thành phần UploadPhoto để gửi dữ liệu ảnh đến hợp đồng!
4. Thành phần TransferOwnership
-
Vai trò của thành phần
TransferOwnership -
Mã thành phần
2-1. Kết xuất nút
transferOwnership2-2. Thành phần
TransferOwnership -
Tương tác với hợp đồng: phương pháp
transferOwnership -
Cập nhật dữ liệu vào cửa hàng: hành động
updateOwnerAddress
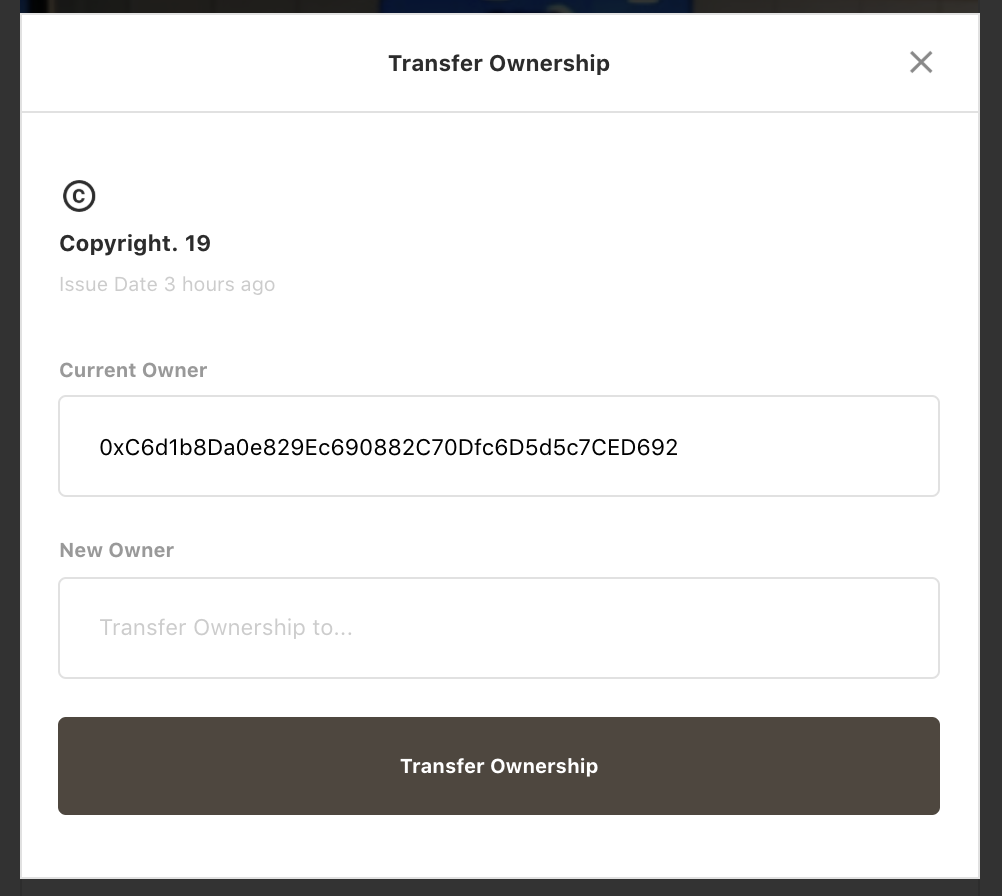
1) Vai trò của thành phần TransferOwnership
Chủ sở hữu của ảnh có thể chuyển quyền sở hữu ảnh cho một người dùng khác. Bằng cách gửi giao dịch transferOwnership, địa chỉ của chủ sở hữu mới sẽ được lưu vào lịch sử quyền sở hữu.
2. Mã thành phần
2-1) Kết xuất nút TransferOwnership
Chúng ta sẽ chỉ kết xuất nút TransferOwnership trên thành phần FeedPhoto khi địa chỉ của chủ sở hữu ảnh khớp với địa chỉ của người dùng đã đăng nhập (tức bạn là chủ sở hữu).
// src/components/Feed.js<div className="FeedPhoto"> // ... { userAddress.toUpperCase() === currentOwner.toUpperCase() && ( <TransferOwnershipButton className="FeedPhoto__transferOwnership" id={id} issueDate={issueDate} currentOwner={currentOwner} /> ) } // ...</div>
2-2) Thành phần TransferOwnership
// src/components/TransferOwnership.jsimport React, { Component } from 'react'import { connect } from 'react-redux'import * as photoActions from 'redux/actions/photos'import ui from 'utils/ui'import { isValidAddress } from 'utils/crypto'import Input from 'components/Input'import Button from 'components/Button'import './TransferOwnership.scss'class TransferOwnership extends Component { state = { to: null, warningMessage: '', } handleInputChange = (e) => { this.setState({ [e.target.name]: e.target.value, }) } handleSubmit = (e) => { e.preventDefault() const { id, transferOwnership } = this.props const { to } = this.state if (!isValidAddress(to)) { return this.setState({ warningMessage: '* Invalid wallet address', }) } transferOwnership(id, to) ui.hideModal() } render() { const { id, issueDate, currentOwner } = this.props return ( <div className="TransferOwnership"> <h3 className="TransferOwnership__copyright">Copyright. {id}</h3> <p className="TransferOwnership__issueDate">Issue Date {issueDate}</p> <form className="TransferOwnership__form" onSubmit={this.handleSubmit}> <Input className="TransferOwnership__from" name="from" label="Current Owner" value={currentOwner} readOnly /> <Input className="TransferOwnership__to" name="to" label="New Owner" onChange={this.handleInputChange} placeholder="Transfer Ownership to..." err={this.state.warningMessage} required /> <Button type="submit" title="Transfer Ownership" /> </form> </div> ) }}const mapDispatchToProps = (dispatch) => ({ transferOwnership: (id, to) => dispatch(photoActions.transferOwnership(id, to)),})export default connect(null, mapDispatchToProps)(TransferOwnership)
3. Tương tác với hợp đồng: phương pháp transferOwnership
Chúng ta đã tạo hàm transferOwnership trong hợp đồng Klaystagram ở chương 4. Soạn hợp đồng thông minh Klaystagram. Hãy gọi hàm từ ứng dụng.
- Gọi phương pháp hợp đồng:
transferOwnershipid:tokenId của ảnhto:Địa chỉ để chuyển quyền sở hữu ảnh
- Đặt các tùy chọn giao dịch
from: Một tài khoản gửi giao dịch này và thanh toán phí giao dịch.gas: Lượng gas tối đa mà tài khoảnfromsẵn sàng thanh toán cho giao dịch này.
- Sau khi gửi giao dịch, hiển thị tiến trình cùng vòng đời giao dịch bằng thành phần
Toast. - Nếu giao dịch thành công tiến vào một khối, gọi hàm
updateOwnerAddressđể cập nhật địa chỉ của chủ sở hữu mới vào trang nguồn cấp dữ liệu.
// src/redux/actions/photo.jsexport const transferOwnership = (tokenId, to) => (dispatch) => { // 1. Invoke the contract method: transferOwnership try{ KlaystagramContract.methods.transferOwnership(tokenId, to).send({ // 2. Set transaction options from: getWallet().address, gas: '20000000', }, (error, txHash) => { if (error) throw error; // 3. After sending the transaction, // show progress along the transaction lifecycle using `Toast` component. ui.showToast({ status: 'pending', message: `Sending a transaction... (transferOwnership)`, txHash, }) }) .then((receipt) => { ui.showToast({ status: receipt.status ? 'success' : 'fail', message: `Received receipt! It means your transaction is in klaytn block (#${receipt.blockNumber}) (transferOwnership)`, link: receipt.transactionHash, }) // 4. If the transaction successfully gets into a block, // call `updateOwnerAddress` function to update new owner's address into the feed page. dispatch(updateOwnerAddress(tokenId, to)) }) } catch (error) { ui.showToast({ status: 'error', message: error.toString(), }) }}
4. Cập nhật thông tin vào cửa hàng redux: hành động updateOwnerAddress
Sau khi chuyển quyền sở hữu, FeedPhoto cần được kết xuất lại bằng địa ch�ỉ của chủ sở hữu mới.
Để cập nhật địa chỉ của chủ sở hữu mới, hãy gọi dữ liệu feed từ cửa hàng và tìm ảnh có tokenId từ biên lai. Sau đó, đẩy địa chỉ của chủ sở hữu mới lên ownerHistory và setFeed của ảnh.
const updateOwnerAddress = (tokenId, to) => (dispatch, getState) => { const { photos: { feed } } = getState() const newFeed = feed.map((photo) => { if (photo['id'] !== tokenId) return photo photo['ownerHistory'] = [...photo['ownerHistory'], to] return photo }) dispatch(setFeed(newFeed))}